Reviewing the Semester

At the start of the semester, I was not exactly sure what I had gotten myself into for this course. With very little experience in 3D printing, I was nervous that I would not have the proper tools for navigating this semester, let alone an entire weekend of just making things! Thanks to my team, mentors, and professor I had a great semester and learned more than I could have hoped! Check out my journey below!

Empathy

To start our semester, we dove right into empathetic human design. What can we learn from those who are different from us in order to create a product that will benefit their lives. Immediately, we were introduced to the Illini Service Dogs, a variety of members from the wheelchair racing team, and others who were willing to help guide us through this process. I found this intimidating because I did not know what I was expected to know or understand about wheelchairs and how they work or how it makes someone feel..the truth was, I did not know anything, and that scared me. No, I was not familiar with the lifestyle of someone who lives in a wheelchair, and I had no intention of trying to tell each user that I knew how they felt because I did not. But, I was willing to ask about how they felt, how they moved, how they lived, and suddenly, I realized not knowing was the best mindset to have when it was time to learn. And with that, I met and learned about some of the most inspiring on this campus.

Optimism

Luckily, I was placed on a great team with my teammates for the semester, Maryam and Kate. We hit it off right away and were very pleased with our first assignment of creating a team name and logo. Upon deciding our mentor to be Arielle, we wanted our group name to reflect she had done with her own company Ingenium when taking the class. With that being said we decided to choose another Latin word, Evinco, meaning overcome. And with our team name, followed our opportunity statement: Increase a wheelchair racer’s grip in undesirable weather conditions.

Embrace Ambiguity

Although this opportunity statement changed over the course of the semester, we had a large task at hand because Adam, the coach of the wheelchair team here at Illinois, said this is a feat he has been trying to overcome for years. We only had one semester to find a result and that was a daunting thought as the weeks passed.

Arielle’s gloves from her company Ingenium need to work in conjunction with the handring.

We had the opportunity to tag along with Arielle to an 8am practice (which my senior year 11am class schedule did not prepare me for), where we observed exactly how wheelchair racing works, the break down of a racing wheelchair, and how athletes attempt to combat poor weather conditions. Each of these lessons brought us closer to understanding how we could improve the racers’ experience. While we were learning about the makeup of the chair, we learned how much work individual athletes have to put in in order to create their own equipment. For example, handrings need to be replaced every 3-4 months depending on how often the athlete practices and how much force is put on the handrail. In order to replace these handrings, the athletes need to use a heat gun to warm up the concrete glue enough so the worn rubber will come off of the aluminum rail, cut up a bike tire, and then glue the new bike tire onto the aluminum. The entire process can take up to 3 or 4 hours. From my knowledge, no other olympic sport requires its athletes to actually MAKE their own equipment. Understanding the “behind the scenes” of what it is like to be a paralympic athlete in wheelchair racing, our opportunity became two-fold: Find a better way to cover handrings in preparation for the race.

Creative Confidence

Over the next couple of weeks, we learned Fusion 360 software, brainstormed how we could accomplish our goal, and had the opportunity to be guided by individuals who work in the Fabrication Laboratory (FabLab) on campus. These weeks were used to help us better understand the resources that were available to our class and how we could use them in order to complete a prototype by the end of the Make-a-thon.

Iterate, Iterate, Iterate

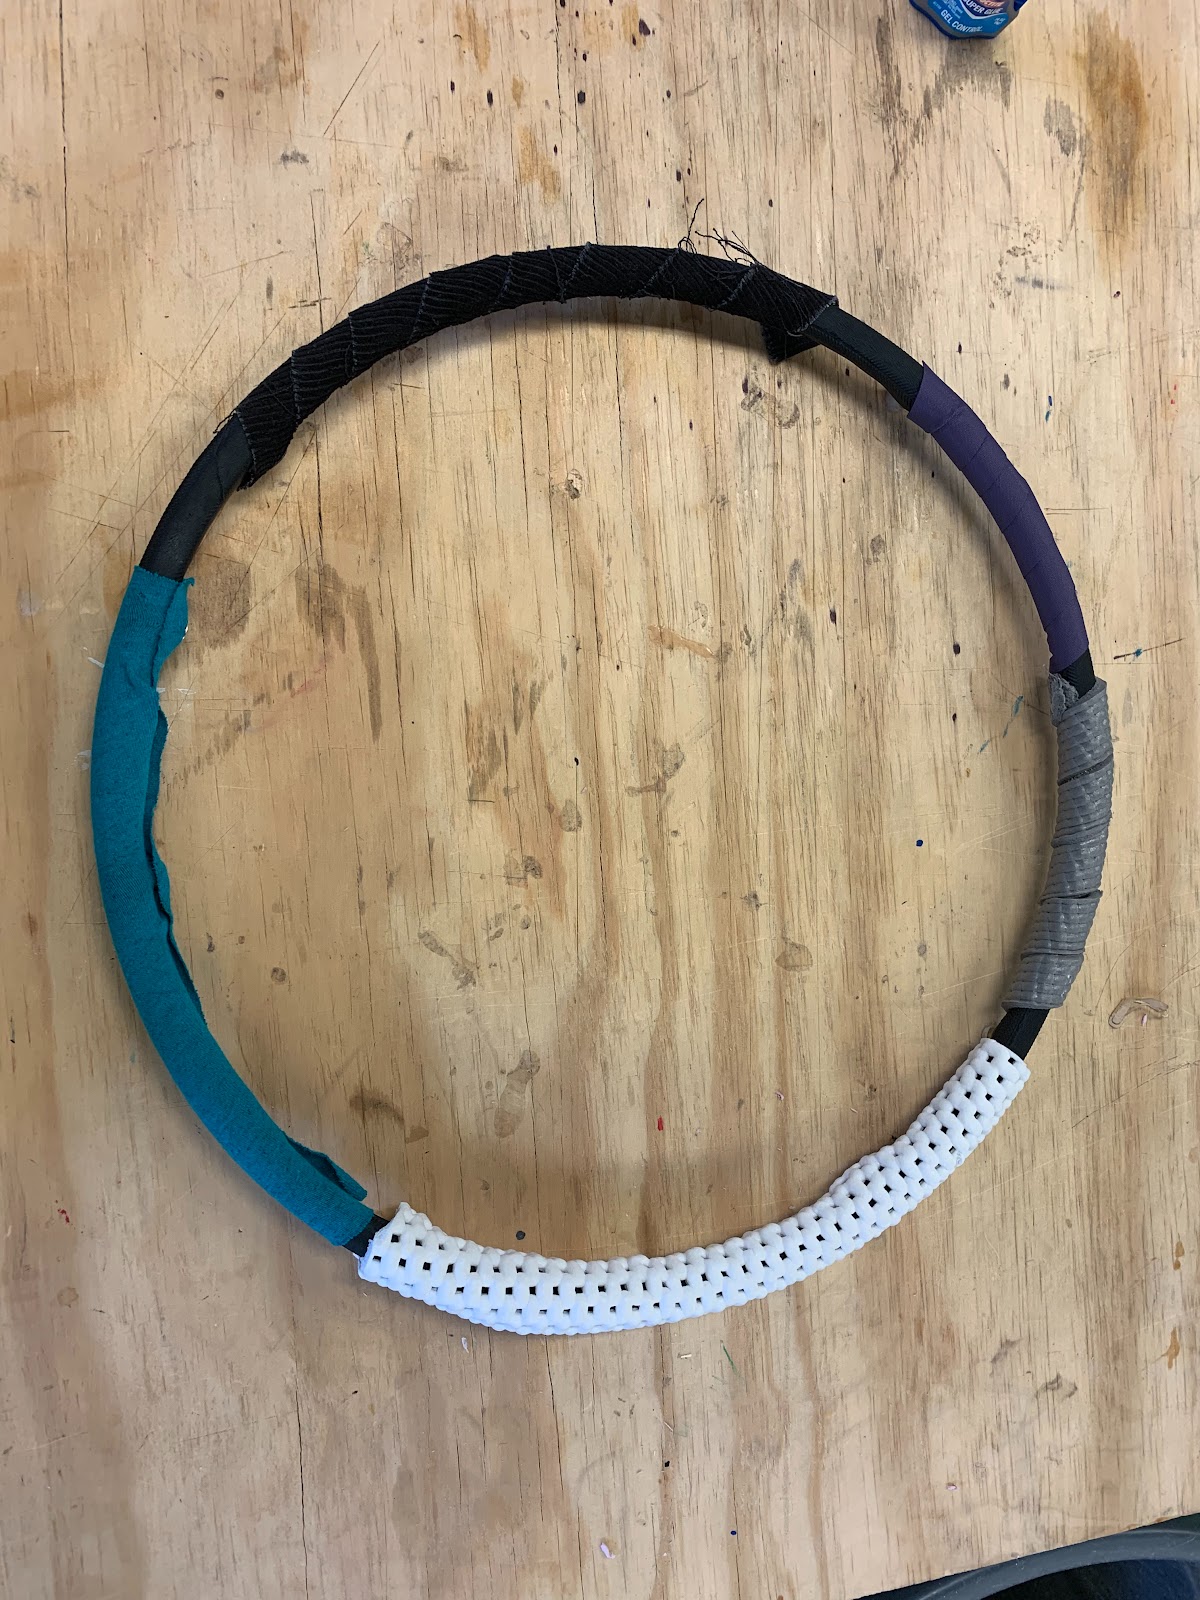
The Make-a-thon was whirlwind of iterations. Every step along the way we faced a new challenge or found something that did not quite work for our team. We ordered three materials in preparation for the Make-a-thon: bath mats, yoga mats, and snap screws. We had to find a way to add this material to the handring in order for it to become more water resistant and withstand large amounts of force from athletes. Unfortunately, after simple testing, the yoga and bath mats were unable to withstand even light force. They began to pill at the first sign of light force.

After this we were on the hunt for the right material within the FabLab. T-shirts, nylon, and corduroy were a few fabrics that we were able to test for process improvement as well as durability.

Here is our low-fidelity prototype that we created as a result of the Make-a-thon.

We borrowed PlastiDip from another group, which is shown in the photo below. Vishal was also able to find PlastiDip Aerosal which was more of a spray compared to the initial yellow dip which we were able to use as a paint.


Make It

After the Make-a-thon, we finally had the opportunity to finalize a prototype. We used the Plasti-Dip Aerosol to coat the aluminum hand ring in 3 layers of paint. With an even spray we had confidence that this would uphold against an athletes’ training.

Learn from Failure

Moving forward, we are aware that three coats of spray were unsuccessful when working with Joey. It peeled off much too easily for someone who is applying an incredible amount of force for a long period of time. Although this solution did not work, we received some positive feedback. Joey was able to reach 1mph faster than he had in the past and he was impressed with the level of stickiness the coating had throughout his practice. He was excited to keep testing and working with us, in order to find a solution that could be used world wide in the Paralympics.

Course Summary

word cloud of student reflections

The third industrial revolution is upon us, and we have the ability to create functional products on our desktop by using some inexpensive and accessible tools. This course was designed to help students get trained on many of these tools and technologies and make things. They explored 3D scanning, modeling and printing to rapidly prototype products. They also had the chance to experiment with open hardware/micro-controllers such as Arduinos and smaller form factors for e-textiles, to explore the concept of the internet of things during the Makeathon. The course also had guest lectures in entrepreneurship, design thinking, digital making and some stories from passionate makers from the community and beyond.

The goal of this course is to bring together students from across campus from several different courses to learn about human centered, empathic solutions for accessible design. With novel ideas and the need to create significant and salient solutions, collaboration is key. The answer does not lie in one domain. Technological tools, corporate spaces and educational environments are being formed to take advantage of the special opportunities inherent only in collaborative work. The three pillars of this course are “learn, make, and share” , and the students embodied these concepts amazingly. Throughout the semester they all learned so much about building and design thinking, made fantastic models and presentations, and continually shared their ideas and growth on the blog.

So much was accomplished this semester, and looking back to January it is amazing to see how far the students have come. This course was an amazing experience, with a variety of guest speakers, tours of different locations on campus, and of course the weekend of the Makeathon.

Over the course of the semester, the class got to learn from the Illini Service Dogs, Adam Bleakney (multiple times), Milestone Studio Labs (who helped us plan the Makeathon as well), Mike Hansen of EarthSense from Research Park, John Hornick – author of 3D Printing will Rock the World, Jeff Ginger – director of the Fablab, Daniel Banach and Jason Roth– Fusion 360 experts, and Valerie from Social Innovation at Illinois. The students also got to visit DRES and the CU Fablab in person! You can see more details about what happened week to week on the updates page.

During all of this the students were working on developing products that addressed a challenge that has not been solved, with a focus on creating products that improve accessibility. They sketched their ideas out, created storyboards, did market research, created many, many models, and interviewed with real users all throughout the process. At the end of the semester, the student teams created a tread that can attach to a prosthetic foot to aid with balance and traction in inclement weather, a leg cover to protect expensive prosthetic pieces, a watch strap that can be put on by users with limited hand strength and movement, a solution for increasing grip on racing wheelchairs during rainy events that can be easily applied, a cover for the joystick on powerchairs to prevent water from getting into expensive componentry, and a yoga foot attachment for prosthetic legs. 

The big event of this semester was the Makeathon, which allowed students to build nice functional prototypes and interact with a larger variety of real world users. It was an amazing event, and you can learn more about it on the Makeathon page!

Here are some things the students had to say about it and they made a video as well.


“The Makeathon exceeded expectations for me and then some. It was riveting to see so many people putting their minds together to solve problems for others than ourselves.”
“The MakeAThon was a long and tiring process but it taught me a few important lessons.”
“Overall this experience was amazing to work with and around such fantastic people that all had a common goal to make the world a better and easier place with their designs.”
“In short, I really learned a lot from the first Make-A-Thon. I realize the importance of communication between team members and the importance of collaboration.”


You can check out more of the students’ thoughts on the blog! Overall, this course is an amazing experience. Students get to have unique opportunities like the Makeathon, learn from amazing people, create fulfilling products, and further expand their education and viewpoint. 

Here are some of the students’ reflections on the course as a whole:
“I ended up learning a lot through this class and I’m thankful for the opportunity to take it.”
“Looking back, I am really glad that I have chosen to take this course. I immersed myself in the designing process and actually came up with something that could have potential impact on people’s life.”
“Overall I have a fantastic time joining this class. I have never been in a class where I have been able to interact and physically design solution for issues that people face every day. One of my favorite things that Professor Vishal said day one was, ‘We are not looking to solve problems, but we are looking to find opportunities’. I thought that this was an amazing way to look at innovation that I had never noticed before.”
“This course changed my future career since it offered me so many possible opportunities to discover in the future. I discovered my interests in designing fields, and I hope to continue my journey on this path. I’ll definitely recommend this course to my friends. Well I wouldn’t say it’s a course. It should be an opportunity to start your adventure.”
“I’ve really grown as an individual because of this course.”

Digital Making Final Reflection

I was really excited for this course because I wanted to make something tangible. I am in an organization on campus called Design for America, so I was familiar with the design process and interested in how we would apply it in class. I ended up learning a lot through this class and I’m thankful for the opportunity to take it.

Week 2

How do you use what you have to make something better?

-Ron

Ron said this above quote when we visited the DRES facility. I really like it because it speaks to the opportunity out there without having to invent something new.

Week 3/4/5/6

These weeks really served as times where we explored, conducted interviews, talked through different ideas, and spent time learning in the fab lab. Week 3 was when we had the cold day, so we stayed in and video chatted Milestone Labs along with our mentors. We saw an opportunity after speaking to Ryan, who said he wasn’t able to really do video interviews because of the heavy equipment and setting it up. This led to our first how can we statement:
“How can we can improve the ability to multitask for people with limited mobility in their arms or are in wheelchairs. ”

Week 4 is when we established our team name as well as did user interviews. These interviews helped us discover more opportunity areas, including the area of grabbing things.

Week 5 is when we curated a bunch of our ideas and sorted through them. We came up with multiple categories ranging from school/work life to personal life. After discussing our insights with one of my team members Huan, I discovered an area of interest which I was curious to explore more which was independence. We originally were looking to explore multitasking this activity helped me consider the element of just being able to do things by yourself.

Week 6 is when we came up with a few more how might we statements.

How Might We create a way for wheelchair users to see what is behind them?

How might we create a way for wheelchair users to grab heavy or hard to grab items easier and independently?

How Might Design an affordable assistive tool?

Week 7

This week Mehmet lead us through an exercise where we looked at our How might we statements from the perspectives of different users. This includes designing for an older person versus a child. It was interesting how the user we were designing for inspired us to think more out of the box. This was a great exercise for us because we actually created something and for the first time thought that we were on to something. I think it was important for us to have this discovery because even though this was far from the design we ended up pursuing, it got us excited at the time.

Week 8/9/10

These weeks are when we met with Dr McDonagh as well as story boarded in class. We were still working on the idea of a glove at this point to help with limited mobility. These conversations and ideating helped us visualize more what our potential project could look like. We also video chatted Milestone labs and got some more insight on our project. We were going forward with the glove but there was still a lot of questions on what exactly we would design,

MAKE-A-THON

This is when everything changed for my team. We went from several ideas this semester to deciding to dedicate to this weekend to creating a watch strap. This came from meeting John McSween at the meeting before the Make-A-Thon. He can’t wear many watches because of his limited ability to pinch. He also tried using a magnetic strap before, but it came in the way of his wheelchair. We spent the weekend prototyping and working hard to come up with a design for him.

The Make-A-Thon taught me a lot. We had to be patient and stay optimistic even when we weren’t sure if we could make something good. We ended up being one of the winning teams which was incredible. The money we won allowed us to buy a watch for John, and redesign the strap for his watch.

Post Make-A-Thon

We ordered material, hit the fab lab, and made a usable watch band.

LESSONS LEARNED

  1. Human centered design is super challenging but super rewarding. I’m so glad we got to make something that John can actually use and wear.
  2. IT is important to be understanding when working with others. My team members all had different things going on at different times but we really depended on each other to do what we can when we could.

THANK YOU NOTES

Thank you John for helping us create this! Your feedback and positive attitude during this process really motivated us.

Thank you Huan for your passion. You brought so much interest and curiosity into this project and I’m grateful I got to know you better through the process.

Thank you Eric for your persistence. You thought about using the hook after we told you to think of something other than velcro, and then worked really hard to make the final watch band.

Thank you Charlotte for all your optimism and help in the class. You were such an awesome TA!

Thank you Mehmet for all your guidance and advice. It was great to learn from you and I really appreciate all the time you dedicated to this class.

Thank you Professor Sachdev for creating a course like this that really challenged us to work hard and do good.

Thank you to all my classmates for inspiring me with your designs and making the world a better place 🙂 It has been a great learning experience being surrounded by such talented people.

Semester Reflection

Taking this course has been a great learning opportunity for me. I have applied design thinking mindset with actual design and prototyping and experienced the iterate process of human-centered design. I have also learned from other teams’ project as I took classes and read reflections every week. After taking this class, I have grown my interest in the area, and have decided to participate in iVenture Accelerator to further the journey.

At the beginning of the semester, I chose to take this course because I wanted to have more hands-on practice with 3D printing, Arduinos and other technologies. I have had some experience with those technologies, and yet I have never had a systematic study on the subjects and didn’t apply those skills into practice. In addition, I care about social justice very much. I have been working as I Connect Facilitator to lead diversity and inclusion workshops on campus, and would like to learn more about people with disabilities and design for people with disabilities. For those two reasons, I signed up for this course.

In the first two weeks, we visited DRES (https://digitalmaking.web.illinois.edu/spring2019/week-2-reflection-inspiration-at-dres/). I have changed my view on the subject and began to understand what it means to design for people with disabilities. One thing that really stood out to be was the word choice of mentor instead of user in this class. People with disabilities have more experience than us. Rather than designing for their unmet needs, the mindset should be we are learning from experts who know more than what we do.

In week 3, we had a session with Milestones Studios to learn the current trends and needs in the assistive technology field (https://digitalmaking.web.illinois.edu/spring2019/week-3-reflection-challenge-to-make-an-impact/). After learning the examples and how to use analysis and synthesis, we wrote opportunity statement as a group. As we worked on the statement, we had a clearer picture of what we wanted to do: improving the ability to multitask for people with disabilities.

In week 4, we first had a session with Mike from EarthSense (https://digitalmaking.web.illinois.edu/spring2019/week-4-learning-from-observations-and-reflections/). This gave me a chance to see a real example where the product evolves with users’ feedback. At later half the class, we decided our team name to be “Blueprint” and designed our logo.

In week 5, we began our class with a presentation by John, I was impressed to see how 3D painting has revolutionized the healthcare industry (https://digitalmaking.web.illinois.edu/spring2019/week-5-reflection-revolutionize-the-world/). Specifically, I realized that 3D printing has the nature to assist with democratization and customization so that it could help with equal accessibility and equal affordability issues in the area. In the second part of the class, we learned the resources available that the Fab Lab and began our journey to learn hands-on skills.

In week 6, we learned how to use Fusion 360 to build a model (https://digitalmaking.web.illinois.edu/spring2019/week-6-reflection-growing-the-passion-and-skills/). We did a pre-class project on a camera and an in-class project on a phone case. For the project, we began the ideation phase. After conducting an interview with mentors, we found some areas that have potential. Besides agreeing on the importance of equal accessibility and equal affordability, we realized that some people with disabilities have issues with seeing things behind them and grabbing things.

In week 7 and 8, we adopted more skills such as circuit, laser cutting and how to use sewing machine (https://digitalmaking.web.illinois.edu/spring2019/week-7-reflection-dive-deep-with-design/, https://digitalmaking.web.illinois.edu/spring2019/week-8-reflection-learning-more-tools-and-reflecting-on-the-project/). In addition, we had make much progress with our project. We brainstormed on the ideas we had and draw stretches that consider multiple settings. We also made some low-fidelity prototype on our idea on vision. We communicated our ideas with the Milestones Studio in week 8, and received feedback on how to approach the ideas.

In week 9, we first finished the skill session with finishing the watch that we were building for detecting the curl and twist of the users which could make sure the users do the exercises as asked (https://digitalmaking.web.illinois.edu/spring2019/week-9-designing-the-object-as-well-as-the-experience/). Then, we learned how to use storyboard to design the whole user experience.

In week 10, we began our preparation for the makeathon event (https://digitalmaking.web.illinois.edu/spring2019/week-10-preparing-for-makeathon/). During the event, our group met John, and he shared many of his personal experiences with us. We realized that he would love to wear a watch but was unable to do so because the existing one in the market doesn’t satisfy the needs. Seeing the actual needs, our group was considering if we should shift our project.

In week 11, we updated again with the Milestones studios and received many insightful feedback (https://digitalmaking.web.illinois.edu/spring2019/week-11-update-the-project/). I realized that it was essential to consider the mechanism of the movement in the design process.

During the same week, we had our makeathon event. Our team officially changed our topic to design an accessible watch for people with limited pinching mobility. For the weeks after, we iterated on the design and came up with the final design last week (https://digitalmaking.web.illinois.edu/spring2019/team-5-watch-strap-for-people-with-charcot-marie-tooth/).

Looking back, I am really glad that I have chosen to take this course. I immersed myself in the designing process and actually came up with something that could have potential impact on people’s life. This wasn’t something that I expected initially, but it turned out to be greater. I love the innovation that I have experienced in the process and get the ambition to connect the innovation with more people to a great extent. This encourages me to participate in the iVenture Accelerator to further my idea in the area.

Team 5 – Watch Strap for People With Charcot-Marie-Tooth

Our team took a different path compared with other teams. At the beginning of the semester, we were focusing on inventing a glove for people with disabilities to eat so that they can eat with comfort and independently. However, we changed our idea after the pre-makerathon event. During the event, we met John, one of the mentors for the course, and we decided to change our idea after hearing his personal story. We learned that there hasn’t been a watch that is accessible for him in the market: most watches require the whole hand to put on and take off. Even with simpler design such as a watch with magnet wrap, those can easily interfered with the manual wheelchair he was using. As a result, he had to abandon using the watch. However, if possible, he really wants to be able to wear a watch. After hearing his story, our team wanted to focus on this opportunity to invent a watch wrap that is accessible for people with limited pinching mobility.

We think the need for such an accessible device is huge. This type of design would enable people with limited pinching mobility to be able to wear a watch with just one finger. Specifically, we found that this design would benefit people with Charcot-Marie-Tooth. In our research, we realized that Charcot-Marie-Tooth is the most common inherited disorder that involves the peripheral nerves. In the United States along, it is estimated that 150,000 people have such disorder. On a global scale, 1 in 3,300 people would have such disorder. One symptom for people who have Charcot-Marie-Tooth is that they may develop weakness in their hands. This makes daily tasks such as writing and fastening buttons difficult. Similarly, wearing a watch independently is hard for them as well.

We have investigated the current market and deemed that the current products in the market don’t solve the problem. The traditional watch requires people to be able to put the wrap into the loop to lock the watch. This is very difficult for people with limited pinching ability. For sports watch that seems to be easy to put on, although it is easy for people to put their hands in the watch, it is still hard for people to lock it so that it would not move around the hand. The magnet wrap doesn’t work for people who use wheelchair because it will interfere with the wheelchair. The watch with slap band seems to work because people can just slap to put it on, yet it is hard for people to take off the watch. Because there is no watch that work in the existing market, we want to invent a watch that incorporates all the advantages of all the previous design.

traditional watch
sports watch
watch with slap band

We started with sketches and low-fidelity prototype to investigate in the movement of wearing a watch. As the pictures below shows, we have used buttons and 3D-printed material to represent a watch in our prototype. We have also used different materials to test the wrap. After trying different designs, we thought the sports watch design was a relatively easy way to put the watch on the hand. We also found that the wrap need to be flexible enough so that people with different mobility and shapes of hands would be able to put their hands in the loop. After idea that we incorporated in our design was to use loops on the watch wrap. This idea was originated from John’s personal life experiences. His clothes has loops on them so that he could just use one finger to wear the clothes. We thought this was a very accessible solution and incorporated this idea in both putting on and taking off the watch. All those concepts are the basis of our design. Another feature that we added to our design was the hook. With previous features and Velcro, the watch was already useful. Nonetheless, we learned from John that he personally would like something more fashionable, and Velcro on the watch didn’t seem cool. Thus, we decided to come up with another version that enables the watch to lock without using Velcro. We started with using hooks in the design. After John tried the prototype and confirmed that the hook idea was feasible, we further looked into other materials that looked safer and more durable. Eventually, we came up with using hook and eye closure. It utilized the same mechanism and was easier to put on the watch wrap and more durable for the users. The users don’t need to be afraid that the hook may move in the wrap.

sketches

Our team used the gift cards that we received in the makerathon event to invent a real watch for John, and below are the pictures for the final product.

The cost of such design is very cheap. Since we only design the watch band, the cost of the watch is not included. The watch that we used in the design was selected by John and it costed $143.44. For other people who want a similar watch, they can buy a watch in the Amazon and only retain the watch portion. The price would vary depends on the actual watch the people choose. For the actual design, the main costs are two components: hook & eye closure, and elastic spool. Both of them can be easily found on websites such as Amazon. For the hook & eye closure, the unit cost was $1 each. For the elastic spool, we bought a 396 inch one for $7.99. In our design, we only used 8 inch which costs around $0.2. Therefore, the total cost of our design is around $1.2.

hook and eye closure
elastic spool

Moving forward, we think there are two possible ways to commercialize our design. The first one is to partner with a watch company. The watch company would use our design of the watch band to come up with accessible watch for the users. The second way is to create customized watch band for people who already have a watch. The users just need to provide the dimensions of the watch, and we can create the watch band that the users can put on the watch.

My Semester with Digital Making

Expectations

When entering this course I truly had no idea what to expect. I had been advised by my fellow classmate that heard that this was an interesting course to take our senior year. Although I didn’t know what we were going to be doing in the class I did know that I have yet to take a class in college anything like it. Throughout my college career, I had been taking very limited classes with a very structured view of business. This course offered me a great opportunity to work on the making behind the business plans, which is what really intrigued me to sign up!

Fusion360 and 3D Printing

As a business major coming from the Gies College of Business, I came into this course with really no background in any design program. Although the course was a huge learning curve I have definitely gained some pretty valuable skills in the process. This first program we learned was Fusion360. This was such an amazing experience because we really got to learn and visualize our designs and then print them on the very same day. I have many aspirations to create my own company and learning the skill of prototyping while utilizing a program like Fusion 360 is definitely going to benefit me.

Iterating

Throughout our entire process, we worked tirelessly making our project as great as it could possibly be. As a group, we met on many occasions in the Art and Design Building making improvements to our prototypes. Again coming from the business school we really haven’t been able to create build and foster projects as we did in this class. I really found great pleasure in working with our projects and learning about the idea of iteration. Throughout our project, we went through 5 or 6 separate prototypes and a large make-a-thon where we put all our hard work together. We went from prototypes made out of paper to cardboard to bending acrylic. This is a process that takes time and effort and is extremely rewarding in the end.

InkScape and LaserCutting

Also in the semester, we got very personal with the FabLab which is an amazing building by the ACES library that has such an incredible environment that foster ingenuity. With the FabLab We worked on making a watch and the great staff members really helped us to understand the software and hardware involved. We needed to work on our software skills so we could design the watch. That is when we were introduced to InkScape. InkScape is a program the allows us to model our prints in 2D instead of 3D. This is important because for the laser cutters that we would be using in the FabLab we need to be able to model in 2D for the cutters to understand. After a quick tutorial on the basics of InkScape we were tasked on creating our watch face so the user would be able to know if the watch function was set to measure “twists” or “curls”.

Overall I have a fantastic time joining this class. I have never been in a class where I have been able to interact and physically design solution for issues that people face every day. One of my favorite thing Professor Vishal said day one was, “We are not looking to solve problems, but we are looking to find opportunities”. I thought that this was an amazing way to look at innovation that I have never noticed before.

A Design Journey to Make Some Difference

Expectations

At the very beginning, I head about this course from my friend Ruei when we were in Chicago and watching Heat VS Bulls. I learned about that this course is focused on 3D printing and students will have lots of opportunities to learn about other skills such as designing method, prototyping, and modeling. I still remember the time when I walked by the Makerlab and I was attracted by the 3D printers. I have never seen a 3D printer before. To me, Makerlab was like the mysterious palace that I need to make lots of efforts to get in. Due to my strong interest in 3D printing and designing, I sent an email to Professor Sachdev after I came back to Champaign. Even though I couldn’t make to the first two weeks’ classes, Professor Sachdev still provided me the opportunities to join you guys. Looking back to the beginning of this semester, I really appreciate the opportunities given to me. Speaking of the expectations, to be honest, I didn’t even think about what we’re going to do this semester, and the only thing that I kept in mind was that we’re going to design a product for our mentors or certain group of people. I was like a freshman to this course when I first walked in the class and found out that we have different teams. At the first few weeks, I noticed that other teams did lots of stuff and share them in class. I was really freak out since I thought my team was not actually making any progress even though we scheduled a lot of interview with potential group of customers. I even thought we probably couldn’t make it till the end of this semester. “Unfortunately”, we did make our product and we actually used our gift card won in Make-A-Thon to buy a watch and redesign our product for our target customer John.

Week 2: https://digitalmaking.web.illinois.edu/spring2019/week-2-reflection-4/

Week 3: https://digitalmaking.web.illinois.edu/spring2019/week-3-reflection-5/

Week 4: https://digitalmaking.web.illinois.edu/spring2019/week-4-reflection-learning-from-interviewing/

Week 5: https://digitalmaking.web.illinois.edu/spring2019/week-5-reflection-6/

Throughout the whole process, what I didn’t expect is that sometimes team members and I would have some different ideas and it was hard to get consensus. Actually, from this experience, I learned about how to collaborate with other people who have different perspectives. I found it was not only about communication but also you need to think about what you can do to benefit everyone and gather everyone together and work on the same goal. I truly realized that it’s hard to manage a team from doing the team project. The second thing that I didn’t expect is that changing our product at the last minute. Since we’ve been working on some glove design that help people with disabilities to hold things like utensils. However, after the meeting before Make-A-Thon, we met John who told us that he has problem wearing a watch and he actually wants a special designed watch so that he can put it on without making too much efforts. We noticed that the special loops design on his socks. Inspired by that and based on Saloni’s suggestion we started making the watch strap at Make-A-Thon. At first we all thought it was a really challenging project and we were stuck for a long time. After spending time trying out different methods, we found a special way to design the watch strap by utilizing simple physics mechanism. At last, we finished our two prototype on presentation day, and both of them worked well for John.

Resources and People

To be honest, I never expected that this course have such a lot of resources and invites lots of guest speakers from different fields and companies. I would say the Professor Sachdev is really good at networking. Sincerely, I appreciate the help and advice provided by all the mentors, TAs, classmates, guest speakers, mentors from Fablab, people we interviewed (Ryan, Zain, Selina, John, Avery), judges, professors from different classes, and everyone who helps us in throughout the whole semester. Due to your help, we can have access to so many resources that can help us improving our products in to next level. Thank you all for your help and time devoted into this course.

Due to the great guest speakers, we have chance to learn about how to design on Autodesk Fusion 360, 3D printing skills, laser cutting technique, Arduino, and sewing skills. These skills really helped us a lot in our designing process.

Week 6: https://digitalmaking.web.illinois.edu/spring2019/week-6-introducing-technical-skills/

Week 7: https://digitalmaking.web.illinois.edu/spring2019/week-7-fablab-reflection/

Week 8: https://digitalmaking.web.illinois.edu/spring2019/week-8-back-to-the-fablab/

Week 9: https://digitalmaking.web.illinois.edu/spring2019/week-9-reflection/

Week 10: https://digitalmaking.web.illinois.edu/spring2019/make-a-thon-pre-night-meeting/

Week 11: https://digitalmaking.web.illinois.edu/spring2019/one-last-week-before-make-a-thon/

Make-A-Thon & Prototyping

I would say Make-A-Thon is the highlight of BADM357. We finally get the time to design our product. Since we changed our project, we spent some time doing research and look for any opportunities that can make our product work. We stayed at Fablab for the whole weekend and kept working on our products. On that Sunday, we finished two watch strap prototypes. We utilized sewing skills and 3D printing techniques through the process of production. We also print out some slides and put them on try-fold.

During the presentation, we introduced our designing process and product to all the judges. Fortunately we won the prize which provide each of our team member $100 Amazon gift card. I was so happy and also shocked. I felt that our work finally got recognized by other people. The recognization also provided us the faith to continue improving our products to next level.

Week 13:https://digitalmaking.web.illinois.edu/spring2019/make-a-thon-3/:

After Maker-A-Thon, we decided to buy a watch with the gift card that we won, remake a better strap that fits the watch face, and give it to John. Last week, we ordered some materials that we need to make the strap. We ordered bra hook, elastic straps, and velcro. We spent one day discussing how we should design the strap and two afternoons on making the product. We adjust the size, the angle, and the surface design based on John’s wrist and his idea. After all the efforts, I showed the watch to John this afternoon. He was really happy about it, and it perfectly fitted his writs. I felt so happy at that time since my teammates and I actually turn this project in course into a product that can help someone meet his demand. Going back to the objective of this course, I realized how important human-centered design is, how hard it is to design a product, how many interview that we need to conduct, and how happy we finally helped someone who needs our help.

Thanks again to all the resources and help provided by all the mentors, guest speakers, sponsors, students, and faculties. I actually learned a lot of technical skills such as sewing, 3D printing, researching, interviewing, laser cutting, drawing, designing, teamwork, collaboration, communication, and brainstorming. I really appreciate this valuable experience. This course changed my future career since it offered me so many possible opportunities to discover in the future. I discovered my interests in designing fields, and I hope to continue my journey on this path. I’ll definitely recommend this course to my friends. Well I wouldn’t say it’s a course. It should be an opportunity to start your adventure. Love Y’all 🙂 Happy Graduation for seniors! Hope to see the rest of you who will still be on campus in Fall! STAY TUNE FOR BADM357 PROMOTION VIDEO!!

Utilizing the equipment in University of Illinois at Urbana Champaign

Jenna wearing the C-Leg protection we’ve designed.

Hi guys, as the semester is over, I just wanted to tell you guys about the awesome equipments that are located all around our school! When I first took this class, I wish I had knowledge to these equipment, instead of searching for them here and there. I have a list of equipment that you guys can utilize to create prototypes in the future! Even though you are not an art major like me, you will have full access to these equipment I am going to be telling you guys. This process is based on my process of our group project, the C-Leg protection. I will take you guys through each step and how we came to our final prototype at the Make-A-Thon.

Located everywhere:

  1. Brainstorming and Ideation:
Jenna’s C-Leg sketch.

This is the very basic and most important step when it comes to design. In order to create a successful design, you need to specify the user and start brainstorming for opportunities. Come up with a few questions and search for your target user. Then ask them those questions and try to find an opportunity. For an example, our group found an opportunity to create a prosthetic leg protection for our user, Jenna. Based on the interview, you will start brainstorming different ideations. This process should be very quick and should always be open to opportunities. For me, the most important part was to keep in touch with the target user, so we know we are in the right track. So, our group drew a picture of Jenna’s leg and constantly referred back to the picture, to make sure we were on track. Throughout our entire process, we had to revisit this step multiple times, because we had to change out design. And this is natural. Do not rush this step, since you might get inspired by the most unexpected ideation.

Located in the Maker’s Lab:

  1. 3D scanner

After you have a good insight of your direction, the next step is to make a 3D model of the product you are basing off of. For my case, we had Jenna come in with her prosthetic leg and we had it scanned using the “Occipital Structure 3D Sensor with Precision bracket”. This program allows the user to scan an object and turn it into an Obj file which could later on be converted into a stl file by using “Scrulptris”. The more complicated the object is, the more time the program needs in order to read the data. For the prosthetic leg, it took us about 15 minutes in total to scan the entire leg. It is really cool to see the model slowly mold into a 3D file while you are scanning.

2. Fusion 360 and Cura

With the obj file is converted to a stl file using “Scrulptris”, you can open the file in “Fusion 360” if you need further modification. For an example, you can add more bulge to a certain area or fill in the holes of the object. If the file has a rough texture, “Scrulptris” will be able to smoothen out the rough surface of the object. This is very important. If you don’t smoothen out the surface and make sure you have no holes, the 3D scan will fail and you will have to start over all again. So, you should always make sure you do it right at the first time. After you send the file into Cura, you can change the density of the object. For my model which does not have a lot of body structure, I have a 15 percent density which is enough to be used as a model. You should ask the workers for better insights on which density to use because it will determine how long the 3D print will take. For our C-Leg model, it took us a total of 10 hours to print out the three separate models. This may not be applicable for everyone but with this C-Leg model, our team saved a lot of time and effort to make it accurate as the actual model. At the end, even without Jenna at the Make-A-Thon, the model fit Jenna’s C-Leg perfectly.

Located in the Fab Lab:

  1. InkSpace and Laser Cutting

InkScape is a digital program that is used in the Fab Lab in order to use the Laser cutter. If you have any experience with any of the Adobe Suite programs, it is very easy to learn. But even without any experience, you can learn how to use it within 20 minutes. The most important part is make sure the lines that will be laser cut should have a stroke of 0.01 mm and colored in red, RGBA: 255,0,0,255. If you would like to have vectors, just change the color to blue, RGBA: 0,0,255,255. Then save the file to a SVG format and print your file on the laser cutter. For my project, I used the laser cutter to cut the Acrylic according to our design. The laser cutter saves a lot of time and cuts the pieces precisely, so there is no wobbly cut strokes. Also, the laser cutter is great for anyone who is using brittle materials such as acrylic and glass. I think our team saved a lot of time during the Make-A-Thon by using the laser cutter.

2. Sowing Machine

Yishou using the sowing machine.

The sowing machine is great when it comes to sowing fabric pieces together. I used to learn how to sow my pants in fourth grade using my hands. But after learning how to use the sowing machine, I now only use the sowing machine to sow any embroidery pieces. When you use the sowing machine, you need to first feed the thread through the holes according to the numbers and make sure you have the feeding thread underneath as well. Pulling back both threads, you can then start using the sowing machine. With enough practice, the final product will turn out to have clean seam or even seamless if you flip it inside out. For our C-Leg protection, we flipped the seamed side inside, so the product looked very clean without any seam to be shown. You can use the fabric as a pocket. For an example, our group inserted foam pieces inside the two fabric and made it accessible with velcro.

3. Acrylic Bender and Heat Gun

Lastly, the heat gun is my favorite equipment to use in the Fab Lab. It is also one of the most dangerous equipment to use, due to how hot it could get. With maximum heat, it could burn your skin very badly, so it should be always be used with heat resistant gloves. Another similar product is the acrylic bender. This product only applies heat in a straight line, so it takes longer to bend objects. I found out that this equipment is best when it’s used to precisely bend an object in a certain angle. For our project, we first used the acrylic bender to get a general shape of the mold. Then we used the heat gun to warp the shape according to the 3D scanned C-Leg. When we were using the heat gun, we had to make sure we protected the 3D scanned C-Leg with fabric, so the 3D canned C-Leg won’t melt. With enough caution, the acrylic bender and the heat gun is a great tool to use.

Conclusion:

Throughout this semester, I’ve discovered all these gems located in our campus. And it was an awesome opportunity to learned how to use all of these equipments. I don’t think I would’ve been exposed to any of these if it wasn’t for BADM 357 class and the Make-A-Thon. This course has definitely made me hungry to explore other equipments located around the campus and I am going to give it a try. I will continue to use these techniques I’ve learned and use it create other prototypes as well. I also hope that this guide will attract other non-designers to take a chance and explore the beauty of designing prototypes.

My journey at BADM 357 Digital Making course

Throughout this semester, my journey at the Digital Making course was such a life changing experience. It opened my eyes to various tools located in both the Makers Lab and the Fab Lab. And with the help of “Milestone Lab”, our team was able to experience making a functioning prototype at the Make-A-Thon. This course has taught me that the result is not the most important aspect instead, we need to embrace our failures and talk with our users to create something that our users will love to use.

Tools I’ve learned throughout the Semester:

  1. 3D printing and Scanning

As an industrial design major, I came into this course with the knowledge of how to use “Solidworks”, so I thought this area was nothing new. I was wrong. Our instructor, Dr. Vishal, coordinated with several experts to teach us how to use 3D modeling programs such as “Cura” and “Fusion 360”. It was also really helpful. Our class was located in the Makers Lab, so we had direct access to these 3D printers. There was also the 3D scanner that was powered by a ipad. While holding the ipad, you can rotate the object and watch the ipad recognize the object into an “obj” file. Then sending this file and convert it to a “stl” file will grant us access to the 3D printers.

For our final project, our team used “Solidworks” to create the model and based it off of a 3D scanned Jenna’s prosthetic leg model, C-Leg, that we’ve previously scanned. The C-Leg was too long, so we had to cut it into three pieces and took us total of 10 hours, but it was the most worthy 10 hours in my life. The 3D model made our project look more refined.

2. InkScape and Laser cutting

We learned how to use “InkScape” on our first week at the Fab Lab. “InkScape” is a very simple tool to use if you have experience of any drawing tools like I do. But even without digital art experience, it’s a much simpler version of “photoshop”. The most beneficial aspect of this tool was it can be transferred over to the laser cutter. The laser cutter is using a laser that is transferred through optic lens and is shotted out through a nozzle that can cut through glass, acrylic, wood, etc in a very precise matter.

Our group used these tools during the Make-A-Thon. We first had to draw a few patterns we wanted our leg protection to have. Then we transferred the sketch into “InkScape”. Then we sent that “InkScape” file to the laser cutter and then laser cut the acrylic board. It was really cool to use all these tools and it really opened my eyes to the numerous possibility of design methods.

3. Arduino and Heat Gun

On our second week in the Fab Lab, we learned how to use the Arduino Uno. We were guided through a tutorial by the staff members in the Fab Lab. And then we were able to make the Arduino Uno turn on and off it’s LED light by uploading a blink and fade mode into the system. Our group did not use this program during the Make-A-Thon, but we are planning on using this blink and fade mechanism to brighten up the leg guard in the future.

We used the Heat Gun during the Make-A-Thon. I have never used a Heat Gun before and neither our group members did. So we were very intimidated by the amount of heat this device can heat up. However after a few practice rounds, we were able to get a clean curve based on our mold. We had our 3D scanned model of the C-Leg covered with fabric to prevent the 3D scanned model from melting. After learning the basics, we were able to create a nice acrylic protection for our model.

Overall

I was first introduced to this class from Dr. McDonagh’s disability class. This is where I met Dr. Vishal and I was inspired by his speech about this Maker’s Lab class.

This class kept me on my toes the entire time. We had a lot of submissions and deadlines to keep up, but it actually made us think constantly about our project. It came to the point where we fell in love with our project and always thought about it whenever we went. For me, I always carry around my sketchbook since you never know when a great idea might pop up. Sometimes I would sketch while I’m eating my lunch in the Link Gallery.

Throughout this course, I learned the importance of the users and learning about each steps of prototyping a project. We were assigned a mentor and we were constantly talking with them and searching for opportunities to make a better product for them. I loved how we bonded together and it drove us to wanting to help them more and more.

I am very sad that is course is over. If I had the chance, I would definitely take this course one more time. And if anyone is willing to take this course, I would highly recommend them to take this course.

There is so many techniques I’ve learned throughout this course and it opened my eyes towards how to become a great designer that cares for the users. I plan to use these techniques and pursue my dreams on becoming an empathetic designer that will seek for opportunities in other user’s needs.

My Experience in the Digital Making Seminar – Spring 2019

Beyond Expectations

Initially, I enrolled in this course to obtain new skills that are rare among business majors and to explore the concept of design thinking. I wanted to learn how to use CAD software to 3D print different objects. However, on the first day of class, my expectations changed. I learned that throughout the semester, we were going to work with mentors on campus on Accessibility Product Design. I assumed we were going to 3D print prototypes that could help our mentors in their daily lives, test those prototypes, and iterate and improve them. However, this course far exceeded my expectations.

Through various workshops during the course of the semester, I was able to obtain a wide range of new skills. I learned technical skills such as Fusion 360 when a representative from Autodesk visited campus and how to code an Arduino to illuminate an LED light and laser cut wood at the Fab Lab. Moreover, I was able to work through the design thinking process over the course of the semester, which was one of the reasons I applied to the seminar in the first place. I never expected to learn these skills and concepts in a business class; however, I was lucky enough that the Gies College of Business and Professor Vishal Sachdev provided me with this unique opportunity right before I graduated!

In addition to teaching me these competencies, this course helped me learn a substantial amount about myself. For example, I realized that I love working with people from different domains who have different backgrounds and experiences. My teammates were Accountancy and Industrial Design majors, and a few of my other classmates were Engineers. It was energizing to see the different ways people think and everyone coming together with open minds and great enthusiasm. Furthermore, I learned that I have a creative mind. Previously, I thought being creative meant have artistic abilities. However, this course helped me understand that I can use my creativity for improving a prototype, writing, overcoming a challenge, and thinking outside-of-the-box.

Semester at a Glance

During the first three weeks of the semester, we met our class mentors and identified opportunities to explore with them. Jenna Fesemyer, a class mentor, is on the Fighting Illini Wheelchair Track team and wears a prosthetic leg on her left residual limb. She inspired us to create a shoe tread that has good traction in icy and snowy weather but weighs less than boots. That’s when my team, Solestice, and I defined our opportunity statement: To create detachable tread attachments that can be used to travel in a variety of terrains. Check out my reflections from weeks 2 and 3 for more a more in-depth look at what we did.

Weeks 4 and 5 consisted of market research and a guest visit from EarthSense, a startup on the University of Illinois’ Research Park. One piece of advice from the representative that had a lasting impression on me is to “fail early and fail often.” This means that the more you fail and the earlier you fail, the more you can improve your prototype and the final product will be. This mindset can be applied to almost anything you do in life. Additionally, team Solestice interviewed our mentor, Jenna, to gain insight on the user experience of the tread and some aspects she would prefer in the tread.

The next few weeks of the semester were spent learning technical skills, learning about different resources on campus, and starting to design our tread. We attended a workshop from Autodesk to learn about the CAD software, Fusion 360, and visited the Fab Lab to learn about the tools that would be available to us during the Makeathon. We also wrote How Can We statements, begun brainstorming potential designs for our tread, and created a storyboard of the user experience with our tread. See my Week 6, 7, 8, and 9 reflections for more detail.

Then, Weeks 10 and 11 were dedicated to preparing for the Makeathon. We met additional mentors who were going to assist us at the Makeathon as well ensure we had all the materials we needed. We met with Milestone Labs, who had consulted with us throughout the semester on our projects. Weeks 12 and 13 were spent making our prototype at the Makeathon and testing it with users. We received some feedback on how to improve our prototype, and we were able to iterate our design before our final presentation.

I am so grateful to have had this wonderful opportunity to learn and grow in new ways during my last semester at UIUC!