Week 9 Final week in Fab Lab

Last week in the Fab Lab, each group finished either designing the top part of the watch or learning how to light up a LED using wires on a breadboard. This week is the last week of our trip to the Fab Lab.

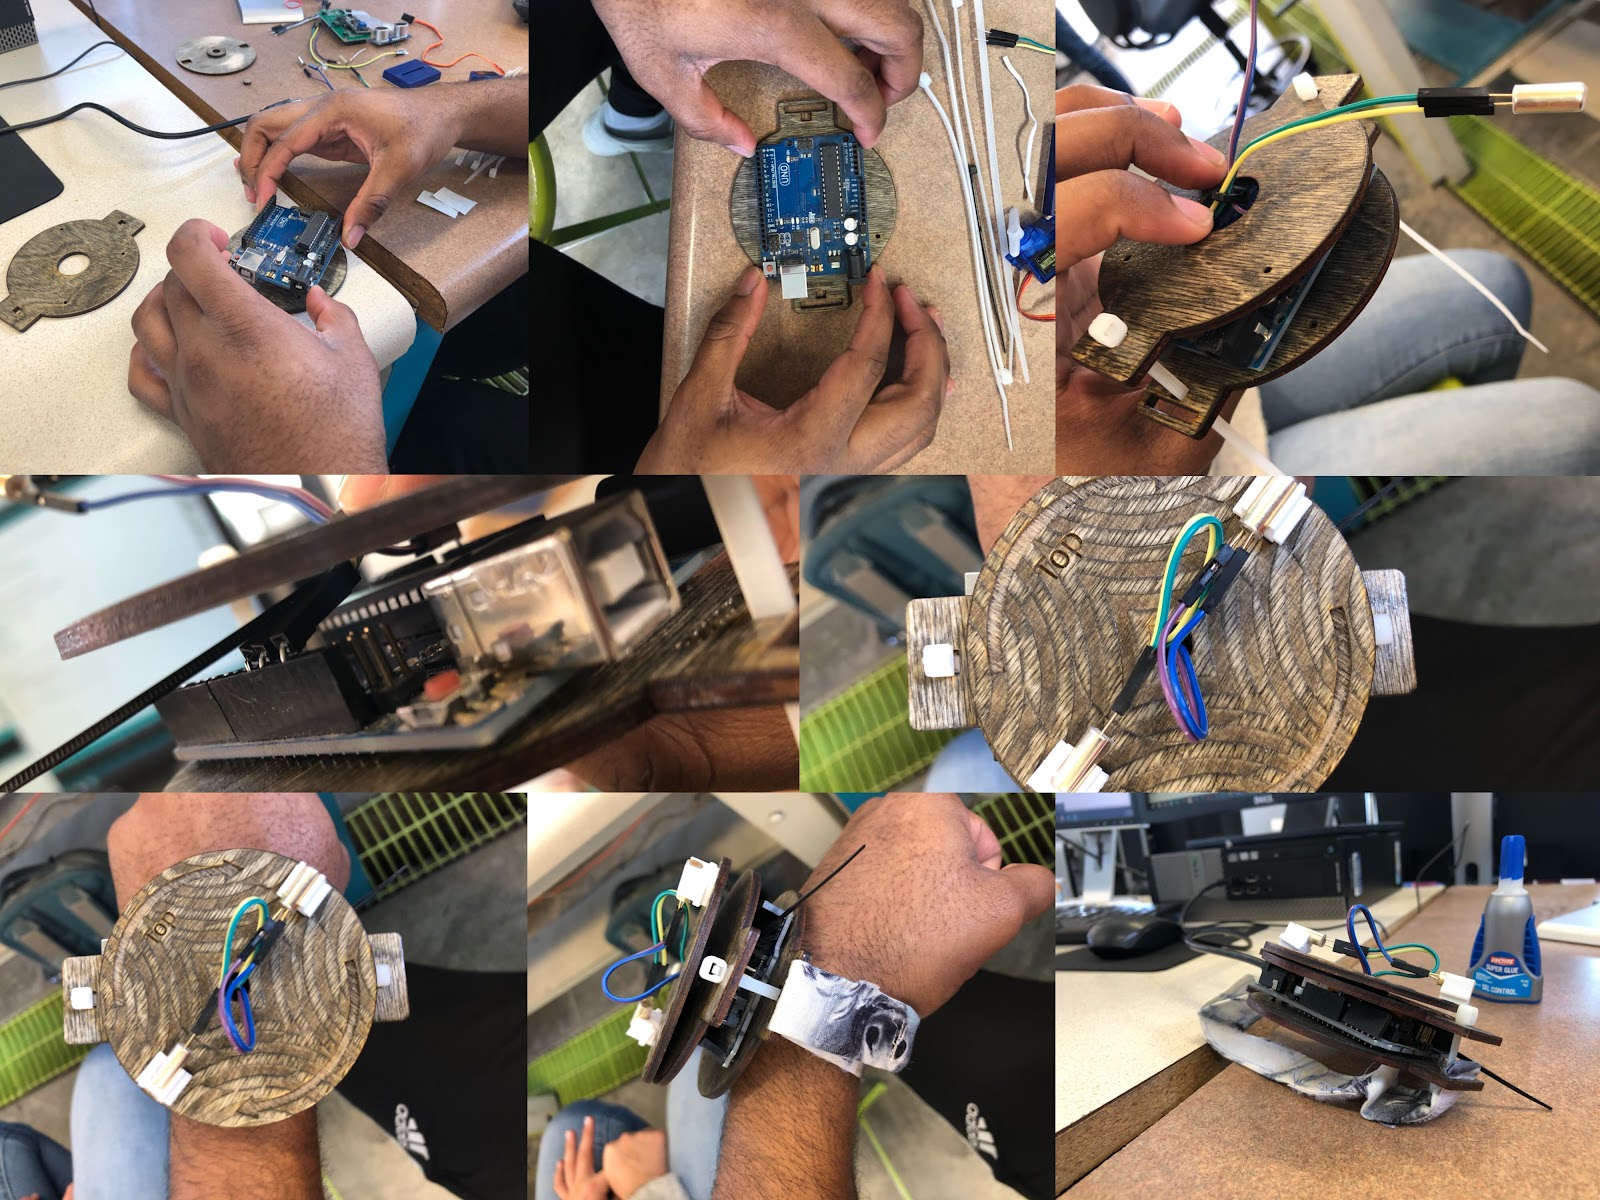
This week was my first experience of using a code. I watched a lot of people using codes from my previous summer internship when I was working with a lot of computer science majors. I always thought it was too difficult for me to learn but with the help of the Fab Lab, it was much easier to learn than it looked. We used this program called Arduino to download codes and input numbers to teach the circuit board. I think it was cool to watch this small circuit board memorize multiple tasks and present them without a single fail. We taught the board how to turn on and off the LED lights with a second interval. Then we taught it how to give out different numbers when it’s turning 90 degrees and not. This way, the users who are using the watch can see when the watch is twisting or turning.


After we made the circuit board, we combined it with our other watch components. It looked really good and it was very satisfying and sad to watch the three week short project come to an end. I feel like we could also integrate this circuit board into our current project of the knee protection. Maybe we can attach a sensor, like when a car is backing up to park, that will make noises to alert when it’s making contact with an object. This will probably go behind part of the prosthetic leg where it is least dangerous. I think through this experience, I have become more open minded with the usage of technology in products. And I think circuit board is a great method to do simple tasks. As a designer, I think I can use this circuit board in many different ideations such as creating a jacket that will light up in the dark to alert drivers.

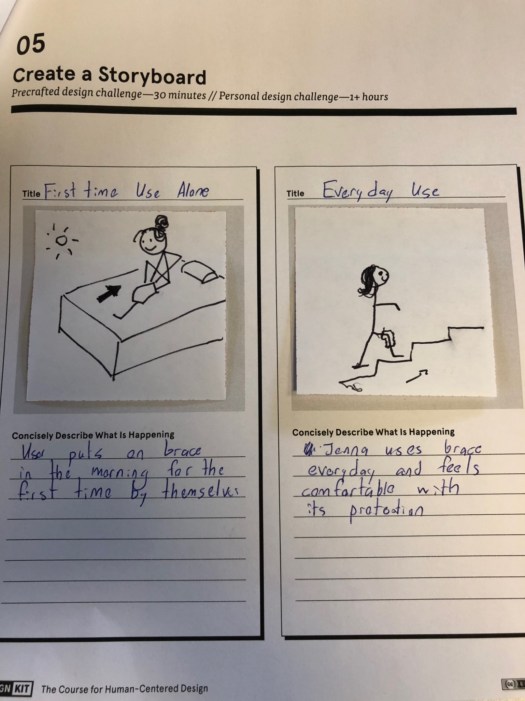
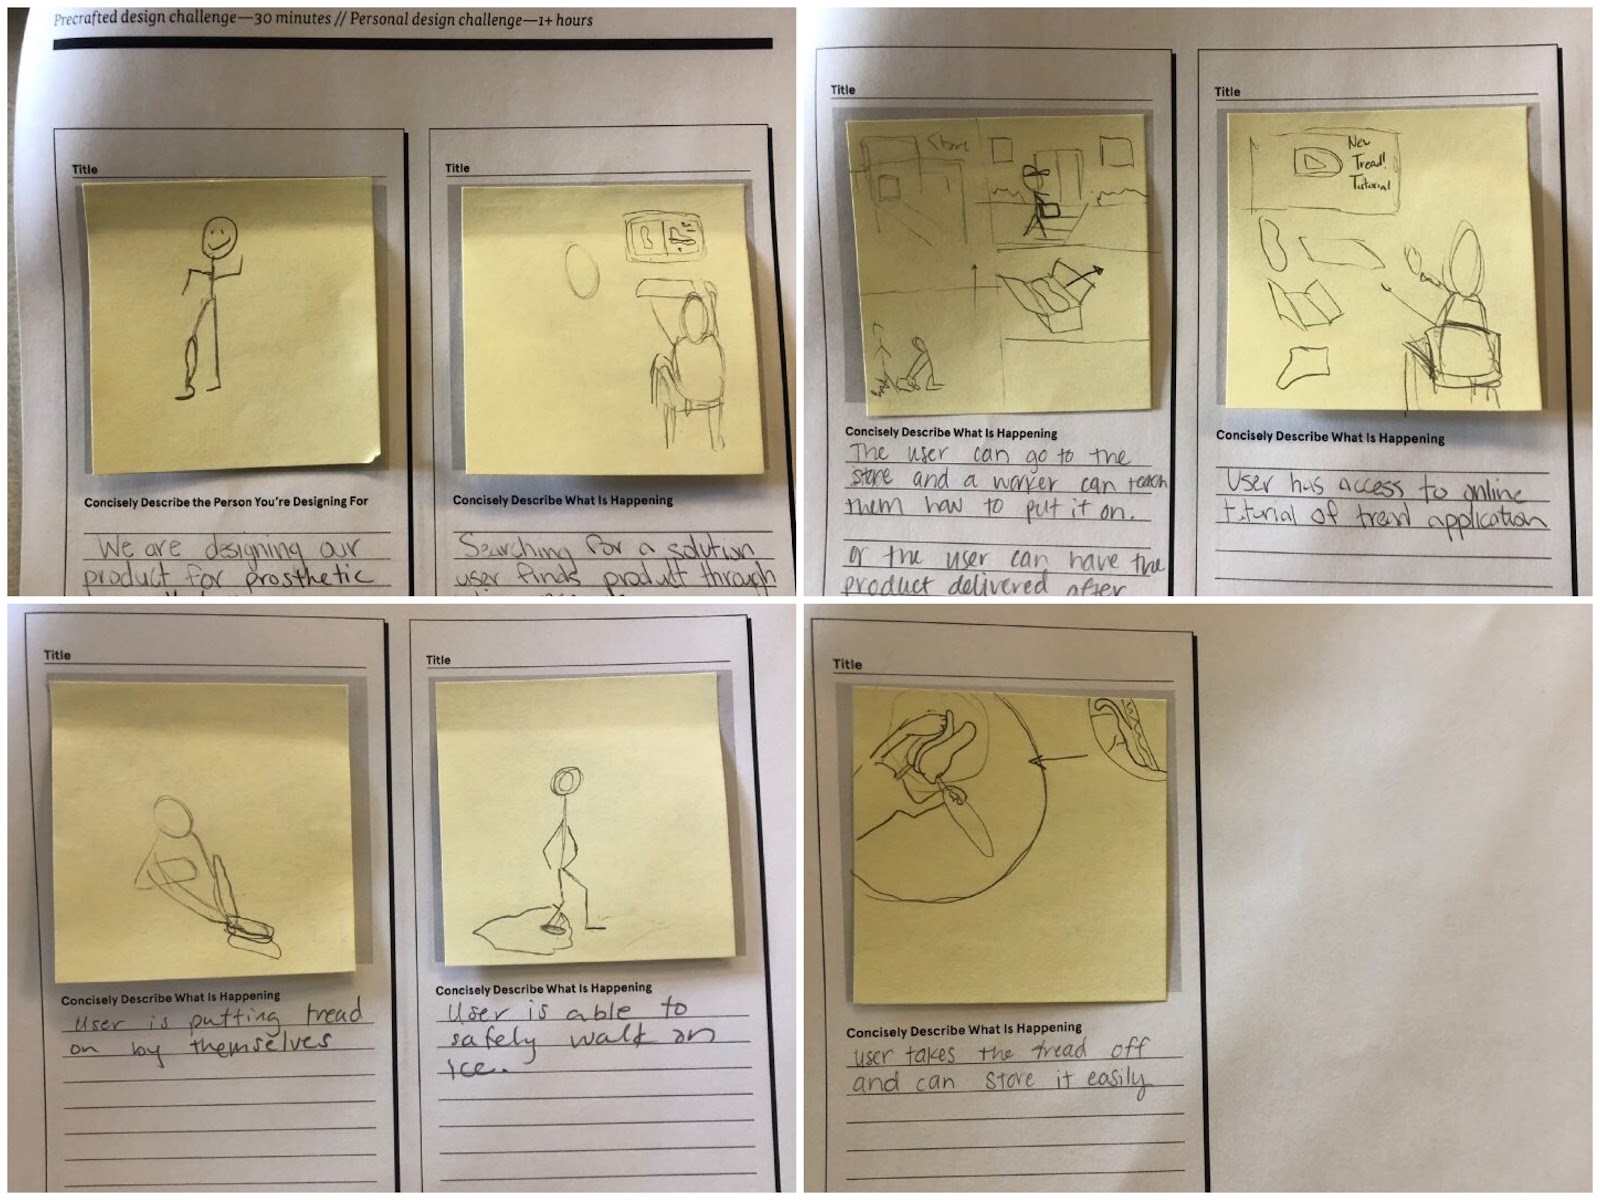
We also learned about how to create storyboards. I think this helped our group the most out. We were finally able to collectively layout the intended usage of our product and how we are going to achieve it. I think this will definitely guide us through out project as we can use this as our root when we are further diving into our research and prototyping. In the future, I think I will use this before I start my projects. Because then, I can always refer back to my guidelines without hindering away.

I think for the next step, our group is going to create more prototypes and talk to the Material Science professor for better insights in elastic material that will wrap around Jenna’s prosthetic leg. Also, we need to make more higher quality prototypes with actual cloth material and make hooks that will latch on to the back of the prosthetic leg.

Week 9 – Designing the Object as well as the Experience

This week, we spent our class at Fab lab again. We continued the work with the watch and the human-centered design for our project.

At the first half of our class, we focused on finishing the watch, the one that would detect the curl and twist of the users when they used the watch so that the watch could make sure the users do the exercises as asked. In the previous two classes, we have designed the watch’s surface, laser cut the wood, sewed the strip, and learned the basics of the circuit. In this week’s class, we furthered our understanding of Arduino software. I haven’t done any coding with Arduino since high school, so I still needed some time to get familiar with the software again. Luckily, the main task in class was to understand the sample code and imitate the code rather than write code by ourselves, so it was pretty easy. We first tried some sample codes. After uploading those codes, we saw the effect on the circuit directly. This gave us a better understanding of what the code would do. We first tried the simple “blink” code in which the light bulb would blink. Interestingly, my friend’s light bulb was different from the normal ones, and hers blinked more frequently than that of the rest of us, so we altered the code to adjust for it. We also tested the sample code that would monitor the tilting. After learning the basics of the sample code, we started to build the watch. We first tackled the model itself. By using some zip tools and glue, the watch became stable without using many materials. After making the model, we connected the circuit and uploaded the code written by the staff at the Fab lab. The code would monitor the number of times the user curl and twist the watch. Overall, the watch was not a complicated model to build, yet it was cool to see how we could make something useful to other people with simple tools. Knowing the basics of all those tools that we have been studying for three weeks, we would apply that knowledge in future design.

test the sample blink code
the watch

In the second half of the class, we continued to work on our group project. This time, we adopted the technique of storyboarding. In the process of creating the storyboard, we drew how the users would interact with the design step by step and wrote the key points for each picture. Through this activity, we could have a better understanding of the whole experience the users would encounter. In addition, it made us reflect deeper on the context the design would be used in. One feedback we received was to consider how the user would be introduced to the design and how more people would know about it. After hearing the feedback, I deemed those were important factors to consider because those would help we design a better experience.

Storyboard

FabLab 3.0

FABLAB 3.0

This week we returned to the FabLab for the third time.  It was very interesting because we were going to be using all the skills we learned from the previous visit to finally assemble our watches.  Brandon, a worker at the Fab Lab, gave an introduction to the Arduino Uno. We learned the types of code and some basic functionalities of writing the code language. Once we wrote out some code we then attached the LED to the audirono. It worked an we moved on to adding the motion sensors and writing the code to run indefinitely. The serial code sneezed when the audition was being tilted and showed the values of the switch; seeing the watches purpose was to capture motion of the wrist.

Image on the left is of the basic audirino plugged in
Image on the top right is of the LED attached to audirino
Image on the bottom right is of the scaled model of an audirno the Fab Lab made

Once we finished finalizing our code we shifted into assembling. We all had a Fusion file of the assembled watch. The class previously laser cut the parts of the watches with unique designs for customization and callout to help with the user experiences. We used super glue to glue to top base and washer. We then attached he aurino to the bottom board with adhesive sttrips. In Order to keep the wires in place we bent them on the board and zip tied them together. After this we placed the three portions together and pulled the sensors through the whole. To keep it all in place, we clamped the watch  together using zip ties. We then attached the sewed wrist strap me made in the previous weeks as well. Lastly we attached pre 3d Printed holders for sensors to rest inside.

The process of assembling the watch. Also showcasing the cool design. Its stained, polished and has an optical illusion engraved in it.

The last part of class was was focused on storying boarding. As an industrial designer we storyboard all the time. We do it for pretty much every project so I am quite familiar with it. Being apart of Team Solstice, we came together to figure out what we wanted our users experience to be. We had to think about how’d they find the product, obtain it, use it, and how it’ll ultimately affect their daily lives. As you can see below there’s my teams rough storyboards. We began by identifying ou users, which in our case people with prosthetic legs. We then moved into how our users might find our product. Since we’re in the digital age we thought though the internet, word of mouth, and social media. Pretty much each of the boxes shows the process the user will have with the product. One that covers the entire journey from finding it, getting it out the box, assembly, and using it.

Solestice’s storyboard


Week 9: Watches and Storyboards

This week was our last week at the Fab Lab, and we started by finishing up our watches. This was really cool because we were able to actually make something. I haven’t worked with electronics or wires in a long time and it was super inspiring to be able to make what we did, to show us what’s possible.

It was also eye opening to be able to have a code and then connected it through a wire and have it added to our watch. It made something that looks so advanced on the outside feel a little more simple. Building this and learning through these workshops has definitely taught us that we can make a lot in the Fab Lab and the more we come in the more we will be able to grow and learn. I know my team will definitely be using the Fab Lab to help us make the final version of our product and I am excited to come back now with the knew making knowledge that I have.

After we finished our watches, we worked on designing the experience we want our users to have with our product. One of the pieces of the storyboard we created is displayed below.

We will bring our gloves to Beckwith first, to have residents get to try them on and use them in the common room. Then they will have the option to take it out with them if they want. Our ideal experience involves them being able to comfortably eat out with friends while being able to feed themselves. Then they will tell their friends about their experience and that’s out we would spread the word about our product.

Moving forward we still have a lot of work to do. We want to have a user that we can use as someone to help us design the glove for and test prototypes with. I will reach out to my friend Brandon this week to see if there is anyone he can think of that would like to help us by testing our prototypes. The end of the semester is coming quickly which is putting pressure on us to finalize our products, which is exciting and stressful at the same time. I am nervous that about the time crunch but know that we have put a lot of work in so I am hoping for the best.

Week 9: Final Session in Fab Lab – Assembling the Pieces and Creating a Storyboard

This week is our final week of learning sessions in the fab lab. In this week, our class is separated in two parts, assembling the pieces of the watch and creating a storyboard for how our product will reach our target consumers.

Assembling the Pieces

In this week, we started with learning how to use the Arduino software to manipulate pre-packaged codes that are available in the software and load these codes to the Arduino, a single board computer. We went through how to make the LED light blink every second and how to use the tilt sensor to allow the computer detect different inputs of the tilt sensor triggered by the different movements of the tilt sensor. Utilizing the tilt sensor made it possible to assemble the watch that detects curl and twists movements. The Arduino board computer with the code that can detect the inputs of the tilt sensor is the core of the watch that can detect curl and twist movements.

Unpacked tool-pack, Arduino connected to desktop (I lost the other pictures I took during the process of assembling)

After learning how to manipulate codes and load codes to the Arduino, we got to the process of learning how to assemble the watch with different parts of the watch. This process is more about following instructions, but the end result is more important to me. I think, the ability to actually assemble the watch is very exciting. I am very proud of the final product, the watch, I assembled because I finally made something. This also familiarizes me with the process that we may need to go through during the Make-a-thon. We will be making and assembling our final product during the Make-a-thon, which may need to go through the same process we went through in the Fab Lab in the past three weeks.

Creating a Storyboard

The second half of the session was working with our team again. We worked on creating a storyboard for how our product will reach our target consumers this time. We needed to draw sketches of the steps of how our product will reach our target consumers and describe the sketches below them in words. We had ideas of how we are going to bring our product to our target consumers; however, we were not art majors. We did not really know how to draw the sketches that we had in our mind beautifully, but we sketched out what we thought in simple strokes that our teammates can understand. This exercise helped us to plan out our marketing strategy in advance and understand our target consumer better. We need to understand how we are going to approach our target consumer before creating the product because we don’t want the product to be created but has no users. I think this is the main reason why we need to create this storyboard before putting together our product.

Piecing It Together

Our last week in Fab Lab brought together the skills we had learned over the past few workshops. The tilt sensor, laser cut watch face, and Arduino were all assembled in order to create our final project, an assistive watch for therapy sessions for outpatients. This watch would count each curl and twist a patient did to better keep track of their routine rehabilitating workouts. Personally, I enjoyed learning some of the coding aspects as I have worked briefly with Arduino previously in an electric engineering course. 

The photos below show the watch with the Arduino inside of it along with the interface that would track when a movement is made.

During the second half of class we had the opportunity to meet back up with our team. Here, we created a storyboard to outline what an average user for our product would look like. This helped us visualize  the steps a customer may have to go through in order to better understand the needs of the user. A picture of our timeline is below. 

Week 9

Final Assembly

This week in the fab lab was mainly dedicated to the final assembly of our watch. We started off with another electronic workshop. In this workshop, we experimented with an Arduino. We learned how to write simple code for running loops. In doing this we were able to do experiments with the LED, such as controlling when it turns on and off and controlling the duration while it is on. After attaching the tilt sensor, we printed the results of the loop. 1’s and 0’s would indicate what orientation the sensor was in. It was interesting to see it work on the LED and then printed on the screen.  

Code for watch

After this workshop, we then transitioned into preparing the Arduino for assembly. The code for the watch was given to us. After uploading the code we taped the Arduino down to one of the boards. After supergluing and taping other parts together we sandwiched the Arduino between two pieces of the watch and secured it with zip ties. We then proceeded to secure the tilt sensors on top of the watch. After attaching the other parts such as the wristband the assembly was finished.

Watch

Initially, when they told us that we were building a watch I thought that it would take longer than the 3 days we spent. However, after seeing how a big idea can be broken down into smaller pieces it was clear to me that maximal functionality can still be achieved even with a basic prototype. Making the watch will definitely help me and others feel more prepared for the make-a-thon.

Week 9 Reflection

This week we also went to the Fablab, and this our third time spending our time there. We continued working on our watch design. To be honest, I didn’t expect that we would finish the watch before we move back to the maker lab. Anyway, it’s great opportunity for us to accomplish a goal and finish a whole product.

“Coding”

Basically, the watch was used to detect whether you curl and twist correctly. This is why we make those two words printed on the watch’s face. Continuing working on the circuit, we started learning coding and input those code and instructions into the circuit board. After doing a series of fancy operation, we can make our light turn on and off. Seriously, I don’t know how it works, but thanks to the really detailed and clear instruction, I finally understand how to make it work. Then the instructor gave us some the two cases of the watch, and they started teaching us how to assemble them together into a final product.

Circuit board

Later, we put the circuit board between the two wood cases and glue them together. Then, we use the plastic strip to combine them together. Moreover, we also need to put the wires and the tilt sensor together and pull them out through the loop. The tilt sensor can sense the rotation of the watch and indicate what action you’re doing. I found that one of the tilt sensor cannot be connect to the wire perfectly, and it’s kinda loose, so I used the glue to stick them together. Since the watch face should be fashion, I used to put “Supreme” & “Versace” logos on it. However, later I found that those logos are kinda of useless, so I deleted them and in order to make my watch face more fashion.

The parts that we use to assemble the watch
Combining the cases and circuit together
The finished product

After we finished our product, Mehmet asked us to go back to the weekly statement activity. Last week, we begin to work on creating the story board of our product and how our customer can benefit from using our product. Since we started doing the weekly statement activity, I found it’s a really interesting and efficient way for us to learn more about what we reach so far of our product. It’s great opportunity for us to explore more and make developments to our product. By drawing the story board, I realized that there’re actually more approaches for us to modify our products and benefit more people.

Story Board drew by Saloni

Later on, Saloni, Ruei, and I discussed the video project of our class. We decided to make some interview videos, just simply asked a few questions to the professor, students, TA, and mentors. Hope we can have more shots and footages in next week’s meeting.

Assembling the Pieces

This week we head to the Fab Lab one more time to assemble the pieces of our motion detecting watches that we have been building over the past few weeks into a final product. To start of the class, we once again got our hands on the Arduino with the objective this time being to write the code for our watches. Due to the fact that I have had prior coding experiences, the activities assigned in class were not too difficult for me to follow. I think that one feature that stands out from the Arduino is the fact it has pre-packaged codes in the software so even inexperienced coders can create electrical products with ease.

Following the activities on the Arduino, we then come to the final stage of our watch making process, to assemble the pieces. It was a very joyful movement for me as I got to see the work I’ve put into the last few weeks coming together into one functional piece. Due to the constraints on material and time, I was not a hundred percent satisfied with my product so I’m hoping to improve on it in the future or even remaking it.

After the creation time in class this week, we were then back to the usual brainstorming session for the latter part of class. This time, the activity Mehmet had for us was draw story boards on how users would be able to find our products, the reasons for using it, and how other users would be affected by it. I thought it was an very interesting activity as it got us thinking more than just our user but every single user that could be affected by it. It helped us modify the direction of our product as we realize that we can create something that can be adopted more that just yoga enthusiasts with prosthetics.

In addition to class this week, we also met with Deana to discuss our prototypes of our product and the insights she gave us was very unique and helpful. First, she noted that due to the fact we do not have any design majors on our team we should probably talk to people with such skill sets to be gain other perspectives. She also suggests us to not mess with the height of the prosthetic as Jenna might have a hard time using it because it might affect her balance.

Overall, I think it was a very productive week and I look to take a short break this coming week as well as keep brainstorming so we can be ready for make-a-thon.

Putting It All Together

Sewing the Strap

We met at the Fab Lab for the last time in order to assemble the motion-detecting watch together. Before the class began, I took some time to go back to the Lab to work on the strap of the watch, which was an interesting experience. Although I have done hand sewing before, I have never used a sewing machine, so I had to begin with the first step, which was threading the machine. After a couple of practice, I was able to begin to use the machine, following a guideline on a piece of cloth to get a feeling of the machine and how to control the pace of it. After some practice and building up confidence, I began to work on the strap.

Using the sewing machine to sew the cloth to create a strap for the watch

Although I had to redo a couple of parts because I got too close to the edge of the strap, it was a fun experience overall, moving at a steady pace along the cloth. It was very satisfying to see the result after the string has been cut from the cloth.

Experimenting with Arduino

Back in the class, we began to play around with Arduino, learning about different components and transferring codes over from the computer to it. Since the majority of the class, including myself, did not have any experience with Arduino, we used the example codes that are already on the Arduino program and adjusted them to fit our situation. We first used the code to light up the little bulb by connecting it to Arduino itself. After, we connected the motion-tilt sensor and used a code to show a graph on the computer that represented when the Arduino was tilted.

This program was to be used for the motion-detecting watch, so after ensuring that the code worked correctly, we started assembling the watch together.

Assembling the Watch

I was very happy to see all the parts come together into what it is supposed to be. From connecting the wires to putting together the different components of the watch, it was as if I was playing with a Lego. Due to the time constraint, we had to rush through at the end, so I cannot tell whether the watch functions correctly or not, but I am looking forward to finding out in the future.

Storyboarding

After the watches are finished with assembly, we got back into our team to continue working on the project. The main focus of the day was to create storyboards to demonstrate how a user would find out about our product, why they would use our product, and how it would be used by the user.

We first began by creating a profile of the user, using Ryan as our base for it (first picture on the top left corner).

Next, we demonstrated a situation where Ryan would be out in the rain using his power wheelchair without any cover for it, leading to a system shutdown. This situation would require him to receive help from a stranger to be pushed to a dry spot where he can wait until the chair dries and the system can be rebooted (the five pictures on the top row next to the profile picture).

We then looked into how a user may find out about our product, one of which was through a Google search. For example, the users may search “wheelchair protection from rain” or “how to protect a wheelchair from the rain” (two pictures on the left bottom row).

Another way that a user may find about our product is by seeing other users using the product (two pictures on the right bottom row). We also showed how the user may use our product, allowing them to travel safely in the rain.

This was an interesting exercise that again, focused on the users of the product. It made us rethink why the users may use our product and what may be a critical part of creating a successful product for them. By also thinking about how they would find out about our product, we were ensuring that our product would reach out to the intended users.

Moving Forward

Moving forward, we will continue to explore different options already available in the market that serves the similar purpose of our product as well as various materials that can be used to develop it. We are also planning on reaching out to Ryan once again to have a conversation with him regarding the potential design of the product and receive his feedbacks. We will make sure to continue focusing on the users and how to make sure that they will have access to our product.