Semester full of Digital Making !

Wow the semester has flew by. I remember taking my disability design course and being heavily encouraged to take this course from my professor Dr Deana McDonagh. I heard countless success stories and instantly got interested. I remember the entire process  of sending a resume and asking access from the instructor. It made the course feel even more official and selective. I wanted to take the course because it could present even more fabrication resources and help me in product development in my startup.

Expectations…

Initially I didn’t necessarily know what to expect. From the course description I thought maybe the the class would be very hands on and explore various methods of fabrication. Even with these little to no expectations the course don’t over promise anything. The course itself wasn’t perfect but it was an overall great experience. It challenged us to think outside the box and look at what we usually consider problems as areas of opportunity for innovation. The structure of the course prompted us to use the parameters set and essentially work through things, which allowed us to learn even more. This style of teaching could go one of two ways. The class could be way to lose, which causes confusion and lack of understanding of expectations. Or it could be how this course went and really give students the opportunity to explore, fail, plan, and execute on an idea.

This course further enhanced some fabrication skills I already have and taught me some fairly new ones as well. As an industrial designer I’m constantly doing project and solving problems. Design thinking, user centered design, empathic design are all things this course subtly hinted in throughout the semester. The workshops enabled us to gain new skills and learn processes. Many of, if not all the guest speakers, provided meaningful insight throughout the semester as well. There are so many takeaways from this class.

Solestice

I was partnered with two bright young women from the college of business. I couldn’t have asked for a better team. We had a great dynamic and right away knew what we wanted to do for the remainder of the semester project.Through the many conducted interviews and mentors stories we gravitated towards Jenna. She shared with us the story of a time where she slipped on ice immediately after exiting her car. This happened all because she can’t wear boots due to the heavy nature of them. This prevents users like Jenna  and other prosthetic users from wearing them as their residual limbs are not strong enough to carry the amount of weight the boot has. This is where Solstice was birthed. We aimed to figure out a way for Jenna to increase traction without adding adding additional weight to her shoes. Our main goal was To create an attachable, lightweight shoe tread that can be used to travel in a variety of terrains.

Low Fidelity Prototype

My group and I brainstormed countless times trying to figure out how to make this idea into a real thing. We’d sketch  ideas and somehow came up with the thought of incorporating spikes ( like in track shoes) it would help with traction. Unfortunately after creating a low fidelity we realized that our user may be required to take said device off when walking indoors. We also wanted to make it as easy to use as possible, while providing a comfortable fit we thought to use velcro. This set us up perfectly to further ideate on this idea and create our very own functioning prototype at the makeathon.

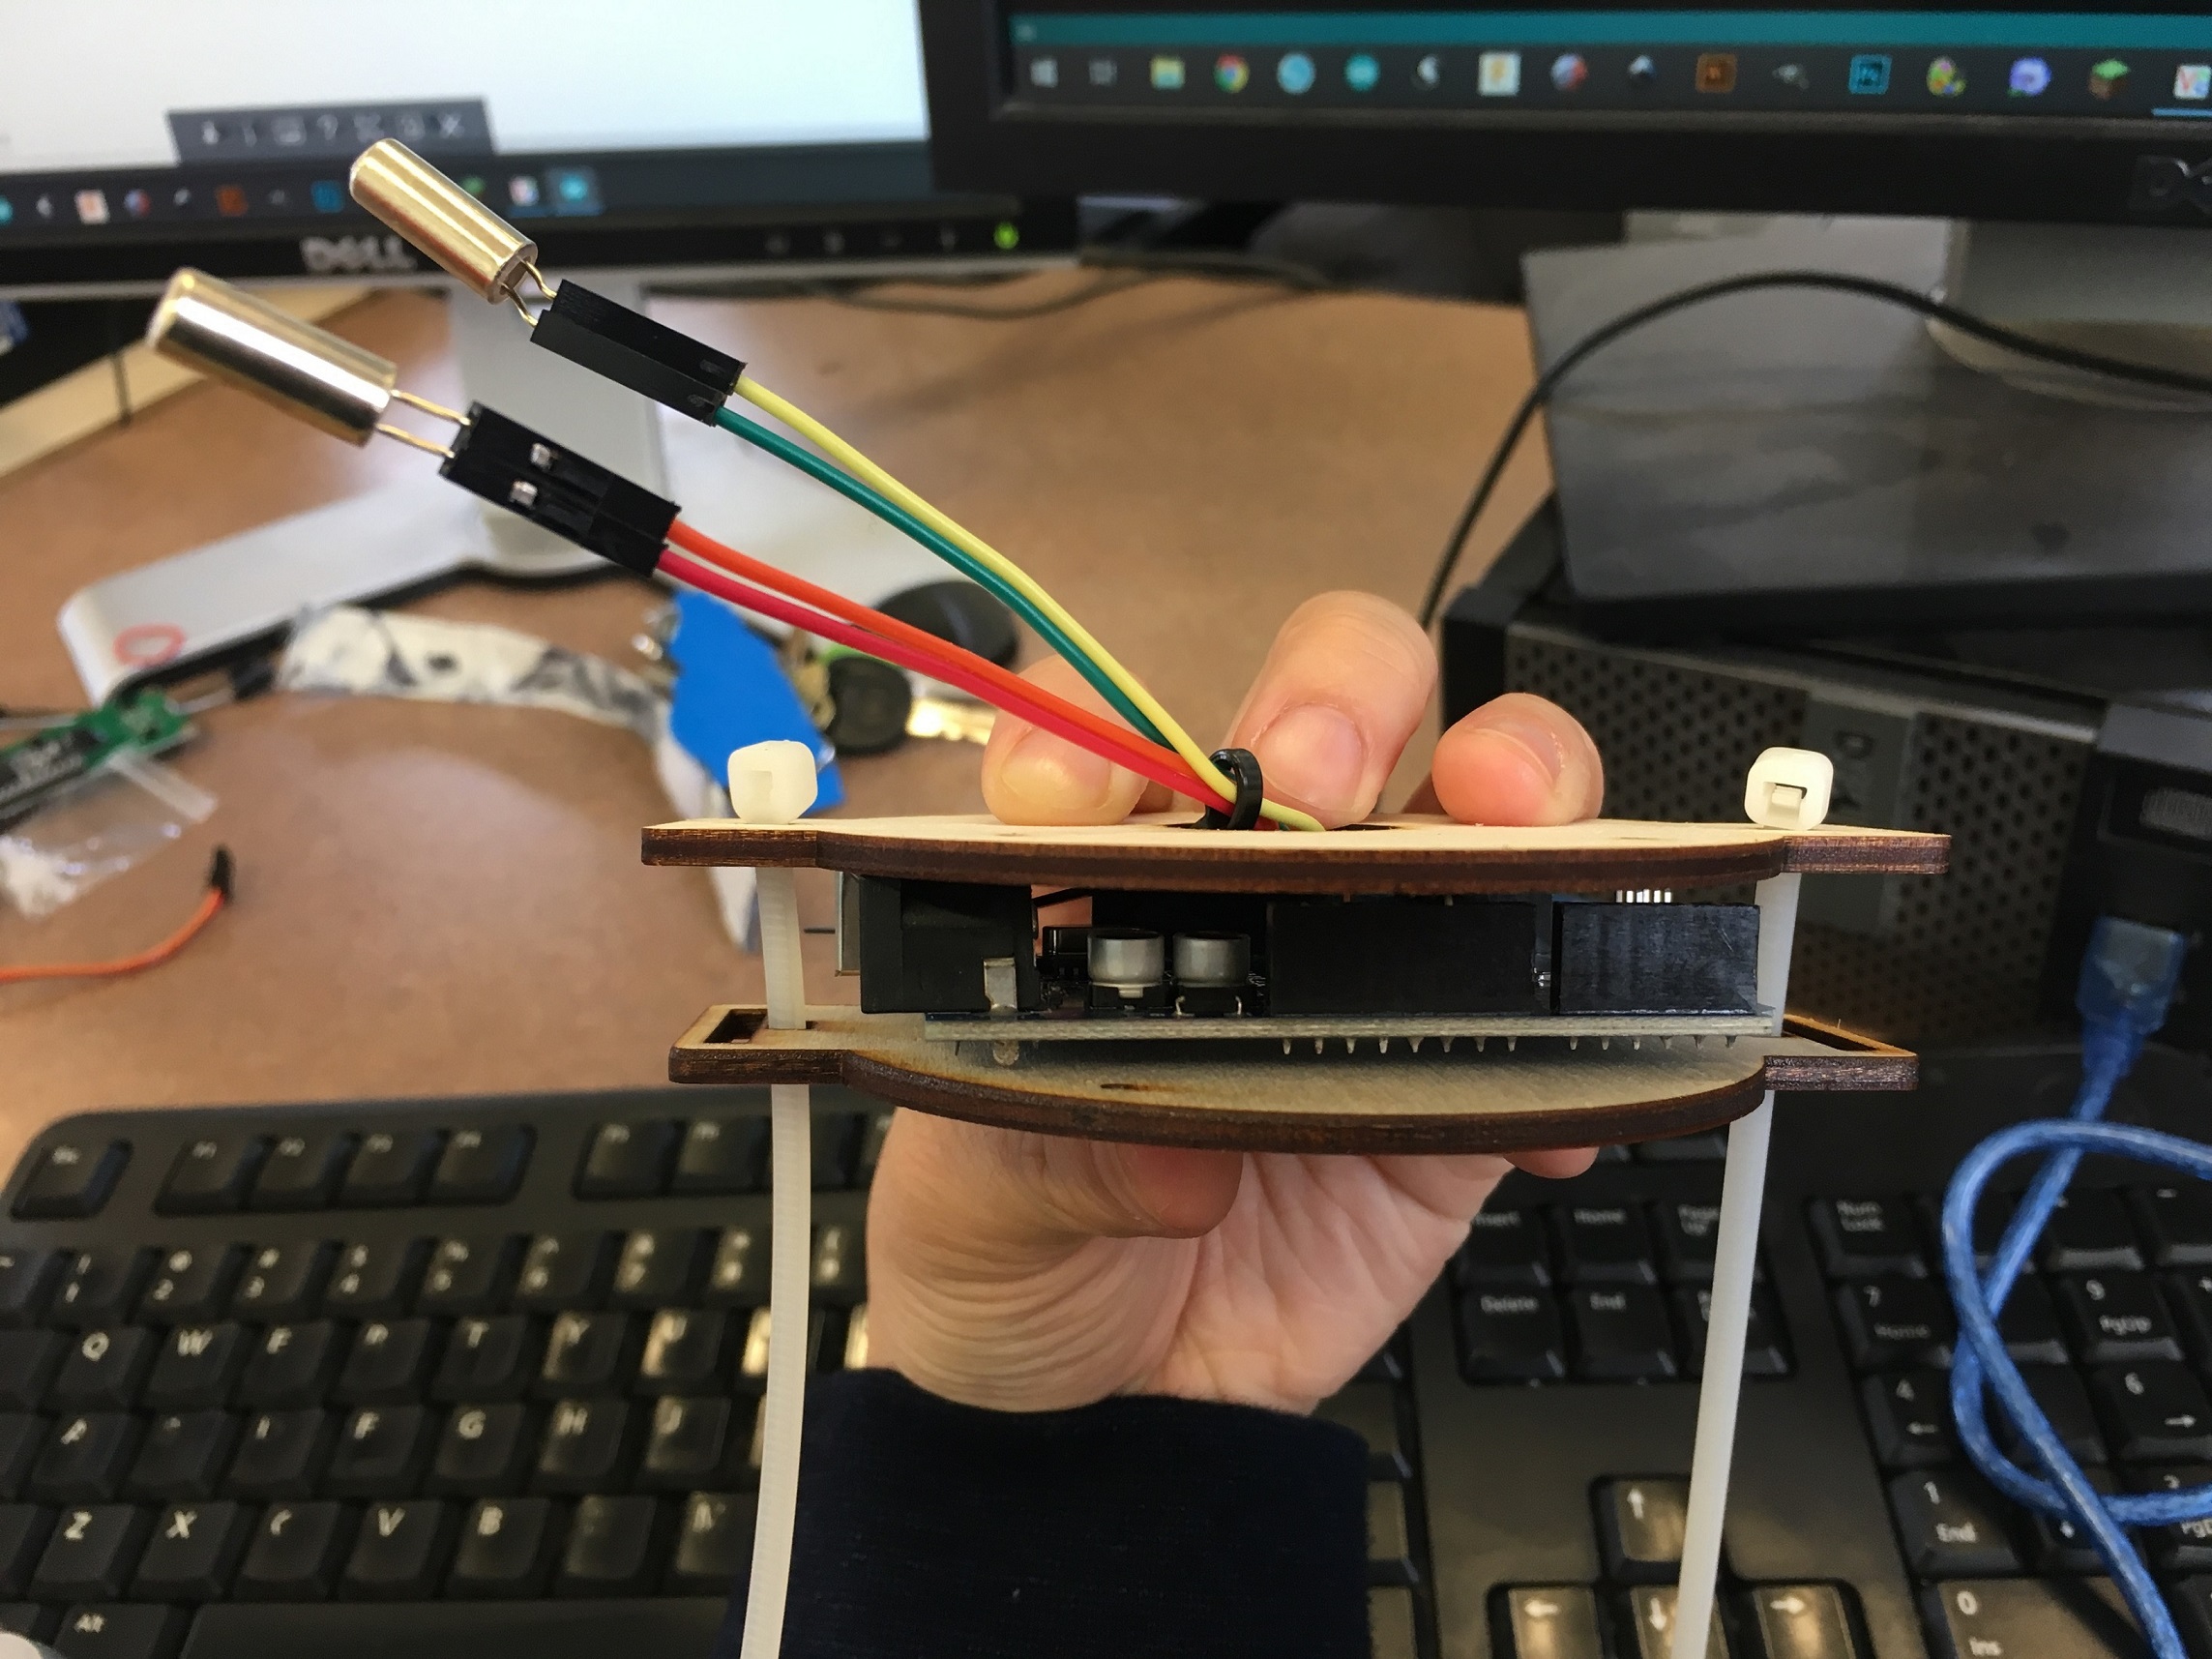
At the Make-a-thon itself team Solstice focused on three main components of creating this product:  Arduino, molding, and attaching. The arduino portion was super cool and challenging. It was my first time coding and working with circuitry. Essentially this would add a unique tech factor to our tread that would allow users to have a sense of force feedback. From research we found prosthetic users have issues shifting weight which can lead to gaits abnormalities. This small pressure sensor would give them that data and in term help prevent this from happening. The design itself was fairly simple. We coded an Arduino Uno to illuminate LED lights that indicated pressure being applied. To create the pressure sensor, we sandwiched a piece of foam with two pieces of copper. Ideally, we wanted for there to be three lights, each indicating where the user is putting pressure on the tread. This would enable the user to ensure they are putting enough weight on their prosthetic to maximize stability.

In terms of creating the tread it we wanted to use a molding compound. This would allow for a lightweight thread, but ensure a grip tread form that resembles that of your regular high traction shoe. We created a mold of a shoe outsole. During this process, we coated the shoe in baby powder and mixed the molding compound to a viscosity similar to pancake mix. We held the shoe down until the mold dried. Following, we used a hot glue gun to fill in the mold with thermoplastic material. After the mold was completely filled, we used a heat gun to smooth the top of the sole, making sure the edges were slightly taller than the inside of the sole. The thermoplastic material we used was similar to silicone and, per our research, is a material that creates enough friction to prevent falling on ice.

For the sake of time and resources we opted to utilize velcro for our attaching method. It wasn’t the worst choice but also wasn’t the best as it came with its own constraints.

Overall I really did enjoy this course. From the challenging nature of it to its looseness it was a great experience. I got to learn new and exciting skills. I got to meet some amazing people. Most of all I got to make something with newly found campus wide resources. I’ve really grown as a individual because of this course. I find myself a better teammate. The collaborative portion of this course really ties teams together and promotes all hands. Hopefully you’ll see a team Solstice sole on the market. We really did nurture this product and can’t wait to see it reach its full potential. Never stop making!


Team 3: Project Reflection

Introduction:

Welcome to Vizallo! Throughout the semester, we built silicone cover solutions to prevent water from damaging electronics in power wheelchairs. We are a team of 4, comprised of 2 technical business students, a computer science major and a very talented industrial designer.

Ryan’s Story:

Our journey began when we were introduced to Ryan, a recent UIUC graduate and a power wheelchair user himself. We heard unbelievable stories of his multi-thousand-dollar machine simply powering off in the rain because of circuit leakage – and we could not believe it. Ryan resorted to literally using a Ziploc bag to protect the electronics to avoid being stuck helplessly in the rain, banking on kind pedestrians to assist him in getting under a roof. It didn’t take us long to commit to embarking on this semester-long design challenge and trying to help Ryan find a sustainable way to stay dry in the rain.  

Research:

We first decided to look into the market to identify the different options that are available for the purpose of protecting the electronics on the power wheelchair. Although there are several brands with the offerings, most of the options available apply the same concept. They look like a little quarantine tent, where the user would insert his or her hand into to operate the joystick of the power wheelchair.

We realized that these types of covers have many flaws and thus, a big space for us to make improvements on. For example, there are many complaints about the product not being able to hold against heavy rain. It could successfully prevent light drizzles from entering through but under heavy rain, the water could still enter through, thus failing to provide its primary purpose of protecting the electronics of the power wheelchair from the weather. Additionally, because the products are so big and bulky, the users always take them off when it is not raining outside. This means that the users often forget to bring the products with them or get caught in the rain by surprise without having access to them. Furthermore, the designs of the products are not appealing to the users, discouraging them from continuous use.

Design Process:

The design process was not easy. To create what seemed to be a simple solution, such as using an umbrella, was not beneficial for our user. This is when we really became challenged by the design prompt. We came up with extreme ideas from protectant fields to very simple ideas such as utilizing saran wrap. After talking with Ryan about his desire to ride in a Ferrari, our perspective changed and we realized that in order to design something effective, we had to thoroughly consider the user. Coming to this awareness really enabled us to focus on the actual problem, which is to protect the joystick. Although we thought of coming up with solutions that will protect the entire chair from the rain or even his hand, in order to design effectively, we had to consider how every aspect of our design was going to affect Ryan.

After gaining an understanding of what is available on the market, we decided to poke around other protective covers to gain inspiration for our product. We did not limit ourselves to the power wheelchair related products and looked far beyond. For example, we looked into baby strollers and convertible cars to gain inspiration for the “armadillo-style” protective cover. We even looked at phone cases to come up with an idea of a “perfect-fit skin” for the arm of the power wheelchair.

Our goal was simple: create a product that is easy and effective. Since we could not exactly predict the other weather conditions that may come with rainfall such as wind, we had to simplify some of our ideas. This is when the phone case idea provided major inspiration. The phone case is an everyday product that is not only practical but also customizable. Those are two characteristics that we did not notice in other power wheelchair protective covers available on the market. So from there, our goal was to create a product that serves as a skin cover for the joystick, thus allowing it to be mobile, simple, and provide a room to add customization.

Make-A-Thon:

Leading up to the Make-A-Thon, we spent most of our time brainstorming. Going into the Make-A-Thon, we had a solid idea of what we wanted to produce but we weren’t quite sure of the process. Our first step involved creating a mold of the joystick. Since we did not get to scanning and 3D-printing the actual joystick until weeks later, we created a model of a joystick out of styrofoam. After this stage, we were again, unsure of our next steps, and so we tried to develop a prototype that incorporated everyone’s ideas.

We decided to develop on the sleeve cover idea, for which, we tried out the heat gun. The goal was to use heat in some way to get the plastic to shrink to the form of the joystick prototype. Unfortunately, this was not very successful. Some of the plastic and styrofoam melted and the rest refused to stick to the prototype. However, what we did discover was that the plastic, when heated would stick to itself. Therefore, after we came up with another idea, which was to cut the fabric into pieces and piece the pieces together with hot glue, we utilized the heat gun to seal the seams.

While looking for inspiration, we also ran into covers/skins with texture such as the one on game controllers. This inspired us to make grips out of moldable plastic that we then added to our prototype for additional support when the joystick gets slippery. The overall process worked out great and after we added a couple of details, we were done with the prototype for the Make-A-Thon.

Post-Make-A-Thon:

After the Make-A-Thon, we continued to work on the next version of the prototype, which would be closer to what we would hope to put on the market. In order to make the prototype more accurate, we scanned the joystick of Ryan’s power wheelchair, with which we 3D printed the mold. Unfortunately, due to the size of the arm of the power wheelchair, we had to scale the mold down and only focus on the part with the joystick to serve as a demonstration. With the scan of the arm of the power wheelchair, we used Meshmixer to isolate the part with the joystick. We also used the software to fill any gaps from the scan.

The file was then transferred to Fusion 360, where the mold is designed based on the scan. Our idea is that we have a base of the mold with the scanned joystick, which will be enclosed by the top that has a slightly larger negative image of the joystick. Therefore, when the top encloses the base, there will be a slight gap between the base and the top, through which silicon will be inserted to produce the sleeve cover. We were unable to try the silicon injection but we were able to successfully print out the top and the base of the mold.

Next Steps/Testing:

Although the semester wrapped up and the project ended, we decided to share what we have planned on doing further if we were to have more time. For example, we planned on performing more user testing. This will allow us to gain perspectives from the other power wheelchair users and also test the scalability of the product by having them give us feedback. This will also give us valuable insight into the user interface/user experience process of putting on and removing the silicone cover. Since certain users may have less dexterity function than Ryan, we must ensure that we can accommodate everyone.

Next, once we have validated with a broader range of users, we would look into manufacturing the silicone cover at a slightly larger scale. However, we will probably only leverage the database we would have built up from working one on one with the other power wheelchair users. Nonetheless, since there is such a limited amount of power wheelchair manufacturers, this would help us cover a substantial part of the market.

Ultimately, we would look to encompass the rest of the market through more one-on-one testing and database logging or try to leverage the OEMs and use their molds directly from the production line. This is where the large scale manufacturing and distribution comes into play, otherwise known as our moonshot.

This is an enormous industry as a whole. According to Smart Chair, the power wheelchair market alone was valued at $3.9 billion. This is a large market which can be easily infiltrated due to the staggeringly low amount of wheelchair manufacturers that exist. According to IBIS World, there are only 21 wheelchair manufacturers in the US, and it is likely that not all of them make power wheelchairs.

Hence why we justified growing a digital database one-by-one based on individual user testing. Since there is a maximum of 21 different models which we would need to model and manufacture for, hustling and meeting users of each type is not completely out of the question. The manufacturer concentration in this market actually plays heavily to our long-term advantage.

The final presentation for my team can be found here: Team 3 Final Presentation.

The Journey Continues…

Thinking back to the time when I was applying to be a part of the course, I realized how far I have come since then. I remember being excited yet nervous about taking the course. As someone who lacked self-confidence in my own technical abilities, I was looking forward to learning different skills, such as using a 3D designing tool and 3D printing a product. However, I was nervous that I would fall behind. You can see how nervous I was from the post I wrote in the past. Little did I know then that I would be spending hours taking a lead in cleaning up 3D scans and printing them for the team by the end of the semester.

Before the course began, I didn’t know what to expect from it. All I wanted was to gain more technical skills that I can continue to use even when the course wrapped up. However, I quickly came to realize that the course provided far more than the hard, technical skills.

Upon hearing the stories of the mentors, I realized that the course is very unique in the sense that it has many opportunities to leave an impact on society. That’s when I began to develop my desire to do something more than simply developing technical skills. Even if I could not complete an idea by the end of the semester, I wanted to leave an idea behind that other people can be inspired by.

Since the course had a main focus on developing ideas around the subject of accessibility, it was critical for us to understand the process of designing and developing prototypes. This was when I learned about the term “design thinking” or “human-centered design.” I realized that this idea can be applied to everywhere in any profession, not just in the space of designing. By constantly keeping the customers/clients in mind and being open to their feedback, you have the best chance of providing something for their needs. This is one of the most valuable ideas that I learned from the course.

As we continued to learn about different skills and qualities necessary to be successful at developing ideas, such as failing early and often, we began to learn the technical skills that I was looking to learn as well. Unlike my worries, I was able to absorb the information quickly and even take a step beyond what was taught in the course.

I remember the first time watching the 3D printers at work in awe as my work on the computer came to life in a tangible form. Although I have always wanted to try it before, due to the lack of confidence, I kept on convincing myself that I don’t know how to do it, so I never have until this point. This class allowed me to break the barrier and become comfortable with the idea of exploring the unknown.

In addition to the 3D designing and printing programs such as Fusion 360 and Ultimaker Cura, I also learned other skills that I did not expect, such as using Inkspace, laser cutting, sewing machine, and Arduino. I also discovered Fablab and its resources, which I am interested in exploring further in the future. I did not realize that we had access to such resources nearby and I am grateful to have met even more amazing people who are ready to help with anything within their capabilities.

The real fun began when I was able to apply these skills to develop my own idea with the team. We faced many challenges throughout the semester from trying to figure out the opportunity we wanted to pursue to making advances in the prototypes. However, we continued to push through and persevered in the end.

Through the Make-a-thon and a couple of weeks after the event, we were able to develop on the prototypes rapidly. It was amazing to see how quickly we were able to make advancements during these three weeks. I was even more surprised to discover how much I could do with Fusion 360 and Meshmixer to 3D print the scan. This experience built my confidence in my abilities to learn and apply the technical skills.

Wrapping up the project, I cannot believe how much I learned from the course. Not only have I gained more technical skills than I expected, but I also learned about different ways to interact with people of varying needs and mindsets. It was also very exciting to be able to see other people’s passion and to watch their ideas become tangible products. I never considered myself an innovator and did not think that I would have an opportunity to work with people of varying backgrounds to develop on a new idea, but this experience demonstrated to me that I have what it takes and I just need to dive into it, past the self-doubt stage. This course has really allowed me to build the self-confidence and passion that I need to pursue after different opportunities beyond my comfort zone. Not only am I excited to see where this experience will lead me to, but I am also looking forward to seeing everyone else continue to grow and reach their dreams!

Thanks everyone for such a wonderful semester! Also a big shoutout to the mentors and judges who provided so much valuable inputs and feedback!

A Designed Journey

EXPECTATIONS.

In terms of expectations for the course, I thought that there would be a lot more tool training and 3D printing involved. Instead, our time was split evenly between team prototyping and tool training. While I knew about the prototyping project, it was both less structured than I expected and more involved than I thought it was going to be. On one hand, we were given the guiding information and assignments to go about prototyping our ideas, but on the other hand, a lot of the initiative was left to our own self to start conducting outside research and interviews, start tool practice and learning, and start networking and testing our prototype.  I had honestly expected the course to “hold our hands” a little bit more than they did, but I am very glad that it did not. In the end, I was able to learn more about the way that I tackle large projects without much guidance as well as learn more about design thinking and the prototyping process. Before, startups were a bit of a mystery to me, a buzzword many people use in business talks, but going through the prototyping process helped me truly understand what a startup does and how difficult that process is.

Another aspect I had not expected was how closely we worked with DRES. I had expected a course about digital making, especially a course housed within the Gies College of Business, to be more bottom line focused in their innovation themes, but the accessibility work and disabilities focus we had in class was a nice surprise. Having done some disabilities advocacy – albeit more on the mental health side rather than the physical disabilities side – before, being able to work in this field put me a little more at ease. It was incredible to see the real impact that our prototypes had on real people at the end of the course.

Group Interview at DRES with our mentors

To see a more in-depth break-down of what the first few weeks of class were like, read the following blog posts:

COMMUNITY + OPEN SOURCE RESOURCES.

It was really cool to be able to learn how to use a multitude of new programs within this class; the program I was most excited about learning was Autodesk’s Fusion 360. My brother took a 3D printing class our senior year of high school, and I was always fascinated by the projects he brought home to show our family. As a result, I was both anxiously anticipating and incredibly excited to work with 3D modelling for the first time during this seminar. Upon completing Lars Christensen’s Fusion 360 tutorial that we used to familiarize ourselves with the Fusion 360 program, I felt really accomplished and inspired to explore 3D modelling further.

Left: 3D printed phone holder, Right, from top to bottom: Fusion 360 file for phone holder, 3D printed box from Lars Christensen’s tutorial, 3D printing in process of Solestice logo

It was around the completion of our introduction to Fusion 360 that we were introduced to a community resource on campus: the Champaign-Urbana Community Fab Lab. For such a compact space, the amount of resources available there was incredible! I was so surprised that we had so many resources available to us as members of the Champaign-Urbana community, and yet, not many people knew of these resources. One of my goals after this class is definitely to let more people know about the plethora of resources we have available to us here in CU. During our three weeks at the CU Fab Lab, we completed a culmination project which taught us how to use Inkscape, an open source vector program similar to Adobe Photoshop or Illustrator, to create laser engraving files; create code and build Arduino programs and other electrical configurations; and use a sewing machine on various types of textiles. Overall, it was a really cool experience that allowed me to familiarize myself with new tools and gain new ideas on what types of innovation could be used to help me create my prototype.

Upper row, from left to right: Sewn watch strap, laser cut & engraved watch face, in-progress watch assembling, Arduino electrical component; Lower row, from left to right: Arduino code, finished exercise watch

For more detail on what the tool training experience was like for me, feel free to reference the following blog posts:

PROTOTYPING.

As part of the prototyping process, we went through many different concepts related to design thinking. First, we learned about human centered design and empathetic design, which really appealed to me. Before, I thought that innovation and prototyping design was only for the random moments of inspiration where someone looks at a problem and is struck by the inspiration to find a solution to it in order to make money. However, we were taught that wording is another important aspect of designing and that we should think of our prototypes not as “solutions to problems” but “ideas for to fill an opportunity,” something that we can use to help people with. We also learned about diverging during the brainstorming process and then converging back upon a decided path to take a prototype idea. Through this process, I was confronted with my indecisive nature. Although I had subconsciously known this, I had not realized why I was so indecisive. Yet, during the prototyping process, I realized that I was indecisive because I feared the failure of arriving at the wrong answer. I disliked choosing a path, preferring inaction over actively choosing wrong. Taking this course has really helped me realize that about myself, and I now try to challenge myself in my daily living to make quicker decisions, to choose a path rather than being crippled into inaction. I am learning to trust my instincts and gut feelings a little more than I did before.

One example of this was the iterations that lead to the drastic changed between our (Team Solestice’s) low fidelity prototype, our Make-a-thon prototype, and our post-testing prototype. In the first prototype, we were thinking of using metal spikes as a source of traction, and we committed to the idea. However, upon further research, before we even got to the Make-a-thon event, we realized that it was not feasible, that it would be even more of a problem for a user to have to take the tread off and put it back on every time they switched between walking outdoors to indoors and vice versa. And here we thought we had the correct idea. Yet, after we tested our prototype with a prosthetic leg user, post-Make-a-thon, we realized once again an opportunity for change. We realized that the tread was too heavy and the Velcro too visible. So, we switched gears once again to look at being able to apply the tread directly to a shoe. So, it was through this course, our prototyping project specifically, that I understood an opportunity for myself to learn to face failure head on, to learn to be okay with the fear of failure, and to keep working, regardless.

Left: Post-Testing Prototype (3rd), Upper Right, Low Fidelity Prototype (1st), Lower Right: Make-a-thon Prototype (2nd)

For more details about the preparation I undertook with my team for the Make-a-thon event, take a look at the following blog posts:

This course has taught me so much, not only about the different innovation tools available in the market right now, but also about myself. I have grown not just in marketable skills, but also as a person, and for that, I am incredibly thankful that I took a chance, braced myself for failure, and applied to be a part of this course.