This week we got an introduction to the Make-a-thon. The participants of this event go beyond our Digital Making seminar course. Its expanded to Industrial design students from Dr. Deana McDonagh and Jim Kendall’s course, as well as students from Jeff Ginger’s Makerspace. This pre-event to the actual Make-a-thon gave us a general overview of what was going to take place leading up to the weekend long event. Later during the session there was a panel of a few returning experts and a few new ones. Some new faces were Isaac, John, and Steve. They all spoke about their disabilities and the daily frustrations they face. The panel even discussed some of the unique ways they’ve adapted to make the best of their situations.
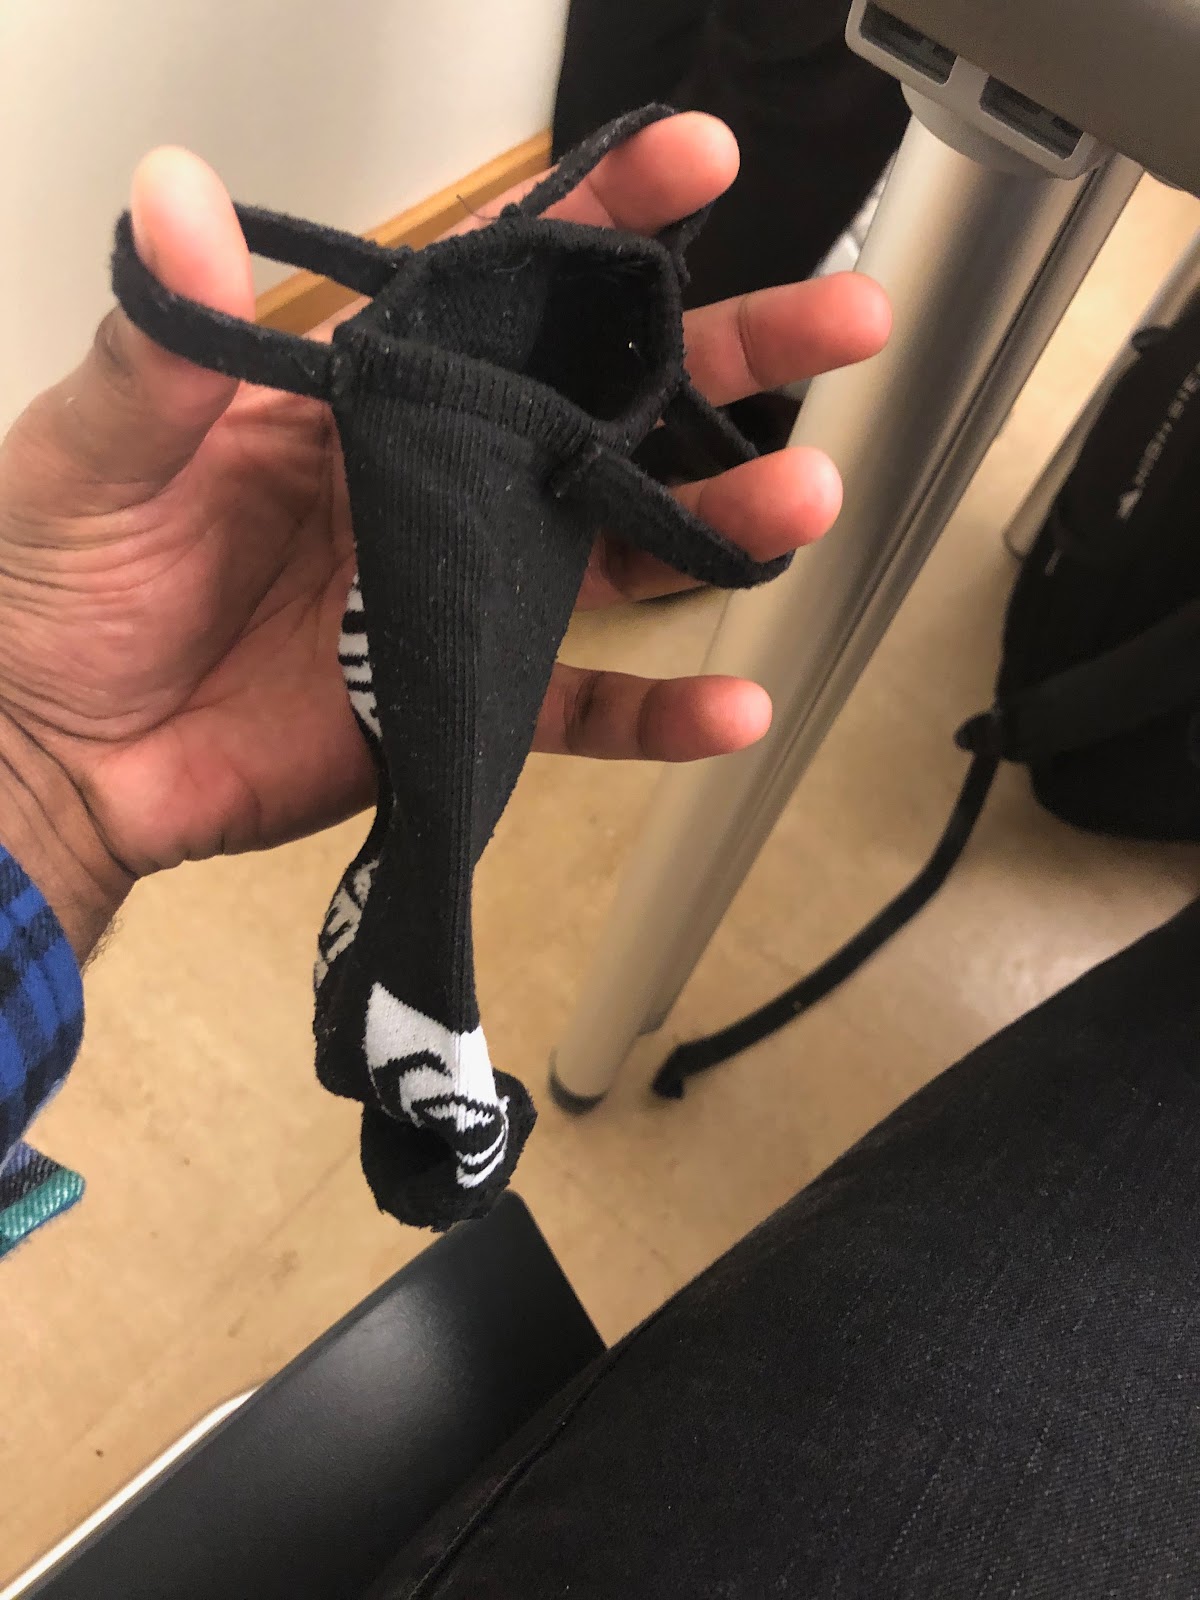
John’s sock with three attached loops Joh’s sock with three attached loops
Above is an image of one of John’s sock. I thought this was so simple, yet very effective. Apart of John’s condition is very minimal grip strength. So task like putting on socks or buttoning a shirt is difficult to him. A simple life hack he came up with was sewing loops on the outer edge of his sock, which he can fit around his fingers and pull on the sock. It crazy to think this is all it took and it making a huge difference.
Steve from the panel also gave us an overview of Clark Lindsey, which is a premier retirement community for today’s accomplished adults. From the presentation he gave I found there to be quite some opportunity in this specific sector. He put a heavy emphasis on fall prevention. Maybe we can design some sort of new innovative thing around this opportunity.
The last part of the Make-a-thon pre-event was a social portion. This time was for everyone to meet and talk amongst each other. Since we’ve been working on our project for sometime used this portion to to talk with some of the new experts and students to see if any wanted to get involved. We did meet a potential new team member from Jeff’s makerspace seminar. She seemed very interested in what it was Solestice is trying to do. After this It really just turned into a team meeting where we mapped out what we needed to from the session up until the Make-a-thon itself.
This week we returned to the FabLab. We continued to familiarize ourselves with all the tools and tech the lab has to offer. We specifically learned a vector editing software called Inkscape. Through this workshop we learned how to create basic shapes, manipulate them, and produce more. After learning the basics of the software we learned to transform images into vector graphics. These skills were then applied to a customized watch. The watch is a device that allows patients who have to do bicep curls and rotation in wrist during rehabilitation. The base of the watch consist of 3 wooden circles, two of which have rectangles on each side. I thought it would be help patients if the watch had small arrow indications of which way the device goes. The top layer rotates, so I designed an arrow pointing in the direction of proper rotation.
3 layered watch with electrical components
After this we moved into sewing. Unlike most of my peers I have experienced sewing. My sophomore year I sewed a jacket with a sleeping bag attachment completely from scratch. So during the tutorials and walkthroughs I was a couple steps ahead. We all picked the fabrics we wanted our wristband for the watch to be and then cut it to scale. We sew it right sice in and sewed the seam. This created the sort of sack like appearance of the band. Getting it right side out was a hassle, it required us to use these thin wooden rods to pull the fabric through. We finished up by attaching velcro strips to the band to ensure a comfortable and secure fit to the wrist.
Images showcasing the process of sewing and creating the band for the watch
The second half of class each group presented to Milestone Labs and Adam Bleakney. We’ve made a lot of progress since last speaking with them. We got a lot of insight from this conversation. We realized we hadn’t thought everything thoroughly. Our design is solid but we have to really hone in on the attachment aspect of it. The overall ease of use should be convenient for the user. They also asked a lot of questions regarding materials of our device. We are currently scheduling a time to interview a material science professor here at the university. This week I have scheduled a virtual interview with my physical therapy. We also have a meeting this monday with my professor who handmakes shoes. We plan to do a bunch more research structured around our opportunity and project idea.
This week, we continued with our learning at the Fab Lab. Instead of working on the motion-sensing watch like last week, I got to work on a circuit and learn how to use a multimeter. Playing around with the circuit reminded me of my elementary school days when I got to tinker around with the flashlight kit and a mini motor car kit in a science class. Though I did not understand the details during then, I still enjoyed trying various configurations to see which one lights up the bulb and runs the motor and which one does not. With the good memory in my mind, I had fun with the breadboard, resistors, and multimeter, trying to figure out how much of a difference each type of a resistor made to the brightness of the bulb.
A circuit with resistors, lightign up the bulb dimly
A circuit without a resistor, lighting up the bulb brightly
After playing around with the circuit, we were very briefly introduced to Arduino and its capability. Although this technology is probably not what our project group would use, it was interesting to think how such a small component can have so much computing power.
Example of how an Arduino is used for a motion sensing watch
Top view of the motion sensing watch
Team Rotam Project Ideas
We also got to meet and receive feedback from the Milestone Labs on our idea of the project. They recommended that we look into different materials that would allow our product to protect the joystick of the power wheelchair. For example, they suggested that we look into the scuba diving suits, which I did not even think of. After hearing the recommendation, it seemed so obvious to me that I should have thought about this before, but while brainstorming, it never came to my mind. That recommendation, however, sparked few ideas of my own, such as looking into the materials of umbrellas. Upcoming week, my team is planning on looking more into what is available in the market for the purpose of protecting the joystick of the power chair as well as different types of materials that could be used to protect it from the water.
After receiving the feedback, the team got together to brainstorm further on our ideas. Last time, we were focusing on additional parts that can be added to the wheelchair to serve the purpose of protecting the joystick, but this time, we focused on how we may be able to make our product be applied to different types of power chairs and not just that of Ryan’s. One idea that we came up with was a DIY molding package. We were thinking that if we could provide a DIY molding package to the users, they can customize the part on their own, ensuring that not only will it fit their power chair, but they could add personal touches and additional comfortability with grooves on the mold and so on.
Outside of the Class
Outside of the class, I managed to find time to go back to the lab to laser cut my own face of the motion sensing watch. While designing this face, I was thinking ‘simple is the best,’ which is how I came up with the design below. I hoped to design the face in a way that it would be very simple and easy for the user to understand it.
Completed face of the motion sensing watch
Though this face makes clear sense to me as a designer, I am wondering how different people would perceive it. This thought made me realize how challenging designing is, which is why human-centered designing is crucial. Through the constant feedback from the users, the designer can ensure that the end product would be easily used by the users for the purpose that they are looking for. This is something that my team will constantly keep in our mind as we proceed with the project.
While using the laser cutter, I was curious as to what else the device is used for. I discovered that this technology can be used not just on wood but also on other materials, such as glass and acrylic as demonstrated by various objects shown here. It was also interesting to find out that there are various ways to use the machine, such as cutting, engraving, and vector etching, which are explained here. Looking through images of different things that this machine is used for, it amazes me how much of a detail that this machine can handle.
This week, we had a fun and interactive session at Fab lab.
At the first half of the class, we were divided into two groups: one group learned laser cutting, and the other group worked with the circuit. Next week, the two groups are going to switch so that every student can study all the skills. I joined the circuit group for this week. Although I have some experience with the circuit in my high school, I haven’t touched it since my freshman year, so it was a relearning process for me. Previously, when I connected items, I always used soldering. This time, the process was less messy; we used electrical insulation paper instead. The output was pretty cool; when the orientation shifted between horizontal and vertical, the lightbulb would turn on and off.
The circuit
In the second half of the session, we were broken into research groups and developed further with our ideation. Since we have come across three themes from the last class, we drew our ideas down visually in this week’s lesson. While we brainstormed, the TA instructed us to consider different situations and how our designs would be altered depending on the circumstances. I regarded this as a handy reflection tool. Before I thought about various users and various occasions, I was envisioning very generally, and this exercise helped me to think of extreme users and consider ways to make the ideas applicable to more users. For instance, for the idea of designing something to assist people in grabbing objects, I initially drew a ring for people’s middle finger to cross. After rethinking how seniors and children would interact with the design, I shifted the model to look like a glove so that it could accommodate people with less strength and they wouldn’t need much physical or mental power to control.
My ideas
After the brainstorming, our group focused on working on one prototype: how to enable people to see what’s behind them. We thought of an object that could stick to the arms of the wheelchair so it could be stable, and then this object could be expanded and adjusted to different heights based on the users’ preferences. When users don’t need it, it could be folded easily to minimize the space it occupies. On top of the object, the users could attach mirrors, phones or tablets to it based on their preferences, and this could let them be able to see what’s behind them.
The prototype for vision
On Sunday, we had an interview with a PA at Beckwith and shared our ideas on different themes and our prototype. He gave us much feedback on how the topics that we discovered were impacting people’s lifes currently, how people were dealing with them, and how he perceived those ideas would apply to the students. We altered our design based on his comments. For instance, for the model to assist people in grabbing objects, he mentioned how some people don’t have strength in their fingers or the fingers may be shaped differently. Thus, we decided to make the glove only cover the palm part of the hand. Also, we realized that the traditional look of the glove might be hard for people to wear themselves. As a result, we designed it to be open at the side with the zipper.
I am Huan Wu, a leadership-oriented undergraduate student studying Accountancy, Supply Chain Management and Information Systems/Information Technology at the University of Illinois at Urbana-Champaign.
I chose to major in those areas because I am a person who likes to learn new knowledge continuously and take on challenges. The challenges bring me excitement, as I enjoy the feeling of using my expertise to tackle hard issues, find insights and initiate change. I believe having an understanding of different fields allows me to have a broader perspective when I look at issues in business. I aim at improving myself and learning skills to initiate change and make real impacts in the world in the future.
My LinkedIn page: https://www.linkedin.com/in/huan-wu-0507/
This week’s class was fun and interactive. We learned more practical tools for 3D printing and worked as a team to brainstorm our research project.
The first two hours were solely on the phone holder model with the software named Fusion 360. Although I have watched the beginner videos in the Fusion websites as well as completed the homework assignment which required building a box before class, I was still not familiar with the software enough to say I could create a model myself without guidance. This has been changed with the tutorial lecture presented by Dan Banach. He was knowledgeable and experienced enough to explain the software techniques with easy to understand language as well as sense and follow-up when people felt not sure. By building the model step by step with explanations on all the features, now I can say I am confident in building simple models by myself. After the class, I adjusted the parameters to make sure the phone holder fit my own phone. I chose a photo that I took at Alaska to be the decal in the front (The public link to my model is here). Seeing models created with my hands through the software and being printed by the 3D printer, I felt a sense of achievement to make something come alive. I started to have a passion for exploring more of the software and have the ambition to build more creative things with models in the future.
The phone holder modelPrinting the model
In the second half of the lecture, we focused on the project. After the third interview on Sunday, our team had a great starting point for the ideation phase. One thing that our team agreed on was the importance of equal accessibility and affordability. We realized that people with disability would like to be able to accomplish many tasks by themselves without assistants’ help. Thus, two of the themes that we found were vision and tools and attachment. We hoped to create something that can help them “see what is behind them” or something that can help them “grab heavy or hard to grab items easier and independently”. I believe those would be interesting areas to explore later because if we could invent something like this, it is possible that it could benefit more people. The last theme we chose was affordability. We agreed that we would like our design to be equal affordable and plan to take cost into consideration in future design. I think we were making great progress for our project and I am looking forward to doing more research to develop our ideas further before we go to prototypes.
I am Huan Wu, a leadership-oriented undergraduate student studying Accountancy, Supply Chain Management and Information Systems/Information Technology at the University of Illinois at Urbana-Champaign.
I chose to major in those areas because I am a person who likes to learn new knowledge continuously and take on challenges. The challenges bring me excitement, as I enjoy the feeling of using my expertise to tackle hard issues, find insights and initiate change. I believe having an understanding of different fields allows me to have a broader perspective when I look at issues in business. I aim at improving myself and learning skills to initiate change and make real impacts in the world in the future.
My LinkedIn page: https://www.linkedin.com/in/huan-wu-0507/
This Wednesday, we participated in a workshop from Autodesk representatives on Fusion 360, an integrated CAD software. We were tasked with creating a phone holder. The representative leading the workshop walked us through the steps to design the phone holder. We are going to print them in the MakerLab later this week. I love this course because we are able to design and create things that we (or others) can actually use. You can see the phone holder I designed here.
Autodesk workshop where we designed phone holders in Fusion 360. The image on the screen is the phone holder we designed.
In addition to designing the basic holder, we also had the opportunity to customize it. We could choose a material, paint colors, add decals, etc. This was my first time utilizing any CAD software, and I really enjoyed it. I thought the Fusion interface was very simple and intuitive. However, I have heard that this is not the case with other CAD softwares. I would love to learn different softwares and see how they differ form each other.
After the workshop, we had about 45 minutes to work with our teams to create “How Might We” statements. We used the post-it notes from last class to help us write them. My team narrowed our work down to 3 “How Might We” statements. These statements are an essential part of the Ideation phase of the design process, so we are testing if our idea to create a tread for prosthetic users will work. This activity challenged us to not be too broad nor too specific. We found it difficult to find a balance. I am looking forward to the next few weeks in the Fab Lab to continue our project!
Hi there! I am a Senior studying Marketing and Information Systems/Information Technology. I chose to take this course in order to expand my creative and design thinking skills that I can apply to my future career. I am grateful that we are provided the opportunity to take this course as Business majors.
This week we were introduced to four guest speakers: Sneha Subramanian from the Illini service dogs, John Hornick author of “ 3D Printing Will Rock the World”, Jeff Ginger from the CU Community Fab lab, and the Illinois Informatics Institute. We began with a brainstorming session with the Illini Service Dogs. We specially were looking at areas of opportunity with improving disabled users independence with service dogs. Ideas bounced around and some really interesting things came from this. After the brainstorming session John Hornick brought so much of the 3D printing industry to our attention. There are so many trends out there, but John emphasised 3 main trends. One of which is that 3D printing spurs innovation, it also increases democratization. Lastly 3D printing is full customizable. I personally really enjoyed all the different innovative projects globally that John mentioned to us.
Jeff from CU community Fab lab gave a very energetic and passionate overview of the lab itself. He told us of all the resources and network we have here on campus. He then went into showing some of his personal projects, all produced at the CU Fablab. He designed this really cool solar power laptop case that charged his laptop. He also created this octopus dongle sort of thing that has every plug in port you could think of. Jeff seems to really be passionate about innovation and I though his overall presentation was inspirational.
After the guest presentation we were given on from our TA Mehmet Aydin on Design Thinking. During his presentation he introduced us to the Design Thinking Modules. You have Inspiration- Ideation- Implementation model. You then have Empathy- Define ( we focus on defining the opportunity from an empathetic standpoint. Then you have Prototype- Test phase. Mehmet also mentioned the idea of diverging, converging and repeating the entire process. You have to just do it. It kind of ties back to last weak guest Mike Henson statement of, “ Fail early, fail often.” The design process is a process of decision making and doing things. You have to ideated on an idea and act on it. Fail and fail and through each failure new innovation ill emerge.
Once Mehmet’s presentation we broke off into our teams to do a “Stories & Experience” exercise. The task of the exercise was for us to look at our interview Q/A and diverge deeper insight from them.We were able to really figure out our users frustrations, emotions, limitations, pretty much the good and bad. Solicestice in particular, was able implement the experiences of the user to create more value with our potential product. It gave us a framework to further structure of customer discovery and validation of the idea itself.
The week we had a guest speaker from a startup here at the University’s research park called Earth Sense. Mike Hansen, an U of I alumni, gave an amazing presentation on his product development journey. He spoke of stories during his Industrial Design graduate days, the failures he had, and pretty much every problem along the way. Being an industrial designer myself, a lot of his experiences resonated with me. He talked about a system of going from 0-1000 in three intervals. Taking an idea from 0 to 1. Once you get the original prototype you go from 1 to 100, with different iterations of that concept. Finally the 100 to 1000, which is the mass production of a product. You can only imagine how many issues and minute things that intervene with this process.
A few Mike said during his presentation that stuck with me were to “ fail early and fail often”. The earlier on you fail, the quicker and easier it will be to make corrections/alterations. The more you fail the better the end result will turn out. Every failure breaches an opportunity for improvement. Which leads to the other quote from Mike, which was “ try again and again until you succeed.” This isn’t limit to product development, but across life. There’s two type of people the quitters and the go getters.
After Mikes presentation we broke into our teams. We had the task of designing a logo and coming up with a team name. Im apart of team one and we’re focusing on a innovative tread for prosthetic users. We came up with the name Solestice. Yes, we spelled it like the sole of a shoe. Which lead to the design of our logo. Its two triangles stack on top of one another, but they are off centered. After getting the tinker file finished we sent it off to the 3D printed and printed it out.
Inspiration continues and shifts toward the ideation phase this week. Starting with a pre-class research plan, we developed the opportunity statement into a complete research plan. We spent a lot of time thinking about the various contacts we could reach to learn more about how to turn our idea of opportunity into a real product. Much more details and research is needed around the areas we have almost no experience in – the life of wearing a prosthetic leg and practicing yoga. We must first confirm that what we learned from Jenna in our first group interview was something actionable. Therefore, we decided to contact Jenna this week, but we just got in contact with her yesterday and had not yet asked her the questions we have in plan. After learning from Jenna, we would like to learn the restrictions in yoga that may prevent our target users from achieving the goal of reaching balance in yoga. Last week, I found a link about the organization that teaches yoga to people with prosthetic legs. If we can get into contact with this organization, I think our learning about yoga and prosthetic legs can be much deeper.
Learning from Failures
This week in class, a guest speaker, Mike Hansen, from EarthSense came to give a presentation on the ideation and creation process of their products. During the presentation, I found a few things that are exceptionally inspiring. He talked about the numerous failures of design models that he had for the camera cap. In this sense, I found that it is extremely important to rapidly try out the ideas in prototypes and not afraid of failures because every failure brings a new lesson learned and allows us to improve the product design. I also found it useful to allow early stage user feedback to improve on the product.
Early stage users of EarthSense product, different things that EarthSense can improve on
First 3D Printed Product – Team Logo
This week in class, we were asked to come up with a team name and logo. As inspired by our team’s opportunity statement, we decided to have a team name that represents a 3D product created for balance, so we named ourselves as 3D Bal, which Bal stands for balance.
3D Printing record: Halfway through printing the entire logo
We used tinkercad.com for the 3D design of the model and added lots of supports before cleaning. Looking at the logo being printed, it feels like a baby is coming to life. Even though this is not the first time I 3D printed an object, the feeling of excitement was still there.
3D Printed logo With Supports
After printing, I cleaned out most of the supports, but there are a few supports in the alphabets “B” and “a” that I was unable to clean out due to their sizes are too small. I am excited about our actual product design.
I am a student who’s currently studying accountancy and management of information systems. I am graduating this year and entering the MAS program at the University of Illinois at Urbana Champaign. I love programming and accountancy as much as I love taking photographs and learning how to play the Rubik’s cube. I love trying out new things and learning new skills. Learning how to make accessible designs utilizing digital making skills is one of the new skills I learned.


You must be logged in to post a comment.