Ideation

This Wednesday, we participated in a workshop from Autodesk representatives on Fusion 360, an integrated CAD software. We were tasked with creating a phone holder. The representative leading the workshop walked us through the steps to design the phone holder. We are going to print them in the MakerLab later this week. I love this course because we are able to design and create things that we (or others) can actually use. You can see the phone holder I designed here.

Autodesk workshop where we designed phone holders in Fusion 360. The image on the screen is the phone holder we designed.

In addition to designing the basic holder, we also had the opportunity to customize it. We could choose a material, paint colors, add decals, etc. This was my first time utilizing any CAD software, and I really enjoyed it. I thought the Fusion interface was very simple and intuitive. However, I have heard that this is not the case with other CAD softwares. I would love to learn different softwares and see how they differ form each other.

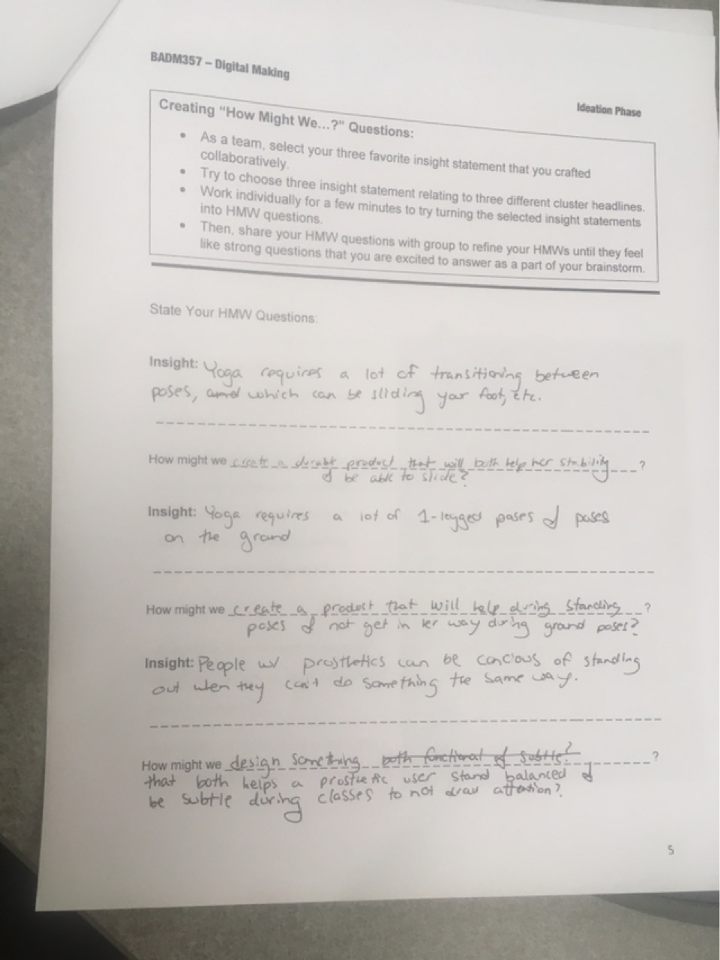
After the workshop, we had about 45 minutes to work with our teams to create “How Might We” statements. We used the post-it notes from last class to help us write them. My team narrowed our work down to 3 “How Might We” statements. These statements are an essential part of the Ideation phase of the design process, so we are testing if our idea to create a tread for prosthetic users will work. This activity challenged us to not be too broad nor too specific. We found it difficult to find a balance. I am looking forward to the next few weeks in the Fab Lab to continue our project!

Week 6 – Learning the Ropes

Fusion 360 Introduction

This week was all about learning how to use the 3D modeling platform Fusion 360 from Autodesk. Our first task was to build the box from this video on our own before class. I had some experience with a 3D modeling software called Sketch Up from a previous class, but I still found my initial pass at building a model in Fusion 360 to be a bit harder than I thought. My biggest problem was not fully understanding the shortcut keys. I had trouble orienting the screen’s viewpoint how I wanted until I learned that holding shift allowed me to move the structure with my trackpad.

In class, we were lucky to have Dan Banach from Autodesk come in and take us through a Fusion 360 tutorial. We were designing a custom-made phone holder. This model was much more complex than the box we originally had to make, but Dan did a great job walking us through it step by step. He also showed us a bunch of really helpful quick key shortcuts that made the making process much more streamlined. Through creating the phone holder we learned how to build shapes, extrude surfaces, measure distances, and change colors and materials of surfaces. In the end, my finished model turned out much better than I thought it would at the start of class. After building the phone holder, we rendered it and exported a file that we could print in the Maker Lab. I went to the Maker Lab on friday to print the phone holder and I am excited to use it when I pick it up on Monday

A rendered version of my Fusion 360 phone holder.

Human Centered Design Activity

After learning how to use Fusion 360, we continued our Human Centered Design activity from last week. First, we reviewed all of the needs that we identified and the groupings we put them in. Our next step was to break down the groupings into “How Might We Statements”. The main focus of these statements was to organize our group’s thoughts and fully identify our direct need. We had some difficulty making our “How Might We Statements” because they could not be too general or specific. Our statements mainly centered around the protection of Jenna’s leg and also giving her more customization and mobility than her current prosthetic covering.

Looking Forward

Overall it was a very informative week and I am excited to start working in the Fab Lab next class!

Learning Fusion360 & How Might We…

This week, we had a presentation from Autodesk Fusion360 to better understand this CAD software and how we can use it throughout this semester to complete our projects. It was really great to have someone in-class be able to talk us through an entire design and learn the software hands-on. Before class, we had an assignment due to familiarize ourselves with the software. With video lectures, you can learn a lot but it is really great to have someone in person be able to troubleshoot any problems you run into and answer your questions. In class, we developed a phone holder with a cord area and a small well for keys. You can see my design here: https://a360.co/2EalDaP as well as the photo below.

Fusion360 phone holder.

I thought the most interesting part of learning Fusion360 was the instructor’s comments on its accessibility. Fusion360 is free for students, which was a very purposeful decision. He noted that some of their clients had a difficult time hiring people with the necessary 3D design skills. Thus, Autodesk made this software free so that there would be more people learning the software and then able to use it in later employment opportunities.

After learning these skills, we returned to the activity we had started last week. This time, we were grouping our ideas into three more tuned “Insight” segments with offshoots. These three groups helped us target our “How Might We” statements. “How Might We” statements help organize the team to get excited about certain ways to create our final solution. Our group focused on the subtlety of the design to not draw too much attention in class, and the functionality of the design to transition through all of the parts of a yoga class. You can see our team’s rough draft below.

How Might We statements for 3D-Bal.

Overall, it was a very productive week and I am excited to be at the FabLab next week to continue learning different tools at our disposal!

Week6: First Touch in Fusion

Fusion 360 – Phone Holder Modeling

Prior to this week’s class, we had a pre-class assignment that introduces us to the Fusion 360. The video we needed to watch guided us, step by step, in creating a box assembly. I followed the steps and created a part of the box assembly. I found that the shapes with the shortcut keys are extremely useful and fast when we are using fusion 360 as compared to the tinkercad.com.

In this week’s class, we had a guest speaker from the Autodesk coming in to teach us how to use fusion 360. We had a hands-on experience of creating 3D models using fusion 360. The guest speaker led us through designing our own cell phone holder step by step. I was very excited about this type of hands-on experience because the hands-on experience is when we can actually learn how to use the different types of software and technology for our project and our future use. I believe that this learning session of 3D modeling will be very useful for our team when we get into the designing and prototyping stage for our project.

Fusion360 3D Modeling & Printing Record

“How might we …” – Question Generation

In the later one-third of the class, we went back to generating insights for our project. We selected three of the major themes that we decided are important in defining our challenge. Then we selected three insights under each theme we identified. According to these insights, we converged to the most important three and formulated a “How might we …” question for each of the insights. All of these questions aggregated together help us define our major challenge and what we need to work toward. I think this activity of design thinking makes us form a better understanding of our intended users as well as the challenge because we were able to brainstorm all the insights we have and aggregate them to form meaningful themes. Through these meaningful themes, we were able to organize what we observed to what we need to solve in reality.

At the end of this design thinking activity, we (our team) come to the conclusion that we need to design a product that will both help the users with prosthetic leg both be able to keep their stability and have the ability to slide. This product needs to help during standing poses (yoga) and not get in the users’ way during the grand poses. Since the product is designing for users with a prosthetic leg, one of the most important ideas is that the users want to look normal and not be different from others. Then designing a product that can both help a prosthetic user stay in balance and be subtle during classes to not draw attention would be extremely important.

Continuing with our project, we will continue to try to reach out to the experts and organizations we found online for the research. We hope to gain more insights to help us generate more ideas and understand our challenge better by continuing with our research. I am also looking forward to learning the tools we have access to and having hands-on experience on the tools in the fab lab starting next week.

Fusion 360 Workshop

This week we focused on the CAD software, specifically Autodesk Fusion 360. Prior to class this week we learned quick shortcuts and the basic fundamental of parametric designing. Dan Banach, education program manager at autodesk, gave an immersive presentation of the world of Fusion 360. He has more than 30 years of Fusion 360 knowledge. He was there from the very start. It all started with a 3D model of a five and quarter sized floppy disk. Dan also simply broke down the ideology of the cloud product innovative software Fusion 360, into three main components: use, design, and make. After his intro  we had the task of going through a tutorial of creating a phone charging stand. This helped us get even more familiar with the functions and capabilities of the software.


Dan Banach during the Fusion 360 Workshop

I myself have some knowledge and previous with CAD. However its with solidworks, which is a lot different from Fusion 360. You have similar capabilities, but solidworks is far more complicated. I like how simplified Fusion makes computer aided design. The shortcuts and keys were super easy to pick up on and the drop down menus house every function. Solidworks took me some time to get a stable grip on. Both softwares are great in their own respective ways. Regardless of which a person chooses you’ll still get a understanding of not only parametrics but design thinking. The software gives you a different method of approaching problems and design decisions. The simplest thing from a curve to the material itself of the product all attribute to the overall product.

My final design and render of the phone charging stand

After the Fusion Workshop ended we were given another on “How to Statements”  from our TA Mehmet Aydin. This activity allowed us to further explore the centralized themes within our ideas. After choosing the top three themes, which we wrote out in concise sentences, we created a how to statement. Essentially staging  a question of how were were going to do some of the things we sought out to solve. Like mentioned in last week’s presentation his is a cycle within the design process. We came to conclusions last week, but this exercise allowed us to revisited, rethink, and revitalize some of those ideas. I feel like now we have a pretty concret grip on the opportunity and the market in which we’re trying to infiltrate.


Fusion

Week 6 took a very exciting turn as we finally delved deeply into creating 3D models in Autodesk Fusion360. Our pre-class activity consisted on making a box-like crate, and we continued getting familiarized with Fusion through further making with Autodesk professionals.

By becoming acquainted with the software, we gained a significantly better understanding on how to approach design challenges with our end user mind. Simple things such as altering the material had an impact which must be accounted for. Lucky for us, color tends to not make as big of a difference – which be a vital factor when we approach our final prototype.

At the end of class, we delved deeper into exploring our project’s themes, insights and guiding questions. We came to the conclusion that we will really need to hone in on how wheelchairs would want to customize their chair. The ability to customize exists, but we need to find out which accessories will bring them the most joy.

Nonetheless, once the design challenge is worked through, we realized that creating awareness about the products will be a huge challenge. A useful or desired accessory is useless if the target users do not know about its existence. Our challenge, became very 2 sided, as merely creating it will not bring the results we desire to see. We will need to effectively market and inform the users about the accessory if we aspire to make a meaningful impact.