Introduction

Nathan Gaertner 
Ryan Kane 
Jae Lee
Hello everybody, we are team Movi! As a group this semester we came together in Professor Vishal’s BADM 357 Digital Making Seminar to combine our individual talents to come to a common goal of trying to make a difference. This semester we paired with Disability Resource and Educations Services (DRES) to work on finding opportunities where we could make a change. This was a phenomenal experience and opportunity for all of us to make a hopefully lasting impact on our community.

Our Mentor: Jenna Fessemyer

Back in the first week of our course, we were happy enough to meet Jenna. Jenna is a current RA at Newman Hall and a senior studying Kinesiology here at the University of Illinois. Jenna has also been using a prosthetic leg her entire life. But oh boy that only fueled her to do more amazing things. Jenna is an avid runner and athlete who just one week ago complete the Boston Marathon. She first sparked our interest when she began to explain her story about her prosthetic leg. In our first meeting, Jenna explained how she has always had trouble walking in the wintery conditions that Champaign Illinois is accustom to for 5 months a year. She went on to explain that even though her prothetic C-leg is worth upwards of $100,000 she is still trained to fall on that leg. With that information, we were baffled to hear that even though her leg is so valuable and she is taught to fall on it in a crisis, there were not many options within the market. After that first day and meeting how amazing of a person Jenna was we were determined to make a difference.
Research
Our group first looked into the market of different prosthetic leg protection types. This helped us brainstorm different ideas and helped us examine the possible impact of our project. We also looked in the different materials and machines that are already available in the market. The first product that we looked into was Jenna’s current leg protection cover, the “Ottobock C-Leg Cover”. This leg protection was very bulky and was not very flexible due to its hard material, silicone. The other protections had a very slim pad of silipos gel. And it only covered the knee portion for Jenna.


Our group quickly realized that these leg protections have a lot of flaws and needed improvement. We were lucky to interview Jenna through this process and Jenna gave us some great insights. First, she told us that the “Ottobock C-Leg cover” can be improved by making the overall product less bulky, especially the back part where all the mechanism is located. Because the leg protection is too bulky in the back, she cannot bend her leg all the backward. With the silipos gel leg protection, Jenna also told us that she does not need protection above her knee. This product will actually hinder her from running and will not actually protect her expensive C-Leg. Lastly, Jenna complained about how the design is too bland. This made her neglect her form using prosthetic leg protections. She wanted to feel special and told us that she will feel more obligated to wear the prosthetic leg if the leg was designed to fit her style.
Prototyping
We thought the design process was going to be easy. However, we were wrong. At first, we went into the process blindly without knowing what our user, Jenna, wants. We tried to come up with our own designs and made prototypes based on the designs we came up with. And we quickly realized that those designs are similar to the volleyball knee pads in the current market. We tried to focus on the knee since it’s the most protruded out portion of the human anatomy. And we assumed that is the portion that needs the most protection. But after our meeting with Jenna, we quickly realized that this design challenge is much different than we first anticipated. We were testing our prototypes for the wrong user and we quickly scrapped the first prototypes.


Jenna showed us her C-Leg model and told us a few key points she wants in her design. She did not like the connection going around the back of her knee, because there is a lot of mechanisms that should not be disturbed. And she does not need any protection above her knee due to it limiting her movement. She also does not need bulky protection around her knee, because she only wants to protect her C-Leg since it’s a hundred thousand dollars. She also wanted the protection to cover her top and the side portion of the C-Leg. This is where most contact happens when Jenna falls on her C-Leg. Lastly, Jenna wanted the prosthetic leg protection to be able to easily attach and detach to her C-Leg.


With Jenna’s amazing insights and understanding of the market, we started brainstorming some ideations. We decided to make the straps come behind the leg protection, but it will not be in the way of the C-Leg mechanisms. Then we decided to use a hinge to easily attach and detach the prosthetic leg protection. With these insights in mind, we made two separate prototypes that illustrate our thought process. Now the C-Leg protection will protect the top and side part of the C-Leg and will not go all the way around the back of the C-Leg. This will make the overall design less bulky. Then the design will have a hinge for easy attach and detachment. Finally, the design cover can be customizable according to the user’s needs.


Overall, we wanted our product to be simple and slim compared to the old “Ottobock C-Leg cover”. Since we cannot have Jenna fall over every single time we make a new prototype, we needed to constantly ask her for improvements and refinements of the prototypes. I think the shin guard gave us a lot of inspiration. She shin guard only protects the shin and the side parts of the leg. So, we tried to follow it’s mechanism, but also fit the C-Leg. And most importantly, we wanted to create a protection that can be customizable according to the user’s preference.
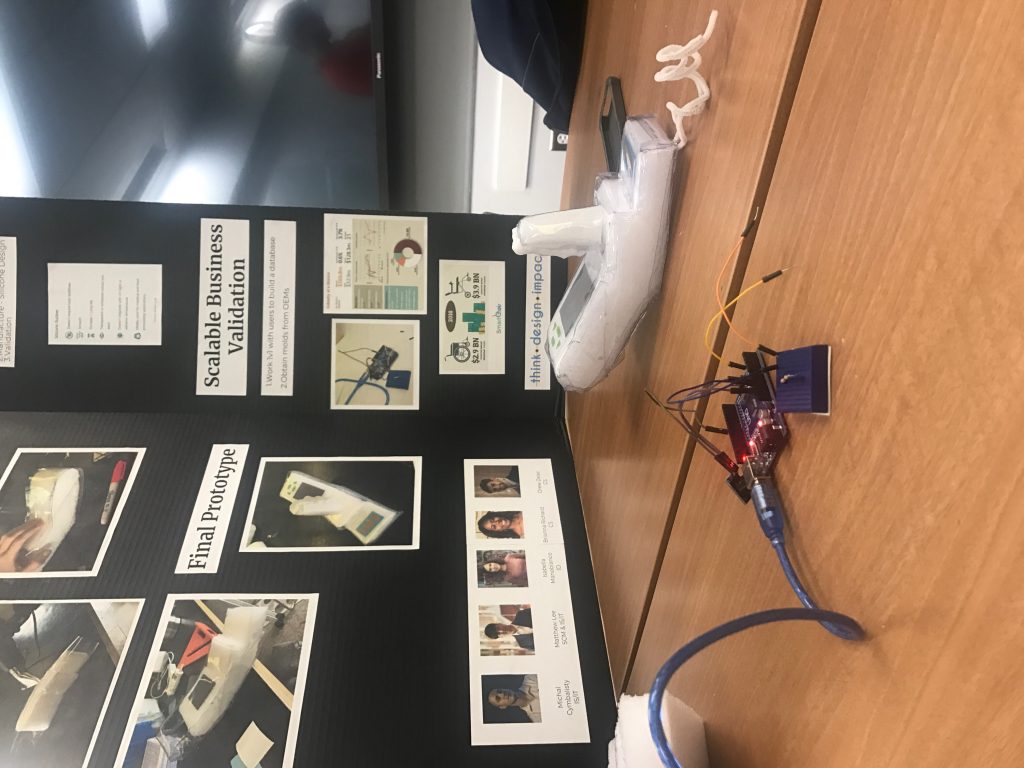
Make-A-Thon
Step 1: We found it very helpful to make a 3D scan of the individual C-Leg. We used a scanner app to convert the image to a .stl file. Our mentor was out of town during our prototyping session so we 3D printer her scanned leg to use for her prototype. Even if you plan to prototype on your own leg, it still will be helpful to scan your leg if you plan on 3D printing because you can build your model design on the actual contours of the scan.
Step 2: We decided to use Acrylic and utilized inkScape to help shape and cut our design. After our design was cut we used a heat gun provided by the fab lab to mold the acrylic to the shape of our 3D printed model of the C-Leg
Step 3: We created the inner padding by using styrofoam and sheets of metal to hole shape to fit inside the acrylic. After the padding was complete we used our tough nylon to create a cloth outer coating and straps to help secure it.
Step 4: We split our acrylic down the middle and added a hinge to make the design easier to put on and simple to take off.
Step 5: Final steps of making everything fit together and ensuring it was up to the standards of safety we had set. At the end of the weekend, we were very happy with what we had put together.


Post Make-A-Thon
After we won the judgment portion of Make-A-Thon we were very excited to continue with our idea for the remainder of the semester. The next week we were able to meet up again with Jenna, our mentor, and do some testing. Overall, the testing went great. We had followed the testing protocol that we had constructed a couple of weeks earlier and were able to work with Jenna. She really liked the way we incorporated different materials and really thought our design was super cool and represented her personality well. There were also definitely areas we needed to improve. The 2 areas that we could improve were to make the interior less slick so the guard would stay secured on and use a more flexible exterior material and make the design less bulky.
The next week we came back to the Art and Design Building and kept working on additional prototypes. To address the bulkiness we took out the interior padding and wanted to change it to silipos gel. Then finally to address the concern of the slickness of the pad we painted the inner nylon layer with a plastic dip which we believed to create more friction between the nylon and the metal part of Jenna’s calf.


Moving Forward
Even though the semester is over, our project will continue forward. We shared our plans on how we are going to take this further if we have more time. For example, we wanted to test our prototypes with more users. Jenna and Jeannette have been our great users throughout this process. However we learned from this class that everyone has their own opinions and the more user group, the stronger our project will become. For instance, every age group has their own opinion for certain designs. Jeannette wanted a huge padding on top of her C-Leg, whereas Jenna wanted minimal padding on top of her C-Leg. They had to do due to each group age’s daily routine and how often they fall on their prosthetic leg.
Next, we wanted to manufacture for a larger group. We were thinking about partnering with prosthetic leg companies to figure out the different scale of each prosthetic leg. This will give us a general database of how big we should make our prosthetic leg protection. We can maybe narrow down the prosthetic leg protection size into five different sizes.
Ultimately, we want to meet with our users one on one and ask them questions to create a prosthetic leg protection that is for that specific user. We will need to coordinate the size of the prosthetic leg, the color of the prosthetic leg protection, the overall design of the prosthetic leg protection. This may cost more time and effort, but overall it is worth the investment.
Final Presentations Slides

My name is Ryan Kane, and I am a senior graduating in the spring of 2019 from the University of Illinois Urbana-Champaign, Gies College of Business. I have a double major is both Supply Chain Management and Information Systems and Information Technology.


You must be logged in to post a comment.