Thinking back to the time when I was applying to be a part of the course, I realized how far I have come since then. I remember being excited yet nervous about taking the course. As someone who lacked self-confidence in my own technical abilities, I was looking forward to learning different skills, such as using a 3D designing tool and 3D printing a product. However, I was nervous that I would fall behind. You can see how nervous I was from the post I wrote in the past. Little did I know then that I would be spending hours taking a lead in cleaning up 3D scans and printing them for the team by the end of the semester.
Before the course began, I didn’t know what to expect from it. All I wanted was to gain more technical skills that I can continue to use even when the course wrapped up. However, I quickly came to realize that the course provided far more than the hard, technical skills.
Upon hearing the stories of the mentors, I realized that the course is very unique in the sense that it has many opportunities to leave an impact on society. That’s when I began to develop my desire to do something more than simply developing technical skills. Even if I could not complete an idea by the end of the semester, I wanted to leave an idea behind that other people can be inspired by.
Since the course had a main focus on developing ideas around the subject of accessibility, it was critical for us to understand the process of designing and developing prototypes. This was when I learned about the term “design thinking” or “human-centered design.” I realized that this idea can be applied to everywhere in any profession, not just in the space of designing. By constantly keeping the customers/clients in mind and being open to their feedback, you have the best chance of providing something for their needs. This is one of the most valuable ideas that I learned from the course.
As we continued to learn about different skills and qualities necessary to be successful at developing ideas, such as failing early and often, we began to learn the technical skills that I was looking to learn as well. Unlike my worries, I was able to absorb the information quickly and even take a step beyond what was taught in the course.
I remember the first time watching the 3D printers at work in awe as my work on the computer came to life in a tangible form. Although I have always wanted to try it before, due to the lack of confidence, I kept on convincing myself that I don’t know how to do it, so I never have until this point. This class allowed me to break the barrier and become comfortable with the idea of exploring the unknown.
In addition to the 3D designing and printing programs such as Fusion 360 and Ultimaker Cura, I also learned other skills that I did not expect, such as using Inkspace, laser cutting, sewing machine, and Arduino. I also discovered Fablab and its resources, which I am interested in exploring further in the future. I did not realize that we had access to such resources nearby and I am grateful to have met even more amazing people who are ready to help with anything within their capabilities.
The real fun began when I was able to apply these skills to develop my own idea with the team. We faced many challenges throughout the semester from trying to figure out the opportunity we wanted to pursue to making advances in the prototypes. However, we continued to push through and persevered in the end.
Through the Make-a-thon and a couple of weeks after the event, we were able to develop on the prototypes rapidly. It was amazing to see how quickly we were able to make advancements during these three weeks. I was even more surprised to discover how much I could do with Fusion 360 and Meshmixer to 3D print the scan. This experience built my confidence in my abilities to learn and apply the technical skills.
Wrapping up the project, I cannot believe how much I learned from the course. Not only have I gained more technical skills than I expected, but I also learned about different ways to interact with people of varying needs and mindsets. It was also very exciting to be able to see other people’s passion and to watch their ideas become tangible products. I never considered myself an innovator and did not think that I would have an opportunity to work with people of varying backgrounds to develop on a new idea, but this experience demonstrated to me that I have what it takes and I just need to dive into it, past the self-doubt stage. This course has really allowed me to build the self-confidence and passion that I need to pursue after different opportunities beyond my comfort zone. Not only am I excited to see where this experience will lead me to, but I am also looking forward to seeing everyone else continue to grow and reach their dreams!
Thanks everyone for such a wonderful semester! Also a big shoutout to the mentors and judges who provided so much valuable inputs and feedback!
Almost everyone has, at one point in their lives,
experienced the pain of slipping on black ice. This could be a story that your
friends constantly make fun of you for, or a silent embarrassment you keep to
yourself (and your neighbors who saw the whole thing). Slipping on black ice is
definitely something that conjures a vivid image in everyone’s mind, and it was
for this reason that our team felt such a connection with Jenna when we first
interviewed her. The first time we met our mentor, Jenna Fesemyer, was during a
large group interview our class conducted at the Disabilities Resources & Education
Services (DRES) building. Our entire class was present to hear Adam, Arielle, Jenna,
Ron, and Ryan
talk about their frustrations. Jenna shared with us the story of a time where
she slipped on ice immediately upon exiting her car and lamented the fact that
she could not even wear boots for more traction in situations like these. We
found out that the boots heavy weight prevented Jenna and other prosthetic
users from wearing them as their residual limbs are not strong enough to carry
too much weight. During our team discussion the following week, we decided to
try to find a way for Jenna to increase traction without adding to much weight,
and Project Solestice was born. Solestice’s goal is to create an attachable
shoe tread that can be used to travel in a variety of rough terrains, with our
first focus being on icy terrains.
First meeting/interview with our mentors.
A RESEARCH OPPORTUNITY.
Throughout class, we worked on different parts of the
prototyping process, conducting interviews, researching different materials and
methods, and defining the challenges and opportunities that inspired us.
Solestice identified four opportunities: 1) prosthetic users cannot wear
heavy-weighted shoes (like boots), so we will make an attachable tread that is
optimized to be lightweight; 2) prosthetic users often fail to shift their full
weight on their prosthetic leg, so we will use arduinos to create force
feedback; 3) prosthetic users may have difficulty putting shoes on, so we will
use elastic and design an easy to use mechanism; and 4) prosthetic users prefer
an aesthetically pleasing design, so we will use lightweight, translucent
material to make the tread less conspicuous. With the four identified opportunities,
we took to the time to interview our mentor who is a prosthetic leg user, Jenna
Fesemyer; a materials science professor, Matthew
Goodman; and a professor who is also a shoe cobbler, Salman Raheel. Through this process, we
found out that thermoplastic material is both lightweight and has enough traction
to be effective. We also brainstormed many ways to attach the tread onto the
shoe. At first, we believed that having spikes on the tread would help the most
and made a low fidelity prototype based on it, but we ran into a problem when
we realized that the user may have to take the tread off when walking indoors. The stage was set, and all we had to do was
wait for the Make-a-thon
event to start creating our very first functional prototype.
Our low fidelity prototype.
MAKING IT OUR OWN THING.
During the Make-a-thon, the work we did on the prototype could be broken down into three sections: Arduino, molding, and attaching.
Arduino
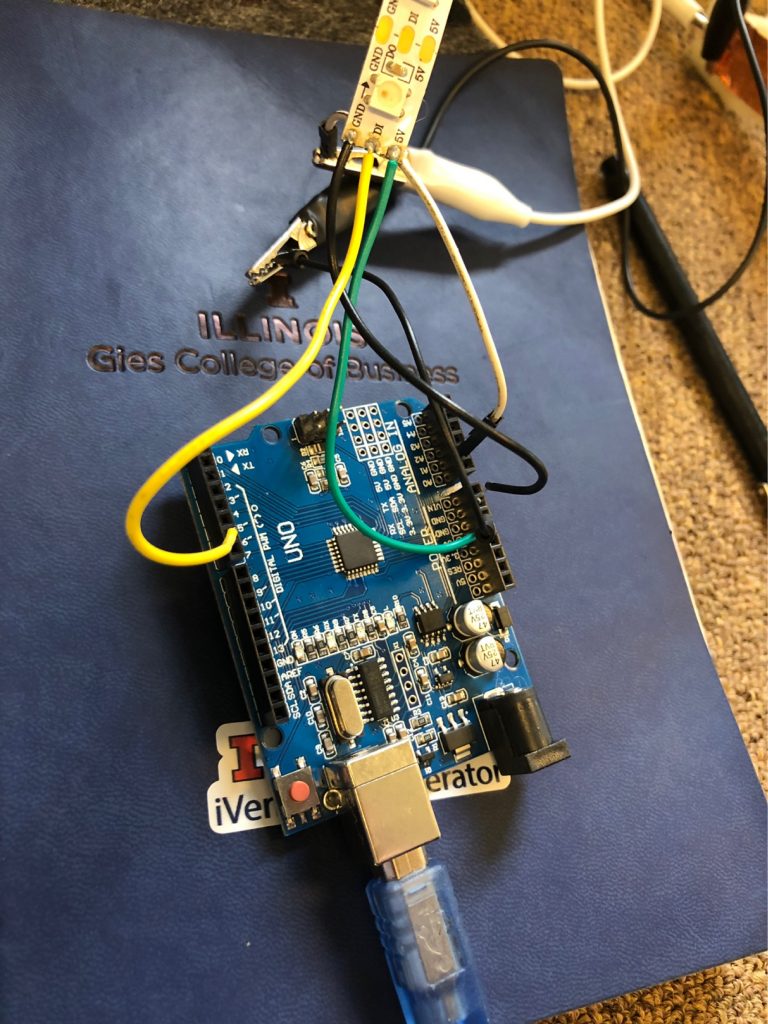
For the Arduino portion of the prototype, we coded an Arduino Uno to illuminate LED lights when a certain amount of pressure is put on the tread; in other words, we created a basic Arduino based pressure sensor. To create the pressure sensor, we sandwiched a piece of foam with two pieces of copper. Ideally, we wanted for there to be three lights, each indicating where the user is putting pressure on the tread. This would enable the user to ensure they are putting enough weight on their prosthetic to maximize stability. The data collected from the tread could also eventually be collected and viewable in an app.
Molding
Using a molding compound and a cheap shoe we bought, we created a mold of a shoe outsole. During this process, we coated the shoe in baby powder and mixed the molding compound to a viscosity similar to pancake mix. We held the shoe down until the mold dried. Following, we used a hot glue gun to fill in the mold with thermoplastic material. After the mold was completely filled, we used a heat gun to smooth the top of the sole, making sure the edges were slightly taller than the inside of the sole. The thermoplastic material we used was similar to silicone and, per our research, is a material that creates enough friction to prevent falling on ice. Ideally, given more time, we want to be able to create the tread design ourselves with the information that we learned from Prof. Goodman on which type of tread design would be most effective for black ice. However, due to the time constraints of the weekend event, we made do with created a mold from the materials on hand.
Attaching
Due to time constraints, we attached the tread via Velcro. While we are not completely satisfied with this method, we were constrained by our budget, time, and materials. Ideally, we would like to use a clear, elastic material to follow the aesthetic we have already created. We will expand upon this more when we talk about testing, however, we are definitely aware that one of our biggest opportunities for further improvement is to research better, more aesthetically pleasing attachment methods. We want to find an attachment method and material that is easier for users to put on than Velcro. One way to possibly do that is to have less straps than we currently do with elastic material so that the Velcro mechanism is not too difficult a barrier.
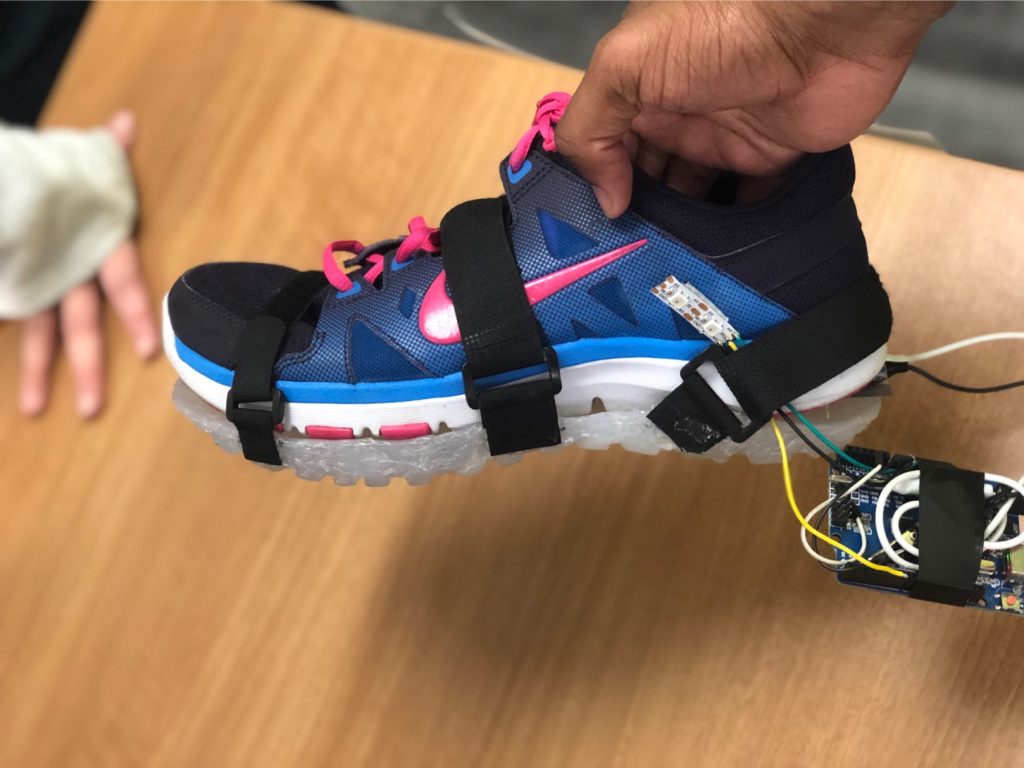
First Prototype
Our first prototype was created from thermoplastic material and attached via three Velcro straps. In the back, we attached an Arduino which enables force feedback. This gives the user the opportunity to analyze where they are applying the most pressure and adjust accordingly. The tread weighs about 1.198 lb with a sneaker (0.598 lb individually), compared to the about 2 lb weight of a regular snow boot.
TESTING OUR METTLE.
Following the Make-a-thon event, we were able to test our prototype on three users: Jenna Fesemyer, our mentor and a prosthetic leg user; Jennifer Clifton, our Make-a-thon teammate and a person with brittle bone disease; and Kim Harden, an elder. While not all our testers were prosthetic leg users, they were all analogous users who would have a use for a tread like this. The feedback that we received was that while the tread itself did its job, the straps were difficult to put on, and the Arduino should probably used as a diagnostic instead of a daily part of the tread. While the tread had incredible “grippy”-ness, we along with most of our testers, felt that it was still a little bit too thick, and that during production, there is an opportunity that we need to identify where we can thin out the tread and make it even lighter. Furthermore, during testing, Jenna told us that she felt that because of the strap and how difficult that is to put on, the tread is not something she felt could be used every day. So, just like an umbrella, Solestice’s tread has a problem where if the user forgets to bring the tread out or wear it during icier days, it will not be of use. Some ways that we have thought of to try to improve this problem is to make either make the attachment mechanism easier or find some way to adhere the tread directly onto the shoe. Finally, Jenna thought the tread aesthetic looked very cool, and Kim thought it made her feel younger.
THE FUTURE IN OUR PALMS.
As mentioned before, there are several ways in which we would like to improve the prototype of Solestice treads.
Researching Even More
There are many topics that we have to do more research on.
First, we want to confirm that the thermoplastic material we used is the material
that can give the best traction. Next, we want to do even more research to create
our own design to optimize the tread for black ice. We know from our interview
with Prof. Goodman that a tread with a larger amount of surface area would be
the best for black ice, so ideally, we would design something similar to the
tread pattern of a winter tire. Furthermore, another idea that we want to look
into is either adapting the tread or finding a material to make the tread shock
absorbing in order to decrease the weight of the shoe for prosthetic leg users.
Finally, we will be researching into
whether it is possible to incorporate some type of cushioning for further
comfort in the tread attachment without having to sacrifice the weight of the
tread.
Business in the Long-Run
If we can raise enough support for Solestice treads, we feel
one of our best options would be to partner with a shoe company. With this
partnership, we can engineer a method of attaching the tread directly onto the
shoe so that users of the tread can always have the tread on. Alternatively,
more information from a partnership with a shoe company could give us data that
allows us to create an easier, less complicated attachment contraption.
Furthermore, we would gain more information on shoe designs in order to optimize
our tread design. Partnering with a shoe company would also give us access to
mass production machines, allowing us to create molds more efficiently, better
control the thickness of the tread (thus making it thinner and lighter), and customize
the tread aesthetics (offering more colors and aesthetic designs).
Additionally, the Arduino portion of the tread, once shrunk to
be more compact, can become a separate product marketed towards physical
therapists who help prosthetic leg users, the elderly, anyone else that has unstable
footing, and even athletes. Through this, we can track data on where people put
pressure on their feet and understand more on how that affects posture and
other health areas. Eventually, an app tracking this information can be created
and the data analyzed to help prosthetic leg users better trust their leg, the
elderly understand how to stabilize their footing, and athletes where to put
pressure when running or participating in other activities to achieve the best
result. Said data could be sold to sports coaches, medical professionals, and
other researchers. This data can also help people with lesser problems, such as
duck feet.
To see our final presentation on Project Solestice, click on the following link.
To see our Instructable (detailed instructions on how to create our prototype), click on the following link.
Salutations! I’m a sophomore studying accountancy who likes to create some art on the side (yes, I’m one of those photographer/poet/all around artist people). My passion is in advocating for equity, and I probably spend a little too much time on Hulu.
Coming into this class I really had no idea what to expect. I knew that the class involved 3D printing and design, but I wasn’t aware of how close we would be working with mentors to develop a real product that could be used in their everyday life. In this class, I was hoping to get more experience with 3D modeling and printing and learn more about the industry in general. I wanted to be familiar enough with the technology that I could use my knowledge after I graduated to understand how 3D printing will continue to disrupt the business world.
Overall, I would say that the class met most of my expectations and gave me great experiences that I wasn’t expecting to get going into the class. The nature of the class led us to focus much more on user-centered design and I gained very valuable experience on how to design for end-users during the product development process. I had some experienced with user-centered design in the past, (https://digitalmaking.web.illinois.edu/spring2019/week-2-recap-inspiration-ideation-and-implementation/) but this semester taught me so much more. From a personal standpoint, this course taught me how to collaborate with people with very different work styles and how to split up work to play to the strengths of everyone on the team. The whole semester was a team effort and I definitely could not have accomplished everything without the help of my amazing teammates, Ryan Kane and Jay Lee.
Resources and People
One of my biggest takeaways from the semester was just how awesome the University of Illinois network is. Vishal was able to do a great job bringing in speakers and resources for our class that helped make the experiential learning process easier. I want to thank Milestone Labs, John Hornick, Dan Banach, and Jeff Ginger for coming in and sharing their wisdom with our class. We were also able to seek advice on our project from two professors: Matthew Goodman (Material Science) and Deana McDonagh (Industrial Design). Both of these professors added helpful insight into the material make-up and aesthetic design of our prototype.
I am also thankful for Adam who introduced us to our mentors at DRES. Before this semester, I had no idea that DRES existed and it was so cool to see all the amazing services the facility provides and the awesome people who work and train there. Specifically, our mentor Jenna was incredible to work with and inspired us to keep on persisting through the design process.
In addition to these wonderful people, we were given access to a lot or resources at the college. I had very little interaction with the Fab Lab and the Makerlab before this semester, but I really enjoyed learning about and utilizing all of the resources they provide. As a Senior, I wish I had learned about these great facilities earlier so I could have used them more often throughout my college career.
One of my expectations coming into this course was that I would learn more about how to 3D print and model. Using Fusion 360, a 3D printing software, Dan Banach was able to teach us how to design our own custom phone holder. When I first saw the design we were going to create I was pretty overwhelmed, but by the end of the process, I realized how easy it was to design and model on Fusion 360. Learning how to 3D model was one of my favorite parts of the class and it was great to see my design come to life both on the screen and then on the 3D printer itself. 3D printing still fascinates me and I am hopeful that I will continue to have access to 3D printers where I can keep on designing and creating.
The most important thing I learned this semester was how to make. I know that this sounds pretty straightforward and a little bit vague, but for me “making” is all about being creative and unafraid to try new things. In business, there is a lot of structure and preparation and there is usually a “right way” and a “wrong way” to do things. However, when it comes to “making” there are so many different ways to achieve your end goal and there is no structure because you are creating something that hasn’t been created before. While at first I was intimidated by this process, by the end I found myself enjoying the ambiguity and creativity needed to succeed. My time at the Fab Lab and prototyping on our project showed me that there are so many ways to be creative and build new things. I hope that when I graduate I can take this new mindset with me and continue to make and create!
Warning:
this course completely defied my expectations and was not at all what I expected
it to be after reading the course description and past testimonials – and that’s
a good thing! When I registered for this course in early January I was looking for
a way to get out of my R class. 357 looked enticing and I had thoroughly
enjoyed my time with Vishal when I took BADM352 last spring. I sent him a brief
email with why some of the concepts we planned to cover this semester enticed
me and viola, I was enrolled.
My initial
thoughts were that this class was going to be like other small business classes
I had taken in the past. Each student pitches an idea, and then 6 or 7 teams
are formed and for the rest of the semester that group of initial ideas grew
whilst everyone else’s ideas were tucked away. Instead, Vishal partnered with
the Adam Bleakney and the rest of the DRES community to be our mentors for the
semester.
I
personally found this scope a lot more fulfilling and impactful than yet
another semester long class which goes nowhere after the course is over. Each
team ended up with tangible prototypes of solutions to opportunities within our
mentors’ lives. Our team worked with Ryan Wilson, a recent Illinois graduate
and power wheelchair user.
Our
group’s initial ideas became centered around personalization and identity, but
we quickly came to realization that we were trying to personalize through
design and not utility. After speaking further with Ryan, he highlighted the
fact that he stills uses a Ziploc bag to protect the electronics on the arm of
his chair from water damage. Ryan even told that he has gotten stuck in the
rain during a storm and he had to wait for someone else to assist him under cover,
so his electronics could dry off and power on his chair.
We then
conducted a search for other products which were designed to solve this
problem. And to our astonishment we found very little out there. The most
common product was a bag like cover which was a pullover and had to be attached
and detached each time it was to be used. Other products included canopy-like
covers for the entire chair, and attachable umbrellas.
Throughout
this search process we realized two key things: each of the other solutions had
to be attached and detached; and nothing could be personalized. Everything had
kind of come full circle, except that we were now solving a relevant problem alongside
the value-add of personalization.
After
spring break, we regrouped yet again with a concrete focus: We had the goal of
creating a prototype during the Makeathon which was held in early April. We
knew we wanted a product which did not have to be taken on and off, we wanted
it to be a permanent part of the chair. Our team drew immediate inspiration
from silicone phone cases. They were also permanent solutions which were made
from a waterproof-material that was tight fit. The ridges for the volume and
home buttons featured in the silicone cases gave us validation that Ryan would
still be able to use the buttons through the silicone case. Additionally, to
ensure Ryan could see his screen, we decided that our silicone casing would be
clear.
The Makeathon weekend culminated
nicely, as our group shared 1st place. After the Makeathon, our
teammate Matthew made a phenomenal 3D printed injection silicone mold based on
a 3D scan of Ryan’s chair. During further market research we also discovering that
there were only 21 wheelchair manufacturers in the United States (IBIS World). By
simply creating 1 3D printed injection mold, we have theoretically catered to
nearly 5% of the power wheelchair market, a $4B industry in 2018. As a business
student I found the intersection of utilitarian design and economic opportunity
utterly fascinating.
I enrolled in this class with some
expectations that were altered quickly as soon as we were introduced to the
scope of the course. It did not give me as much individual freedom as I had
expected, but the partnerships and vision made it all worth it. After meeting
the other professors, we became one big family at the Makeathon, all united
through a mission to improve the lives of others – and that is something that
is greater than any individual can be.
My intentions for taking Digital Making was to better understand digital making and to become more fluent within the skill. As an industrial designer I have been able to to acquire skills in “making”, however I was looking to refine my skill set as well as learn more. Thanks to this course, the MakerLab and the community Fab Lab I have learned so much about digital making this semester!
What I learned and the people I met:
Visiting DRES
DRES
Visiting DRES was a great experience. I thought it was really interesting to see the progression of the racing wheelchairs over time. Especially as an industrial designer, I found it inspiring to see the amount of opportunity there is within this field. While we were in the basement we also had the chance to see four athletes training on racing wheelchair rollers. This really put a lot into perspective for me, forcing me to think about the stigmas there is surrounding people who use wheelchairs in relation to exercise.
I really appreciated the people we met during our visit for giving us some their time and sharing their stories. As a designer in this situation it is easy to think just of the wheelchair and design innovation vs. the person and their life experiences. It was extremely valuable to sit down at a table and listen to their stories. In design it is very structure oriented, and having the opportunity to listen to real life experience gave me a lot more insight than I would have jumping into this project with strictly online research. Everybody had such interesting and unique story to share.
Milestone Labs
Milestone Labs come to campus during the coldest days in the midwest so unfortunately we were only able to speak to them through Skype.
Talking to two members of the Milestone Labs team was a great opportunity for students to learn about the design process or refine what has been taught to some already. Particularly they helped us figure out our “Opportunity Statement”. I love we refer to this as the opportunity statement rather than problem statement which is typically what it has been referred to in the past 4 years in my college career. Opportunity statement makes things more general and instills more open ended-ness not simply one solution to a “problem”.
This last class was a pinnacle point for my team in terms of brainstorming. The worksheet really helped bring everyone’s voices forward, although we were not sitting in the classroom face to face we were able to discuss through video chat and bounce ideas off each other in our google document.
Michael Hansen “fail early, fail often”
We had the opportunity to listen to Mike Hansen who now is a part of the EarthSense startup.EarthSense is revolutionary for the agricultural business. They are creating new possibilities in crop breeding, agricultural product development, product testing, crop research, and field scouting by improving the quantity, accuracy, cost, and speed of in-field plant trait data collection and analytics. (https://www.earthsense.co/home)
Mike stressed the theory of trial and error. SolidWorks and 3D printing lend themselves to learning from failures since both are relatively young practices. The only true way of learning how to use either platform one must try things they will most likely fail at. Mike’s story about constructing the case for the camera is a great example of failure leading to innovation. Trying something that no one has done before is a risk, however, if risks aren’t being made, progress isn’t being made either.
Guest Speakers
Three guests came to our class to share their insights. These guests included a member of the Illini Service Dog, John Hornick, and Jeff Ginger. We started by talking about possible opportunities for design within the service dog experience, then learned a lot about advancements within the 3D printing world, were exposed to the amazing network of Fab Labs, and finally met up with our teams for a brainstorm activity.
A few opportunities the Illini Service Dogs were presenting our class were redesigns of collar and leashes, a better way of connecting leashes to wheelchairs, FOB attachments to carabiners to open and close cabinets, better designed problem collar so it is easer to take on and off, and finally an easier clasp for the vests the dogs have to wear. As for research opportunities, we were encouraged to talk to occupational therapists, physical therapists, personal assistants and expert users.
John Hornick was extremely well versed on the history/progress of the 3D printing world. He shared a lot of interesting information. My biggest takeaways were democratization and customization. 3D printing allows people and patients to physically see ailments in the 3-dimensional world giving a lot more people access to information that wasn’t able to be expressed before. John also talked about the customization 3D printing is capable of. There is great strength within 3D printing. These technological advancements have aided in facial reconstruction, implants as well as 3D printing of skin! Wake Forest University’s Institute for Regenerative Medicine is 3D printing cartilage, organ tissue and even skin for the U.S army.
Our final speaker for the day was Jeff Ginger who works at the UIUC Community Fab Lab. He is an expert problem solver and critical thinker. Jeff introduced us to his world of Fab Lab. Fab Lab actually is a network of fabrication labs across the world who hold conferences and offer easier/cheaper access to extremely expensive tools to the general public.
AutoDesk Fusion 360 Basics
Dan Banach from AutoDesk lead a workshop on Fusion 360. We learned the basics of 3D modeling as well as shortcut keys. Prior to our class meeting in the basement of the Psych building we were assigned the task of downloading Fusion 360 and following a tutorial of how to make a basic rectangular box. We used methods like sketching, extruding (both adding and subtracting material), and filleting.
Although I have taken a course on SolidWorks (another 3D modeling program) it was nice to have a basic tutorial to show how to use fusion 360. I downloaded Fusion 360 last year when I found out about the FREE program. I tried to teach myself, and when I first download the program it was little overwhelming. However, once I started watching specific tutorials for what I wanted to accomplish it started to become for familiar.
Dan Banach’s workshop was very helpful! I saw people who had never used Fusion or a 3D modeling program create in 3D space for the first time. The phone dock we created wasn’t the simplest design either. I learned short cuts I had not known before as well as the possibility of inserting a decal on a surface. I would love to take another AutoDesk workshop for Fusion, there are other “environments” I would love to learn about. Specifically I would love to learn how to use the sculpt tool.
Fab Lab Part 1
Champaign-Urbana Community Fab Lab
We were taught how to use Inkspace to design templates to laser cut surfaces, and the basics of lighting a small LED light bulb with a simple electrical circuit.
Using a multimeter we measured the voltage the battery carried as well as the strength of the resistors. Depending on what level of strength your resistor was the brightness of your LED light bulb changed. The higher the resistance the lower the light would be.
We ended our class session we split off into our project groups. In these groups, we had an extensive brainstorming activity. This was the biggest brainstorming session for our group since we have had a breakthrough in our direction after our successful and highly informative interview with Ryan.
In this brainstorm activity, we were told to think about solving the problem at hand wearing many different hats. During one round of brainstorming were told not to think about cost in another we were told to think about solving the problem for someone very young. It was interesting to look at the problem through so many different lenses.
Fab Lab Part II
We learned how to use the laser engraving and cutting software Inkscape, then we learned how to use the Fab Labs high tech sewing machines.
This was my first time using the program Inkscape, however, I am very familiar with changing regular files to vector files. I work for a screen printing company on campus where it is a similar process for preparing files for production. In order to get the best image resolution, all artwork files must be converted to vector format. Once a file is converted to vector format the design can be enlarged to any size and keep its resolution (it will never get pixelated). It is very similar for laser cutting, these lines must tell the machine exactly what to do, either raster or vector. Vector will cut straight through while raster will engrave .
The second portion of the class we were taught how to sew our watch bands! We started with a cloth where we were told to follow a zig-zag line to practice with the pedal and changing directions while sewing. I love to sew so it was awesome to have an opportunity to!
Fab Lab Part III
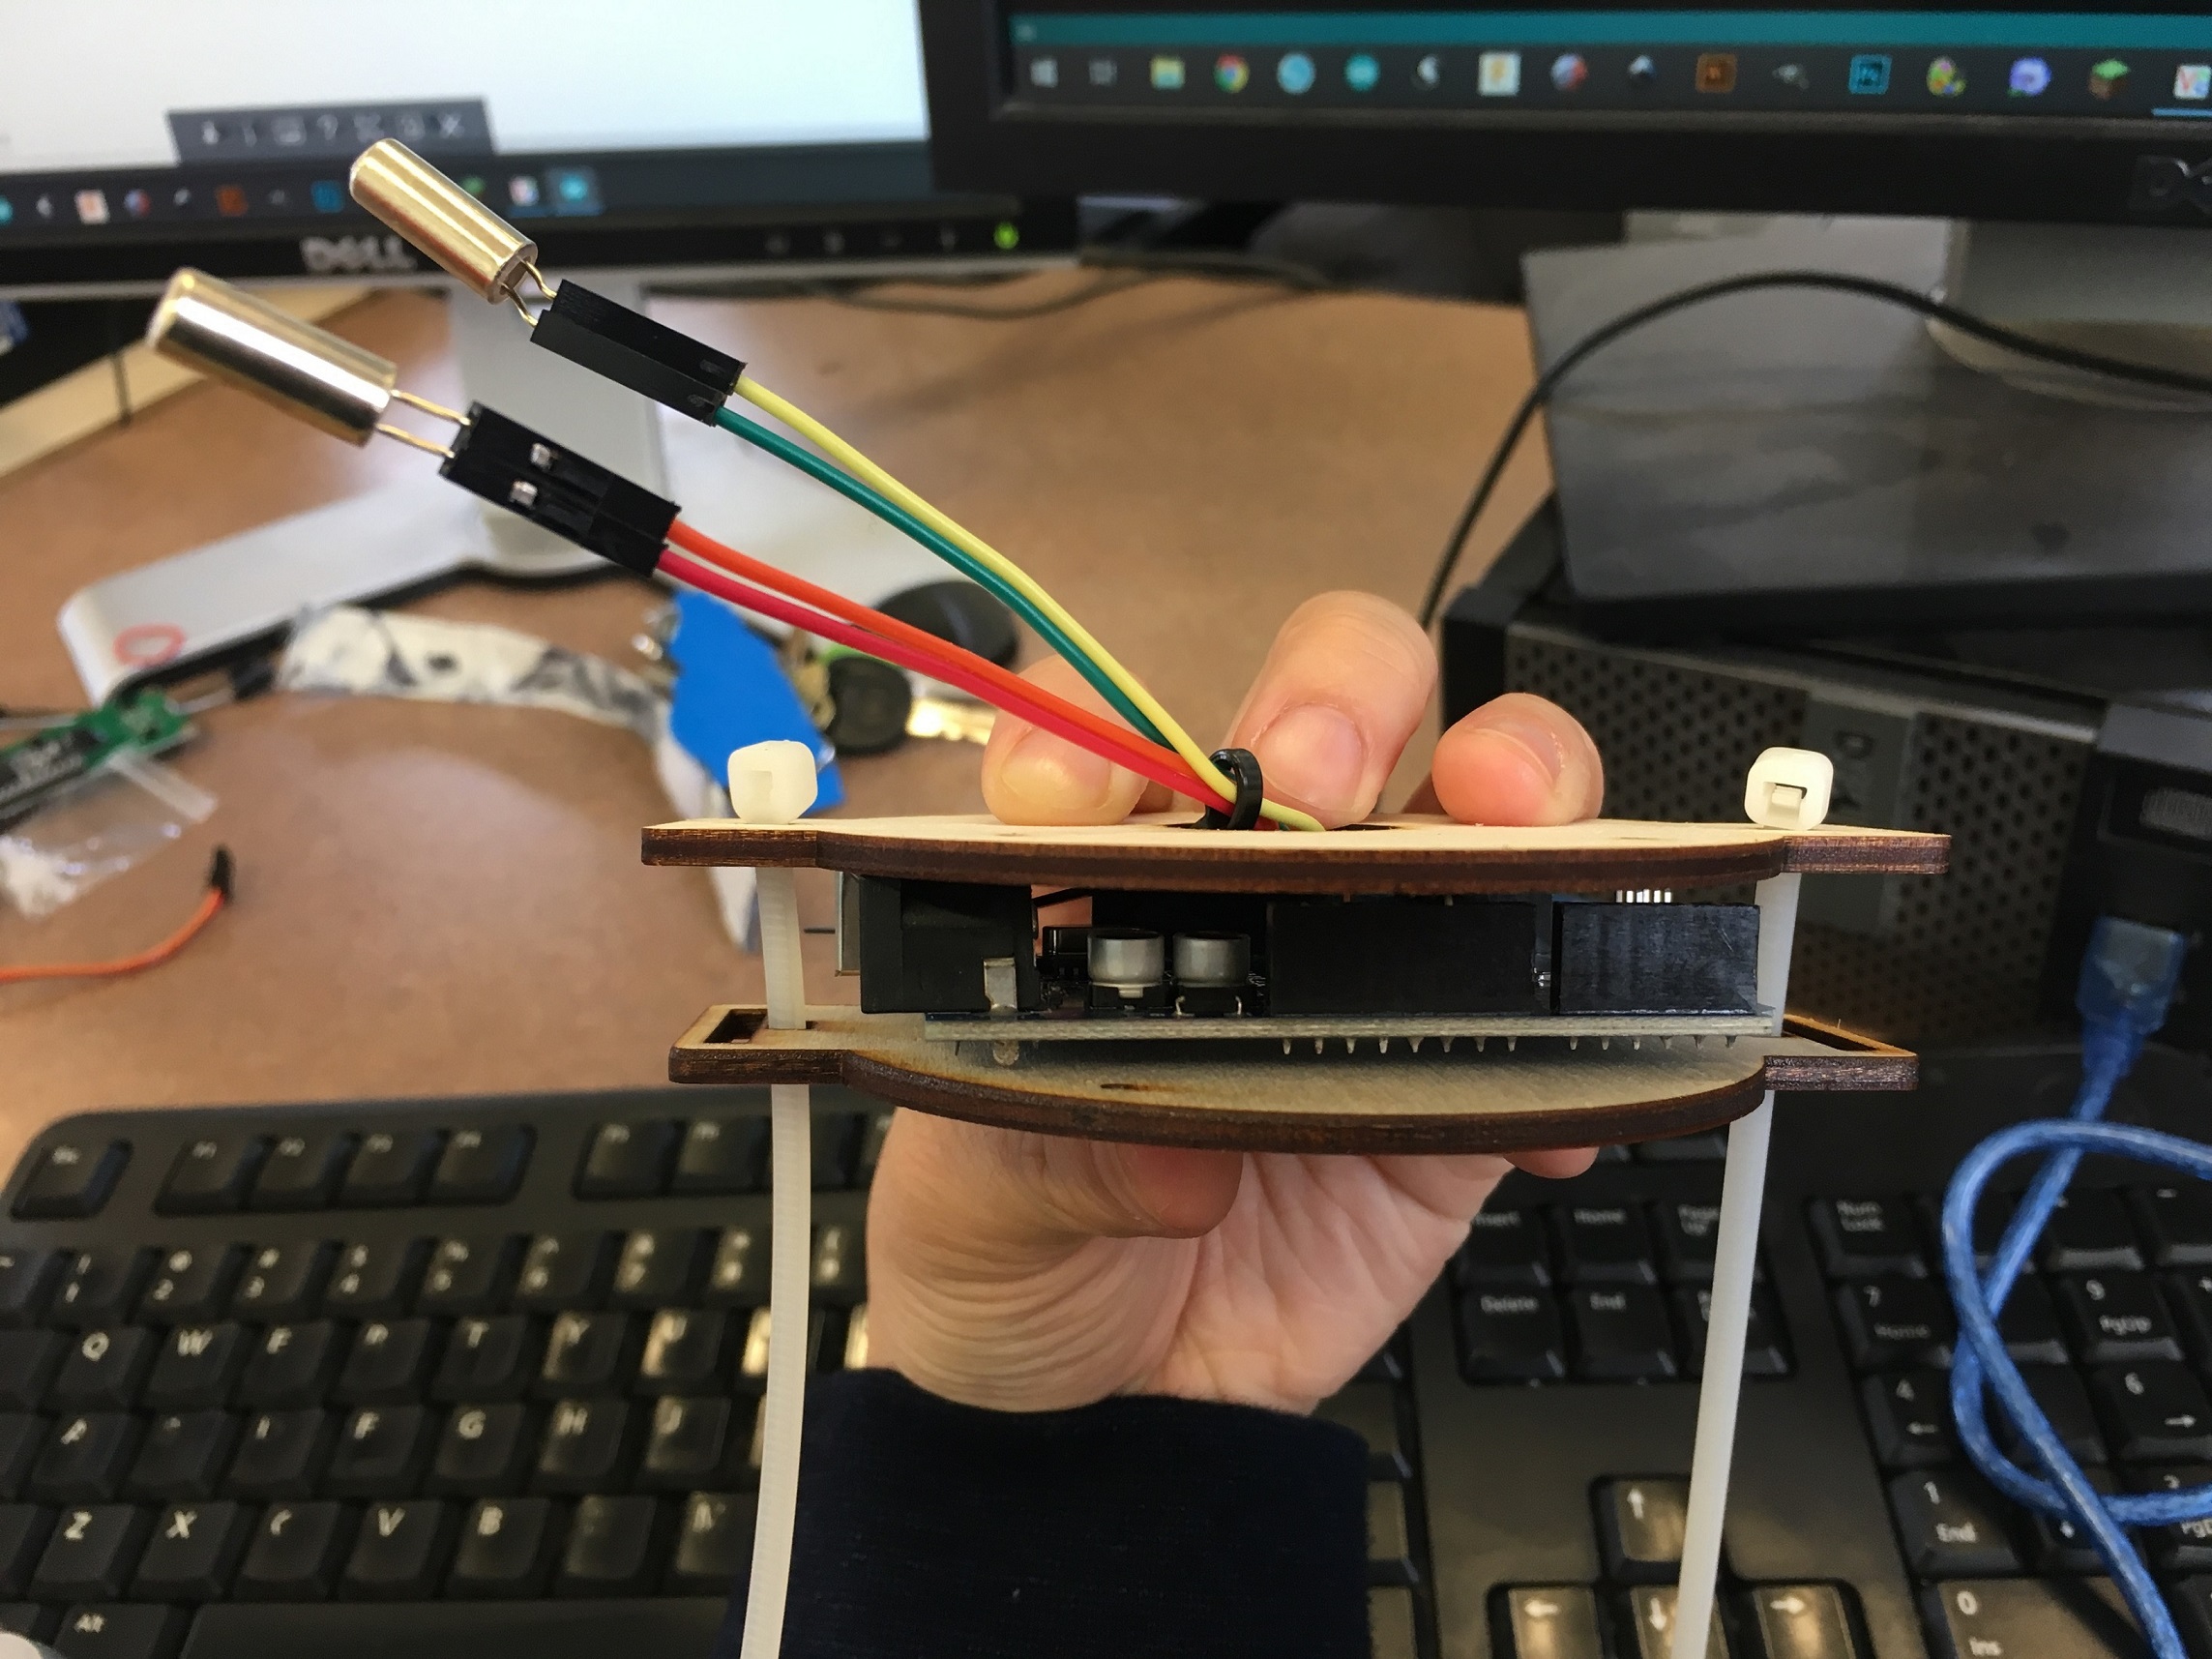
It was awesome to see out watches finally come together. In the last class we laser cut the watch parts as well as designed the watch face. During this class we learned how to code an Arduino Uno board to count the number of curls/twists through a tilt sensor. We were directed how to assemble the final parts as well as test out the software. This was my first time ever coding! I have had an amazing time at the Fab Lab learning all sorts of new skillsets. I will be coming back to use the resources and staff!
Take Aways:
This course opened up the world of digital making and the communities we have to support digital making on campus and surrounding campus.
Taking Dr. Mcdonaghs’s ARTD 420 course really encouraged me to take this course as my next step. Both Professor Vishal and Dr. Mcdonagh have taught me to conduct more empathic research within my designs which has been the first time I have practiced more emotional design within my department. Being able to partake in something like the Makerthon was something I would never think id be able to do and being able to work with my team members so successfully and win was one of the best feelings I’ve ever had in a course!
In terms of expectations for the course, I thought that there
would be a lot more tool training and 3D printing involved. Instead, our time
was split evenly between team prototyping and tool training. While I knew about
the prototyping project, it was both less structured than I expected and more
involved than I thought it was going to be. On one hand, we were given the
guiding information and assignments to go about prototyping our ideas, but on
the other hand, a lot of the initiative was left to our own self to start
conducting outside research and interviews, start tool practice and learning,
and start networking and testing our prototype. I had honestly expected the course to “hold
our hands” a little bit more than they did, but I am very glad that it did not.
In the end, I was able to learn more about the way that I tackle large projects
without much guidance as well as learn more about design thinking and the
prototyping process. Before, startups were a bit of a mystery to me, a buzzword
many people use in business talks, but going through the prototyping process
helped me truly understand what a startup does and how difficult that process
is.
Another aspect I had not expected was how closely we worked
with DRES. I had expected a
course about digital making, especially a course housed within the Gies College of Business, to be
more bottom line focused in their innovation themes, but the accessibility work
and disabilities focus we had in class was a nice surprise. Having done some disabilities
advocacy – albeit more on the mental health side rather than the physical
disabilities side – before, being able to work in this field put me a little more
at ease. It was incredible to see the real impact that our prototypes had on
real people at the end of the course.
Group Interview at DRES with our mentors
To see a more in-depth break-down of what the first few weeks of class were like, read the following blog posts:
It was really cool to be able to learn how to use a
multitude of new programs within this class; the program I was most excited
about learning was Autodesk’s Fusion
360. My brother took a 3D printing class our senior year of high school,
and I was always fascinated by the projects he brought home to show our family.
As a result, I was both anxiously anticipating and incredibly excited to work
with 3D modelling for the first time during this seminar. Upon completing Lars Christensen’s
Fusion 360 tutorial that
we used to familiarize ourselves with the Fusion 360 program, I felt really
accomplished and inspired to explore 3D modelling further.
Left: 3D printed phone holder, Right, from top to bottom: Fusion 360 file for phone holder, 3D printed box from Lars Christensen’s tutorial, 3D printing in process of Solestice logo
It was around the completion of our introduction to Fusion 360 that we were introduced to a community resource on campus: the Champaign-Urbana Community Fab Lab. For such a compact space, the amount of resources available there was incredible! I was so surprised that we had so many resources available to us as members of the Champaign-Urbana community, and yet, not many people knew of these resources. One of my goals after this class is definitely to let more people know about the plethora of resources we have available to us here in CU. During our three weeks at the CU Fab Lab, we completed a culmination project which taught us how to use Inkscape, an open source vector program similar to Adobe Photoshop or Illustrator, to create laser engraving files; create code and build Arduino programs and other electrical configurations; and use a sewing machine on various types of textiles. Overall, it was a really cool experience that allowed me to familiarize myself with new tools and gain new ideas on what types of innovation could be used to help me create my prototype.
Upper row, from left to right: Sewn watch strap, laser cut & engraved watch face, in-progress watch assembling, Arduino electrical component; Lower row, from left to right: Arduino code, finished exercise watch
For more detail on what the tool training experience was like for me, feel free to reference the following blog posts:
As part of the prototyping process, we went through many
different concepts related to design thinking. First, we learned about human centered design
and empathetic design, which
really appealed to me. Before, I thought that innovation and prototyping design
was only for the random moments of inspiration where someone looks at a problem
and is struck by the inspiration to find a solution to it in order to make
money. However, we were taught that wording is another important aspect of
designing and that we should think of our prototypes not as “solutions to problems”
but “ideas for to fill an opportunity,” something that we can use to help people
with. We also learned about diverging during the brainstorming process and then
converging back upon a decided path to take a prototype idea. Through this
process, I was confronted with my indecisive nature. Although I had
subconsciously known this, I had not realized why I was so indecisive. Yet,
during the prototyping process, I realized that I was indecisive because I
feared the failure of arriving at the wrong answer. I disliked choosing a path,
preferring inaction over actively choosing wrong. Taking this course has really
helped me realize that about myself, and I now try to challenge myself in my
daily living to make quicker decisions, to choose a path rather than being
crippled into inaction. I am learning to trust my instincts and gut feelings a
little more than I did before.
One example of this was the iterations that lead to the drastic changed between our (Team Solestice’s) low fidelity prototype, our Make-a-thon prototype, and our post-testing prototype. In the first prototype, we were thinking of using metal spikes as a source of traction, and we committed to the idea. However, upon further research, before we even got to the Make-a-thon event, we realized that it was not feasible, that it would be even more of a problem for a user to have to take the tread off and put it back on every time they switched between walking outdoors to indoors and vice versa. And here we thought we had the correct idea. Yet, after we tested our prototype with a prosthetic leg user, post-Make-a-thon, we realized once again an opportunity for change. We realized that the tread was too heavy and the Velcro too visible. So, we switched gears once again to look at being able to apply the tread directly to a shoe. So, it was through this course, our prototyping project specifically, that I understood an opportunity for myself to learn to face failure head on, to learn to be okay with the fear of failure, and to keep working, regardless.
This course has taught me so much, not only about the different innovation tools available in the market right now, but also about myself. I have grown not just in marketable skills, but also as a person, and for that, I am incredibly thankful that I took a chance, braced myself for failure, and applied to be a part of this course.
Salutations! I’m a sophomore studying accountancy who likes to create some art on the side (yes, I’m one of those photographer/poet/all around artist people). My passion is in advocating for equity, and I probably spend a little too much time on Hulu.
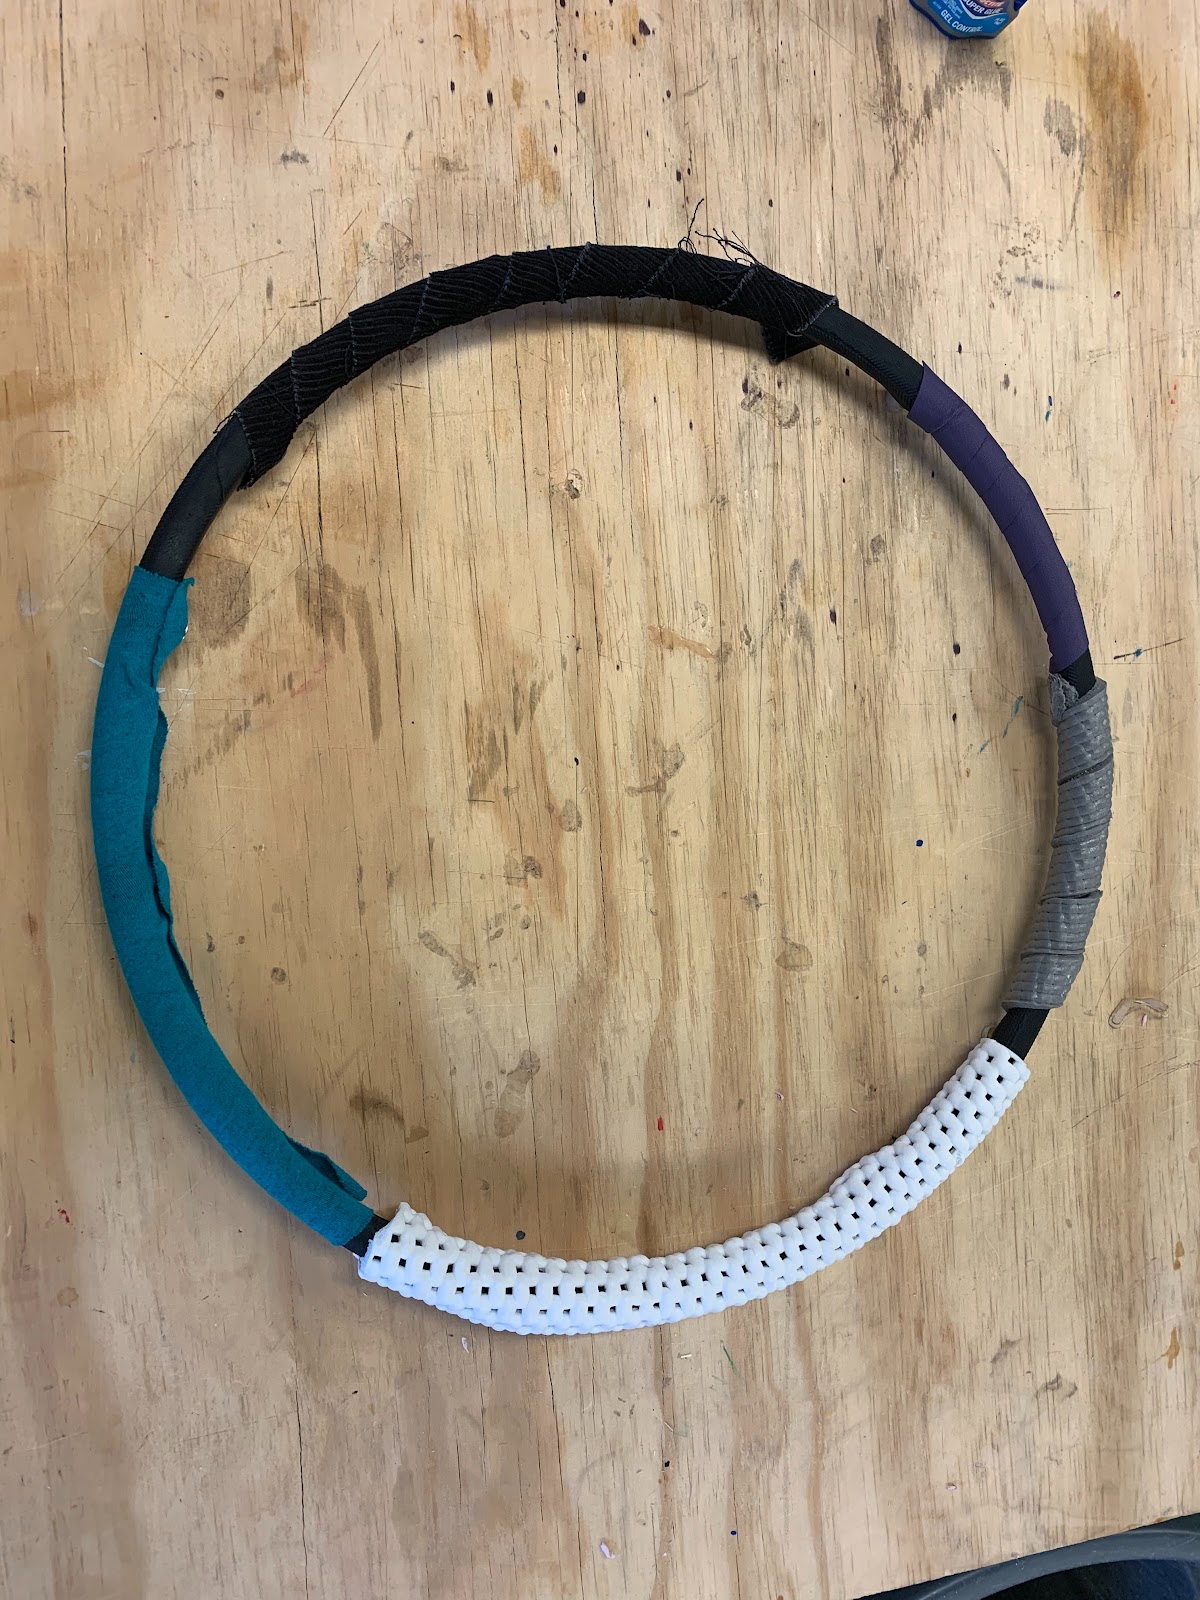
Since the class we met the mentors, we knew we wanted to work with Arielle. We were inspired by the way she made awesome use of her time in this class and really made something worthwhile. Arielle really saw an opportunity for change and improvement and through this class was able to even create a business out of it. We were also excited about the area of opportunity she presented and the idea of potentially helping our U of I team and her company. After meeting with her and Adam, they explained to us the main problems they have when it comes to racing. They showed us the gloves and how they work in part with the hand ring on the wheel.
They told us the major issues they face is that when it rain, it becomes very slippery between the hand ring and the glove. This causes the athlete a lot of trouble as they can’t get as good of contact between the glove and hand ring. Once the weather conditions become poor, it doesn’t matter how much the athlete trained or how fast they race if they can’t make good contact. We worked with Arielle and the paralympic wheelchair racers to find a better way to cover their hand rings in preparation for a race.
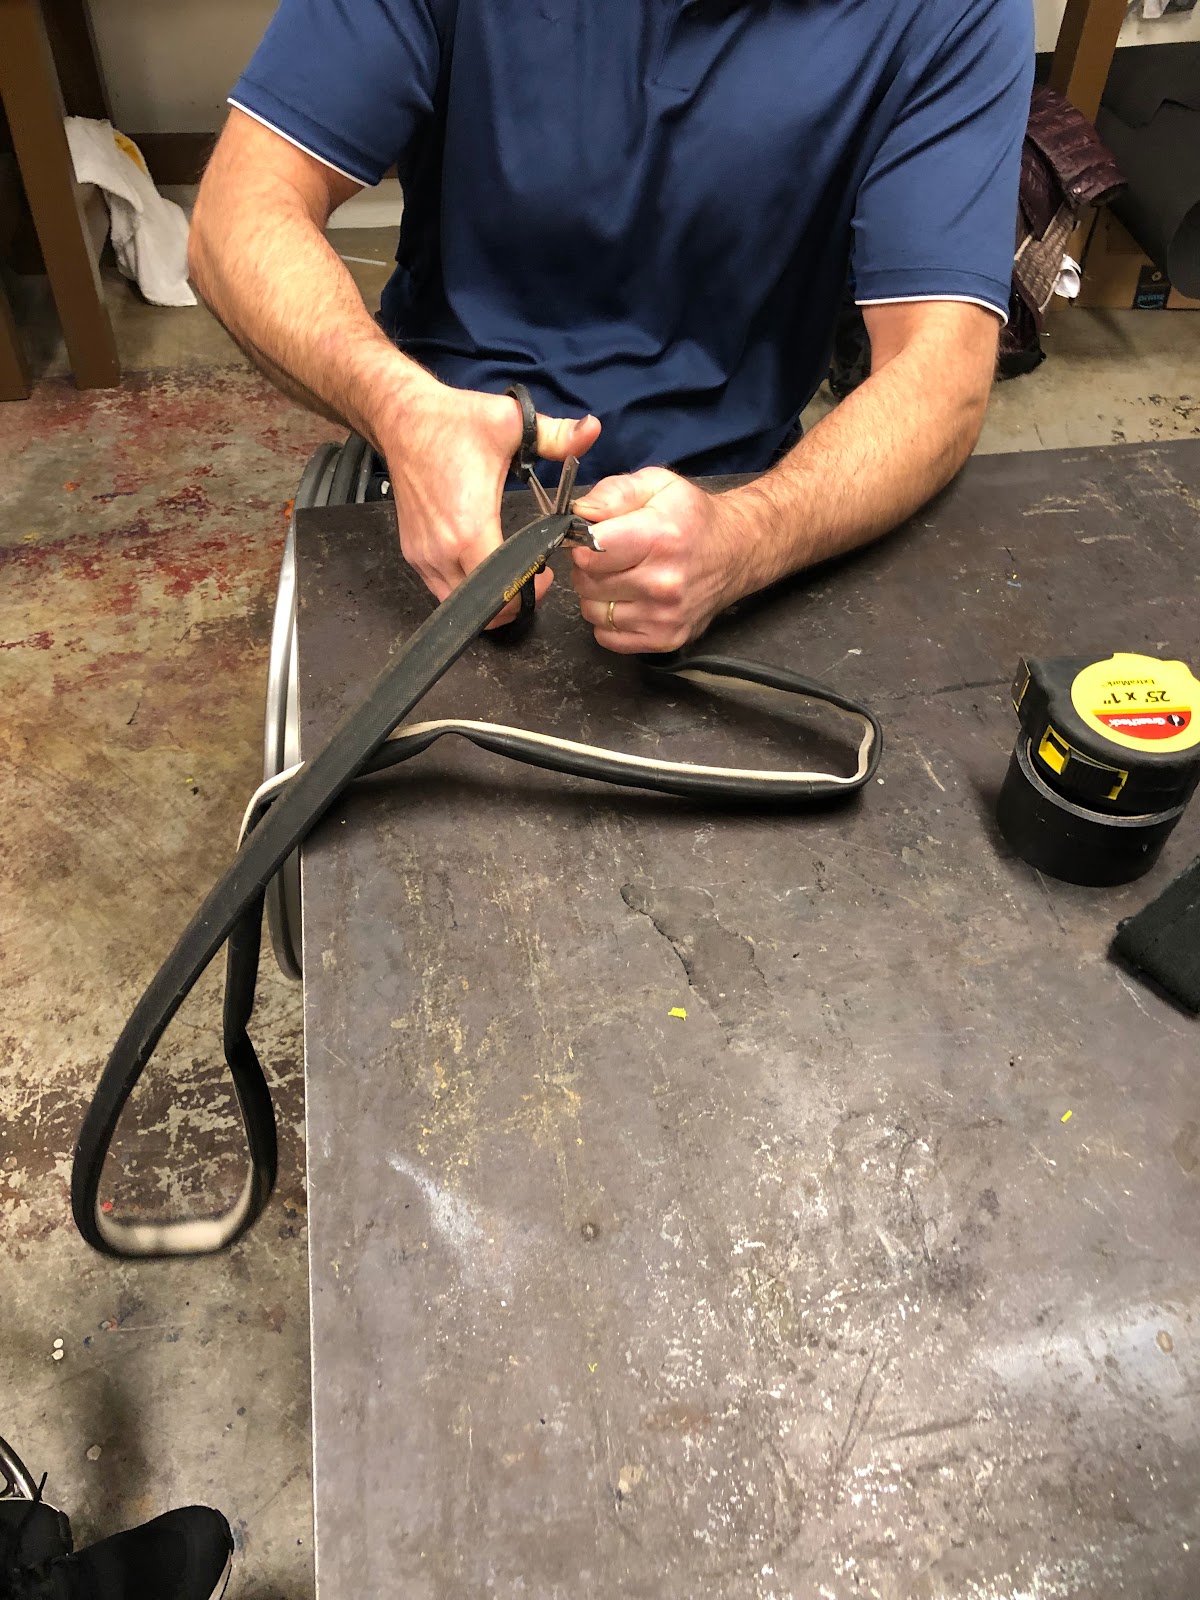
The other problem they face is the fact that there is no easy way to cover the hand ring. The hand ring is made of aluminum, so they need a cover to create friction as well as protect the athlete from injury. Adam told us of the many solutions he has tried over the years to solve this problem, as there is not a solution that exists on the market. Currently, they use a bike tire which they have to carefully place and glue around the hand ring. This is a daunting process that takes a very long time. The cover lasts for a few months, and then they need to be replaced. In order to remove the cover, they have to either heat it with a heat gun or put the ring in the oven to be able to get the cover off.
After meeting with Adam and Arielle, we were able to formulate our opportunity statement. We decided our goal was to work with Arielle and the paralympic wheelchair racers to find a better way to cover their hand rings in preparation for a race.
Tire CoverHand ring with tire coverWorn down tire cover
Initially, we hoped to solve the challenge of how to help the racers in bad weather conditions. Going into the Makeathon, most of our ideas included creating a cover for the hand ring. After meeting with a materials science professor and tips we received from Milestone Labs, we begun to consider what material might be able to create the best kind of friction with the glove when wet. We considered a snap cover, zipper, fabric cover and more. We purchased a variety of materials including a bath mat and a yoga mat. During the Makeathon, we quickly realized that our materials were very soft and didn’t withstand even minimal testing with the glove. We looked around the FabLab for scrap materials from other groups. We found some nylon, as well as a dip plastic rubber called Plasti Dip. We created this low fidelity prototype using our materials. Since we only had two hand rings, one covered and one uncovered, we had to create sections for each material.
Makeathon Prototype
After testing each section, we found that our most promising solution was to pursue to Plasti Dip. We discovered that there was a spray version available, which seemed to be a good and easy option. After the Makeathon, we purchased a can of the spray Plasti Dip to create another prototype. We used the spray booth in Art + Design to coat the hand rings and the gloves. The spray was so easy to use. We did the recommended three coats, waiting 30 minutes between each and four hours for it to dry. After it had dried, it had created a nice even coat that was slightly sticky to the touch.
Plasti Dip SprayHand ring in the spray boothDried hand ring
We met with Joey Gibbs from the racing team to test the prototype. Once we arrived at the DRES morning practice, Joey was able to remove one of the hand rings from his chair and attach our prototype to it. The glove we had sprayed was not Joey’s size, so he wants able to test the glove with the ring. However, we did see Jenna, another racer and mentor from our class, and she was able to test the glove for us. After going about 40 feet, the Plasti Dip on the glove started peeling away immediately. We quickly realized this was not a solution.
Worn Plasti Dip gloveJoey testing our prototype
Once Joey was ready to start practicing using our prototype, he quickly realized that the Plasti Dip created the perfect amount of friction between his glove and the ring. It was sticky enough to create a good grip, but not too sticky that it slowed down his stroke. After about five minutes of Joey practicing at a regular speed, we could see that the rubber spray coating was starting to peel away. Even though it was peeling away, it didn’t affect Joey’s speed or efficiency. After about 15 minutes, the rubber on the ring was almost worn away. We noticed that one section of the ring, however, was withstanding Joey’s strokes. Once we took a closer look at the ring, we realized the part that was no peeling was the part that we had coated with Plasti Dip at the Makeathon. This lead us to believe that our potential solution might be stronger if both types of Plasti Dip are used or if more coats are applied. In the end, Joey had found that his overall speed was actually 1 mph faster with our prototype than normal. This was an exciting finding! We think that if the team pursues trying this material in various ways, they might find a solution that is easier and more effective.


You must be logged in to post a comment.